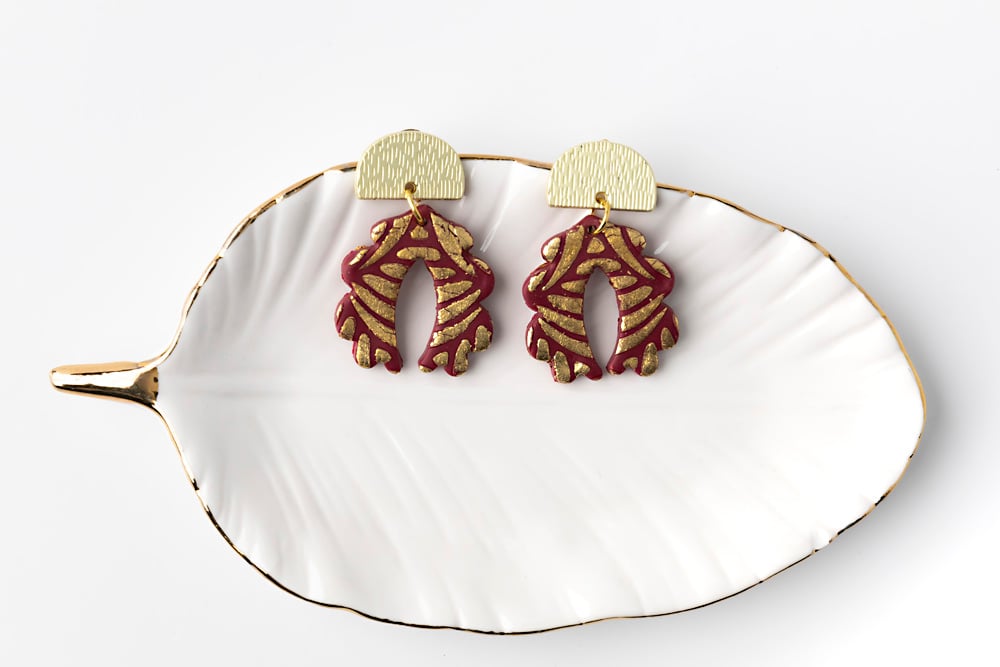
Sculpey Soufflé™ Cabernet and Gold Leaf Stencil Earrings
Sculpey Soufflé™ Cabernet and Gold Leaf Stencil Earrings
Designed by Amy Koranek
Read More
Sculpey Soufflé™ Cabernet teams up with some composite gold-toned metal leaf and a stencil for a clever way to create a patterned earring in a flash! COMPLETION TIME:
60 Minutes to make, bake, and assemble
Read Less
ADDITIONAL SUPPLIES
- Composite gold leaf
- Stencil (mine is from Etsy: search “stencils for polymer clay”)
- Gold arches with built in ear posts and backs (2) (Etsy: search 6 pcs matter gold planted arches)
- Cutters (Etsy: search blair clay cutter earring”)
- 8 mm Gold-tone jump rings (2)
- Flat nose pliers

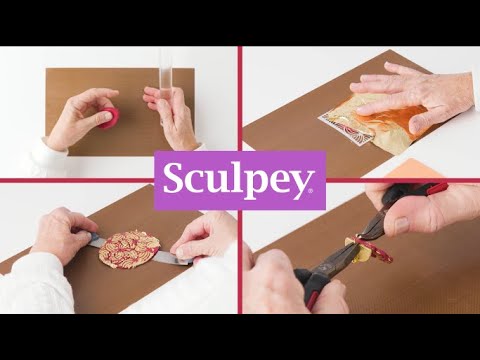
Project Instructions
- Getting Started:
Start with clean hands, unwrap and knead clay until soft and smooth, or condition by running clay though a Pasta Machine. We recommend using a designated machine for clay purposes only. When working with multiple colors, clean hands with soap and water or baby wipes (we have found that baby wipes work best) before switching colors. Shape clay, pressing pieces firmly together. Wash hands after use.
- Baking (also called Curing):
Roll 1/2 bar of Cabernet to a sheet 1/8” thick.
Place the stencil on top of the sheet and roll over it with the Acrylic Clay Roller until the stencil is slightly seated in the surface of the clay. The clay should be at least level with the stencil if not slightly raised in the openings.
Place the stencil on top of the sheet and roll over it with the Acrylic Clay Roller until the stencil is slightly seated in the surface of the clay. The clay should be at least level with the stencil if not slightly raised in the openings.

Carefully lay a sheet of composite gold leaf on top of the stencil.
Smooth the gold leaf down so it is clinging to the clay.
Smooth the gold leaf down so it is clinging to the clay.

Burnish the gold leaf and the stencil using your fingertip in circles. Using heavy pressure, you should be able to flake the gold leaf off where it is contacting the plastic stencil. The gold leaf should remain on the surface of the clay because the clay is slightly sticky.

Once you can see that the gold leaf is only on the clay, carefully peel the stencil back.

The image from the stencil is now transferred to the clay surface.= using the gold leaf material.

Determine where on the sheet you can cut out two of the cutter shapes that will give you a match set if desired.

Cut two of the shapes and set the scrap aside.

Lay out the clay pieces with the findings to determine where to poke holes for assembly.
Poke holes using the Blunt Point Tool.
Bake the clay pieces following the baking instructions for Sculpey Soufflé™.
Allow the pieces to cool completely before handling.
Poke holes using the Blunt Point Tool.
Bake the clay pieces following the baking instructions for Sculpey Soufflé™.
Allow the pieces to cool completely before handling.

Use flat nose pliers to connect the clay pieces to the metal findings with jump rings.

These metal findings have built in posts so no gluing is necessary.

- Choosing a selection results in a full page refresh.
- Opens in a new window.