

Sculpey Premo™ Stacked Heishi Bead Bracelet Set
Sculpey Premo™ Stacked Heishi Bead Bracelet Set
Designed by syndee holt
Read More
Sculpey Premo™ Butter Yellow is the star of this cool little set of heishi style bracelets! Once you start making heishi, you just might not want to quit – and with all the gorgeous colors in the Sculpey line – why would you?
Read Less
ADDITIONAL SUPPLIES
- Size 0 double ended knitting needles (they are actually 2 mm if you have another source) (at least 5)
- .8 mm clear beading elastic for stringing
- Antique gold beads – I like the texture that these have as well
- Small bowls or old egg crate to store the heishi
- Pair of jewelry pliers that are flat on the inside – not needle nose rounds
Project Instructions
- Getting Started:
Start with clean hands, unwrap and knead clay until soft and smooth, or condition by running clay though a Pasta Machine. We recommend using a designated machine for clay purposes only. When working with multiple colors, clean hands with soap and water or baby wipes (we have found that baby wipes work best) before switching colors. Shape clay, pressing pieces firmly together. Wash hands after use.
- Baking:
Roll a small ball of the conditioned Butter Yellow that is about 3/4 of an inch (19 mm) in diameter. Thread it onto one of the doubled ended knitting needles. Place it on your work surface

Begin rolling the clay back and forth to spread it along the needle. I use both hands as soon as I can and gently pull my hands apart as I roll to help lengthen the clay along the needle. I like to roll them out to about 5/16 inch (8 mm).

Trim the ends by pressing the clay blade into the clay and rolling the needle away from you. Save those scraps you see at the top of my screen for later in the project!

Repeat with the other two colors. Note that I’ve made 2 needles of the Butter Yellow.

Remember those scraps I said to save above? Roll a few into a small ball around the same size as the plain colors. Thread it on a skewer

Roll this clay out as before. It isn’t too exciting is it?

The party begins when you grasp each end and twist in opposite directions to twist stripes into the clay! Make one skewer like this. (Obviously, I can’t make just one! I’ve still got scraps left!)

Bake the skewers according to the directions in Step 1 above. When the clay has baked and cooled to the touch, grasp the middle of one of the clay tubes and grasp the end of the skewer with your pliers. Twist the clay and the skewer in opposite directions until you feel the clay pop and release from the skewer. Then you can just slide the tube off the skewer.

Now just start slicing! The slices do NOT have to be the same thickness nor do they have to be even thickness in the slice. In fact, it adds more interest to the design.
NOTE: I have found that if I keep my tubes to be cut on top of my oven while I baking that the warm clay cuts even easier!
NOTE: I have found that if I keep my tubes to be cut on top of my oven while I baking that the warm clay cuts even easier!

I like to put my heishi pieces into small bowls for the assembly process. Then I put the remainder of the heishi into a recycled egg carton where I store them by color. I also keep the needles and any uncut clay tubes in there as well!
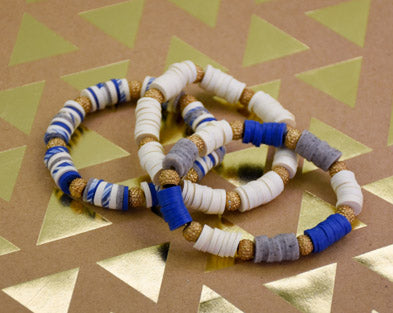
I started with the all-Butter Yellow bracelet, just threading just short of an inch of heishi before placing a gold bead onto the elastic. I know that my wrist is a little over 7 inches, so I figured 1 inch (with the gold bead) would be about right. It is far more random than using regular beads because the heishi are random widths.
I started with the all-Butter Yellow bracelet, just threading just short of an inch of heishi before placing a gold bead onto the elastic. I know that my wrist is a little over 7 inches, so I figured 1 inch (with the gold bead) would be about right. It is far more random than using regular beads because the heishi are random widths.

When I am pretty sure of the fit, I tie a double knot in the elastic, taking care to NOT stretch the elastic in the beads. Then I clip the elastic to the length of the heishi.

I added the Ultramarine and Gray Granite heishi in color blocks with the Butter Yellow and the gold beads for the second bracelet. For the final bracelet, I used all 3 colors randomly with the twisted color heishi.
