
Sculpey Premo™ Lace Earrings
Sculpey Premo™ Lace Earrings
Designed by Precious Nunez
Read More
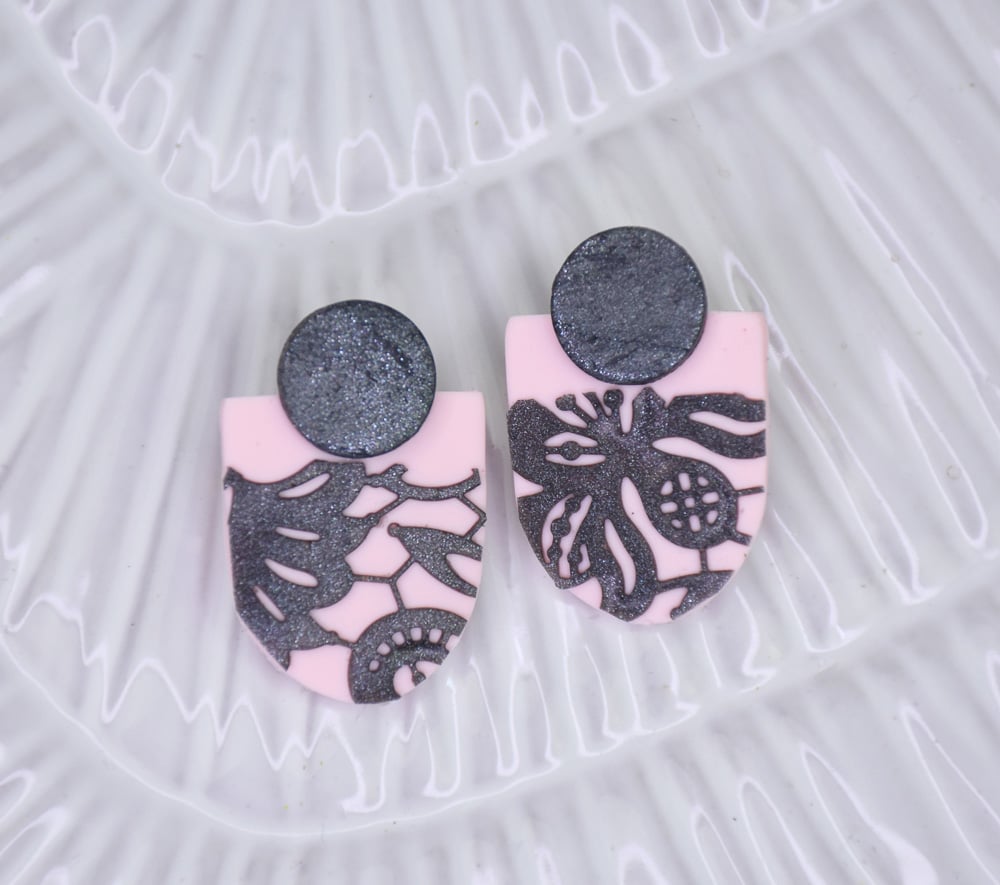
Make these super cute and simple lace earrings using Sculpey’s new Premo™ Light Pink, Liquid Sculpey Charcoal Metallic and Graphite Pearl. This set makes a cute yet elegant piece to your outfit or a great gift for a friend!
TIME TO COMPLETE: 30 minutes to make/30 minutes to bake
Read Less
ADDITIONAL SUPPLIES
- Scissors
- Super glue
- X-Acto knife
- 2 Gold-tone jump rings
- Needle nose pliers
- 1 small circle cutter
- 1 small arched cutter
- 2 Gold-tone earrings posts and backings
Project Instructions
- Getting Started with Sculpey Premo™ :
Start with clean hands, unwrap and knead clay until soft and smooth, or condition by running clay though a Pasta Machine. We recommend using a designated machine for clay purposes only. When working with multiple colors, clean hands with soap and water or baby wipes (we have found that baby wipes work best) before switching colors. Shape clay, pressing pieces firmly together. Wash hands after use.
- Baking (also called Curing):
- Getting Started with Liquid Sculpey®:
-
Baking:
- -It is important to use oven thermometer when you bake the liquids so that you can ensure your oven is at the correct temperature.
- -Do not microwave the liquids. They must be baked in a Preheated oven at 275 ºF (130 ºC) for liquid colors and 300 ºF (149 ºC) for Clear – Do not exceed baking temperatures.
- -If your piece is less than 1/4” bake for 15 minutes. For thicker pieces that are 1/4” or above bake for 30 minutes.
- -If your liquid project has become yellowed or discolored in the oven, when you remake it, tent it by placing either – folding an index card in half and placing your project under it by using aluminum foil over your project.
Here’s a tip for baking perfectly in silicone molds. Dampen a dish towel with water and wring out as much of the water as you can. Fold the damp towel so that the molds can sit level on top of it. The damp towel will slow down the curing process so that the LS will cure evenly throughout and avoid warping.
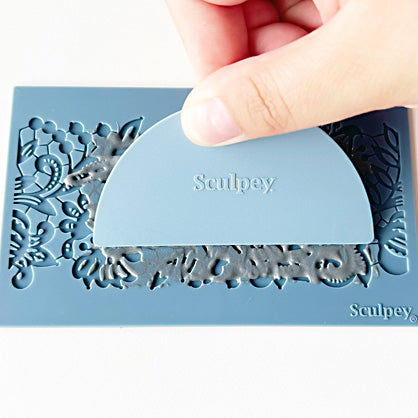
Squeeze Liquid Sculpey Charcoal Metallic on the lace mold from left to right to cover the mold leaving space in between to spread the liquid Sculpey evenly through the crevices with the supplied spreader tool.
Bake according to Step 1.

Gently peel the lace away from the mold once the liquid Sculpey has been cooled.

Roll out a large ball of pink clay and run through the conditioning machine on #2 setting. Make sure the clay slab is wide/long enough for the clay cutters to fit.

Take your arched cutter and cut two pieces for the main base of the earrings.

Place your arched cutter over the lace to map out where you need to cut the excess. Cut excess lace, do this twice for both earrings.

Place the mold halfway onto each earring base, flip it over and trim excess lace once again but with scissors to get a clean cut. Press the lace into the clay lightly

Cut out two small circles with your cutter on the Graphite pearl clay. Add them to the earring base where they are halfway off the base, leaving room to add the earring posts later.

Bake according to Step 1 above.

Once the pieces are cooled, super glue the earring posts to the back of the graphite pearl pieces. Glaze if desired. Here is a looked at the completed earrings.
