Sculpey III® Whimsical Santa Figurines
Sculpey III® Whimsical Santa Figurines
Designed by Maria Saracino
Read More
Read Less
Always wanted to try your hand at sculpting? This is the project for you!
ADDITIONAL SUPPLIES
- Black beads 12mm
- 1/4” dowel cut into 4” lengths
- Red Craft Paint (shown in tutorial - Americana Alizarin Crimson)
- Triple Thick Brilliant Gloss
- Paint brush
- Exacto Knife
- Sculpting Tool
- Gorilla Super Glue
- Aluminum Foil
- Powdered Blush Make-up
- Soft make-up brush
- Ruler
- Optional (roll stamper with holly pattern)
- Optional – glitter, snow, embellishments

Project Instructions
- Getting Started:
Start with clean hands, unwrap and knead clay until soft and smooth, or condition by running clay though a Pasta Machine. We recommend using a designated machine for clay purposes only. When working with multiple colors, clean hands with soap and water or baby wipes (we have found that baby wipes work best) before switching colors. Shape clay, pressing pieces firmly together. Wash hands after use.
- Baking:
Prep the Legs:
Paint the wooden dowels with two coats of your red craft paint. Set aside and allow to dry completely.
Paint the wooden dowels with two coats of your red craft paint. Set aside and allow to dry completely.

Prep the Armature:
Tear off approximately 2 feet of aluminum foil and loosely scrunch into a ball. Gently roll the ball of loosely scrunch foil on your work surface, slowly start creating a cone shape. (Don’t try getting there all at once – work on it slowly to get a more symmetrical shape.)
Tear off approximately 2 feet of aluminum foil and loosely scrunch into a ball. Gently roll the ball of loosely scrunch foil on your work surface, slowly start creating a cone shape. (Don’t try getting there all at once – work on it slowly to get a more symmetrical shape.)

Tear off another foot of aluminum foil and wrap around your cone to add a little more height or to widen the base. The base of your cone should be approximately 2” in diameter and flat so your cone sits firmly on a flat surface. The height of your cone should be approximately 5-6” and should taper to a point. You can bend and curl the point as you like.

Creating the Boots:
NOTE: One package of Sculpey III Suede Brown will make two pair of boots. A good reason to make two of these little characters.Condition half the package of Suede Brown and roll out to about 1/4 inch thickness. Cut out the sole pattern, on the right, and place on your clay. Using your exacto knife cut around the sole pattern and remove the excess clay. Remove the paper pattern.
NOTE: One package of Sculpey III Suede Brown will make two pair of boots. A good reason to make two of these little characters.Condition half the package of Suede Brown and roll out to about 1/4 inch thickness. Cut out the sole pattern, on the right, and place on your clay. Using your exacto knife cut around the sole pattern and remove the excess clay. Remove the paper pattern.


Re-condition the brown suede clay that you removed from around the sole pattern. Roll the brown suede clay into a cylinder, approximately 2 1/2” long. Cut approximately 1/4” off each end and reserve these ends for use on the next page of instructions.Your cylinder is nowapproximately 2” long. Cut the cylinder in half so that you have two 1” cylinders.

Using the little ¼” ends that you cut off the cylinder on the previous page, place them on top of the sole touching the cylinder. This will become the instep of the foot. Gently blend the instep into the sole and into the ankle of the boot. To blend all the seams all around the boot without flattening or distorting the shape use a gentle petting motion.


Shape the toe of your boot into a point. Don’t thin out the clay, keep it compact. Gently push up the arch of the foot and define the arch and inner foot so that it is clear thatyou have a left and right foot.

Insert your dry painted dowel into the top of the boot. It might help to start the opening with the end of your paint brush or the tip of your pencil. Insert the dowel and push down all the way into the ankle of the boot. If your dowel pokes through the bottom pull it up and patch the hole at the bottom on the sole. Define and shape your boot a little more to add some character.

It’s the little things that make a difference and get all the “oohs and aahs” from your audience. Use your own imagination to detail the boots in your own unique way, but here are a few ideas: Bunions are not cute on our own feet, but there is something charming about a little bunion on a Santa or Elf. Add a few score lines around the ankles to make the boots look a little slouched and weathered. Add a bell or two – just make sure they are pushed into the clay so that they lock in. But don’t worry, if they pop out after you’ve baked the feet, all you will need to do is add a drop of Super Glue to secure them.

Cut the layer of beige Super Sculpey clay in half. Condition one half section by rolling, squeezing and warming the clay in your hands. Avoid stretching and folding it over onto itself – this introduces air bubbles and may cause blistering on your sculpture when you baked it. If you have a pasta machine, run your clay through the pasta machine on the widest setting. If you don’t have a pasta machine, use a rolling pin to thin out and create a skin layer of polymer similar in thickness to a pie shell.

Using your exacto knife, cut your clay into three long strips. Don’t worry about measuring - just eyeball it and cut into three strips. Using one strip at a time, start at the bottom of your cone, and spiral the clay around the cone. Try not to overlap the clay, but rather meet the edges. Continue until the whole cone is covered. Use whatever clay is left over to seal the bottom of your cone. Don’t worry if little bits and pieces of foil are showing through, we’ll take care of that in the next step.

Blend . . . Pet . . . Blend . . . Repeat...Seal up all the seams and cover all the foil by gently blending the clay. I like to use a soft petting motion to blend the seams, letting the heat from my fingers and the repetitive petting motion smooth away any seams. You can also roll the cones between your palms to smooth out any lumps and bumps. Reshape the point of your cone.

Condition the other half layer of Super Sculpey clay by rolling, squeezing and warming the clay in your hands. Roll the clay into a cylinder approximately 4” long. Cut this cylinder into 3 sections. Don’t worry about be exact, just create 3 approximately equal sections. Roll one of these sections into a smooth ball. This will be the beginning of the face!

Creating the Face:
Pancake this ball of clay into an oval mound approximately 1” wide x 1 ½” long. Position this oval mound in the middle of your cone. Gently curve the clay mound around the sides. Don’t worry about blending, but make sure the clay mound is making good contact with the clay on the cone.
Pancake this ball of clay into an oval mound approximately 1” wide x 1 ½” long. Position this oval mound in the middle of your cone. Gently curve the clay mound around the sides. Don’t worry about blending, but make sure the clay mound is making good contact with the clay on the cone.

Using your sculpting tool, lightly score the center of the mound of clay of the face, with both a horizontal and vertical line.

Position your black beads on the horizontal line approximately one bead apart. Push the beads into the clay so that half the bead is buried in the clay mound.

Using one of the sections left from Step 14, create little balls the approximate size shown in the template above. As indicated, each ball represents a part of the face.

The Nose:
Use the ball of clay marked for the nose. Roll it into a smooth ball, then gently elongate one end to form a tear drop approximately 1” long.
Use the ball of clay marked for the nose. Roll it into a smooth ball, then gently elongate one end to form a tear drop approximately 1” long.

Position the nose on the center vertical line. The pointy top of the tear drop should line up slightly above the top of the eyes.

Using your sculpting tool, gently blend the seams on the side of the nose – under the nose and the tip of the tear drop into the forehead. Keep the bridge of the nose tight so it doesn’t encroach into the eyes.

Detailing the Nose:
Use your sculpting tool to cut into the area where the nostrils should be. Cut in and spread outward slightly. Repeat for the other nostril. Shape and flare the nostrils. Shape the nose by slightly defining the ball of the nose. The nose looks big right now because he doesn’t have cheeks yet. Once the cheeks are added his face will be more proportioned.
Use your sculpting tool to cut into the area where the nostrils should be. Cut in and spread outward slightly. Repeat for the other nostril. Shape and flare the nostrils. Shape the nose by slightly defining the ball of the nose. The nose looks big right now because he doesn’t have cheeks yet. Once the cheeks are added his face will be more proportioned.


The Cheeks:
Use the ball of clay marked for the cheeks. Roll it into a smooth ball then cut it in half. Position each half of the cut ball on either side of the nose. Each half should touch the side of the nose and cover the lower edge of the eyes. This will give you character a smiling eye look.
Use the ball of clay marked for the cheeks. Roll it into a smooth ball then cut it in half. Position each half of the cut ball on either side of the nose. Each half should touch the side of the nose and cover the lower edge of the eyes. This will give you character a smiling eye look.

Blend the sides of the cheeks outwards and blend the inner part of the cheeks gently into the side of the nose. Do your best not to disturb or distort the nose when you do this.


The Eyelids:
Roll the ball of clay marked for the eyelids and mouth. Roll into a long thin rope approximately 3” long. The ends of the rope should have a soft point on the ends. Position the pointed end on the inside of the eye where the tear duct should be and curve the eyelid over the bead. Cut away the excess clay at the outer corner of the eye. Repeat for the other eye using the other end of the rope with the pointed end. Gently pat down the eyelids so that the clay of the eyelids makes good contact with the clay underneath. Put aside any left over clay.
Roll the ball of clay marked for the eyelids and mouth. Roll into a long thin rope approximately 3” long. The ends of the rope should have a soft point on the ends. Position the pointed end on the inside of the eye where the tear duct should be and curve the eyelid over the bead. Cut away the excess clay at the outer corner of the eye. Repeat for the other eye using the other end of the rope with the pointed end. Gently pat down the eyelids so that the clay of the eyelids makes good contact with the clay underneath. Put aside any left over clay.


Creating the mouth:
Roll the leftover clay from the eyes into a ball and pancake slightly. Position this pancaked piece of clay in the area of the mouth, touching the base of the nose. Apply a little pressure to make sure it makes good contact with the clay beneath.
Roll the leftover clay from the eyes into a ball and pancake slightly. Position this pancaked piece of clay in the area of the mouth, touching the base of the nose. Apply a little pressure to make sure it makes good contact with the clay beneath.

Using your sculpting tool, create the opening to the mouth by inserting the tool and slightly applying pressure down towards the chin. This will give him the look of saying “Ho, ho, ho”. You can add a few little details like smile lines at the corners of his eyes, but keep it simple


The Beard:
Open your package of Super Sculpey III White. Divide the block of clay into quarters and condition each section individually. Using one section at a time, roll out into strands of clay 12-14” long. Lay down the first section of the beard, starting at the hairline along the side burn area of the face on one side. Flow the strand around the cone. Keep adding strands of clay following a flowy pattern. The strands should be set close together but not overlapping. It’s okay if there are little openings here and there, they will disappear once you add texture and detailing to the beard. Continue until the full beard is done all the way around. You should be able to do this with 3/4 of the block of white clay.
Open your package of Super Sculpey III White. Divide the block of clay into quarters and condition each section individually. Using one section at a time, roll out into strands of clay 12-14” long. Lay down the first section of the beard, starting at the hairline along the side burn area of the face on one side. Flow the strand around the cone. Keep adding strands of clay following a flowy pattern. The strands should be set close together but not overlapping. It’s okay if there are little openings here and there, they will disappear once you add texture and detailing to the beard. Continue until the full beard is done all the way around. You should be able to do this with 3/4 of the block of white clay.


You have ¼ of the block of white clay left. Roll it out into a long cylinder 12” long. Cut a 3” section. Point the ends and fold in half. This is the moustache. Position the moustache under the nose making sure there is good contact with the clay underneath. Wrap the pointed ends up along the sideburn area towards the hairline. Roll another small ball, the size of a pea and then shape it into a teardrop. Position the teardrop under the lip, pointy side down, to create the little goatee and finish the beard.


Roll another small pea of white clay and position over the eyes to create eyebrows. Roll one more small pea of white clay and create a few strands of hair above the eyebrows. Use your tool to score and create some texture in the beard. These lines and ridges will catch light giving your sculpture dimension. Don’t forget to add a little details to the eyebrows and hair too.


Add a little blush powder to the cheeks and nose to give your Santa a jolly cold nipped look. Be very careful when you apply the make-up so you don’t dirty the white clay. Add a little inside his mouth as well. A little goes a long way. Keep the color to the apples of his cheeks, the tip of his nose and inside his mouth.

Trimming the Hat:
Using whatever white clay you have left over, roll into a cylinder and then roll out into a rectangle approximately 4” long. You can leave it plain, or you can imprint a Christmas design onto it with a roll stamper or any other stamp or pattern you want. In the photo above I used a holly and berry pattern. Wrap this rectangle around Santa’s head. Position above his eyes, covering the edge of his hair and beard. Join the seams at the back of the head and blend together.
Using whatever white clay you have left over, roll into a cylinder and then roll out into a rectangle approximately 4” long. You can leave it plain, or you can imprint a Christmas design onto it with a roll stamper or any other stamp or pattern you want. In the photo above I used a holly and berry pattern. Wrap this rectangle around Santa’s head. Position above his eyes, covering the edge of his hair and beard. Join the seams at the back of the head and blend together.


Add the Legs:
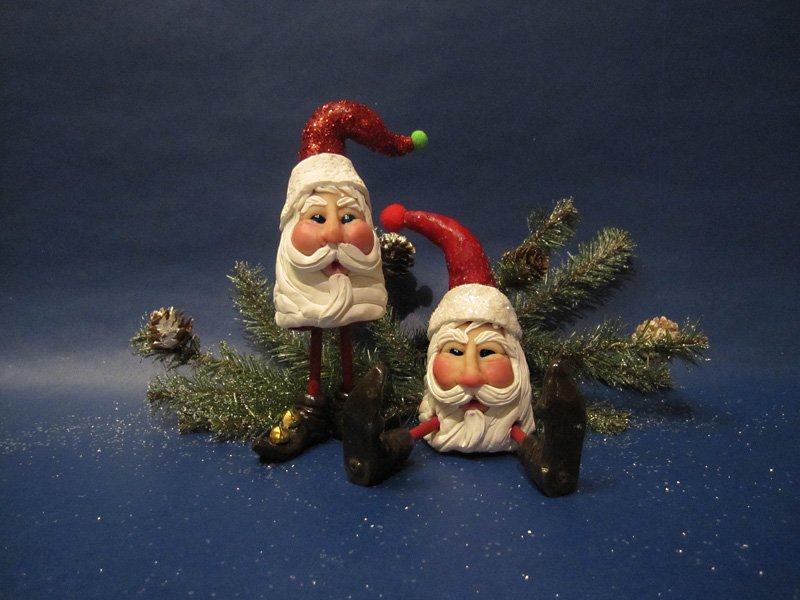
Carefully poke holes in the body where you would like the legs to be attached. I’ve shown you both a sitting Santa and a standing Santa in these images. Insert the legs to make sure the figure stands or sits correctly. Remove the legs and put the legs and body on a cookie sheet. Preheat your oven to 270º and bake your sculpture for 20minutes. Remove from oven and allow to cool for another 15-20minutes.
Carefully poke holes in the body where you would like the legs to be attached. I’ve shown you both a sitting Santa and a standing Santa in these images. Insert the legs to make sure the figure stands or sits correctly. Remove the legs and put the legs and body on a cookie sheet. Preheat your oven to 270º and bake your sculpture for 20minutes. Remove from oven and allow to cool for another 15-20minutes.


Paint Santa’s Hat in the same red paint you used for the legs. Also paint the bottom of your sculpture. You will need at least two coats of paint to create depth and richness in the color. Allow to dry completely.

Add a few drops of Gorilla Super Glue to the leg openings on Santa’s body. Insert the wooden legs. Place your sculpture in position and allow to dry. Super Glue takes less than a minute to set. IMPORTANT TIP: Super Glue is a fast setting glue. If you get some on your fingers, resist the temptation to wipe it away. Your fingers will stick together and you risk losing a few layers of skin. Instead, open and splay your fingers apart immediately. You’ll just get a little crusty patch on your fingers that will be easy to loosen and remove after you soak your hands in soapy water.

The Finishing Details:
•Add a little Triple Thick Brilliant Gloss to the eye beads to make them glass-like glossy.•Add a little Triple Thick Brilliant Gloss for a patent leather look to the boots.•Do you like glitter? Add a little white glitter to the trim of his hat or opt for red glitter to the hat.•Add a little pompom to the tip of the hat.•Make your little character unique and a reflection of you.
•Add a little Triple Thick Brilliant Gloss to the eye beads to make them glass-like glossy.•Add a little Triple Thick Brilliant Gloss for a patent leather look to the boots.•Do you like glitter? Add a little white glitter to the trim of his hat or opt for red glitter to the hat.•Add a little pompom to the tip of the hat.•Make your little character unique and a reflection of you.


