
Sculpey III® Mini Succulent Pinch Pots
Sculpey III® Mini Succulent Pinch Pots
Designed by Cindi McGee
Read More
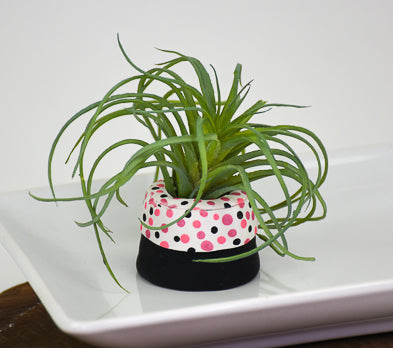
Create a charming little pinch pot for your favorite small succulent or air plant in an afternoon. Or make several to create a collection! You can change the color scheme to fit your décor.
Time to create this project: 45 minutes
Baking time: 30 Minutes
Read Less
Baking time: 30 Minutes
ADDITIONAL SUPPLIES
Create a charming little pinch pot for your favorite small succulent or air plant in an afternoon. Or make several to create a collection! You can change the color scheme to fit your décor.Time to create this project: 45 minutes
Baking time: 30 Minutes
Project Instructions
- Getting Started:
Start with clean hands, unwrap and knead clay until soft and smooth, or condition by running clay though a Pasta Machine. We recommend using a designated machine for clay purposes only. When working with multiple colors, clean hands with soap and water or baby wipes (we have found that baby wipes work best) before switching colors. Shape clay, pressing pieces firmly together. Wash hands after use.
- Baking:
Use clay tool to cut approximately 1/4 oz. of Black from the block. Set aside for later use.
Roll the Black clay into a ball and press it against the work mat. Use your hands to form the ball so the base is larger than the top.
Roll the Black clay into a ball and press it against the work mat. Use your hands to form the ball so the base is larger than the top.

Press into the center of the top to make an indentation.
Use your thumb and first finger to pinch the clay and create the sides of the pot. When finished, turn upside and press against the work mat to flatten top edge.
Use your thumb and first finger to pinch the clay and create the sides of the pot. When finished, turn upside and press against the work mat to flatten top edge.

Roll approximately 1/2 oz. of White clay to create a long, thin sheet. Be sure your sheet is long enough to create a strip that will go around the top edge of your pot. Set aside for a moment.

Use your hands to roll a small amount of Princess Pearl into a strand of clay about 1/8” diameter. Use the clay tool to cut small sections of the strand, then use your fingers to roll the pieces into small balls of clay.

Place the balls of Princess Pearl clay onto the White sheet, then use the side of the clay tool to press them flat into the clay sheet.

Use your hands to roll a small amount of Dusty Rose clay into a strand of clay about 1/8” diameter. Use the clay tool to cut small sections of the strand, then use your fingers to roll the pieces into small balls of clay.

Place the balls of Dusty Rose clay onto the White sheet, scattered around the Princess Pearl balls, then use the side of the clay tool to press them flat into the clay sheet.

Repeat the steps with Black clay. I made the Black clay balls a little smaller than the two shades of pink.

Use the clay roller to roll over the dotted sheet and further press the dots into the White base.
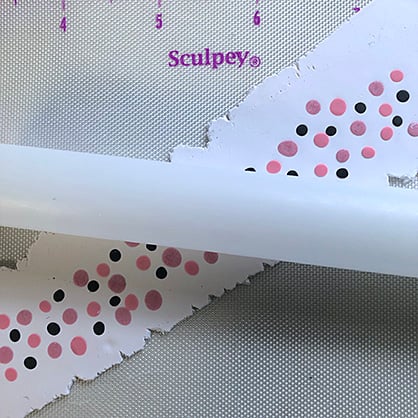
Use the clay tool to cut a strip of the dotted sheet about 3/4” wide and long enough to wrap around the top edge of the pot.

Carefully wrap the strip around the top edge of the pot. Use the tool to trim away any excess and smooth edge where the ends meet with your fingers

Cut a thin strip the width of the top edge of the pot. Place it onto the top edge of the pot and trim as needed. Use the flat side of the tool and your fingers to gently smooth the edge where the thin strip meets the wider strip. Bake according to instructions.

Here is a look at my finished pot.

- Choosing a selection results in a full page refresh.
- Opens in a new window.