

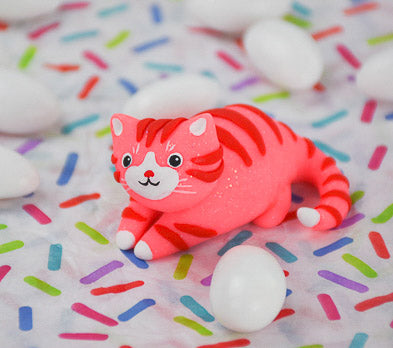
Sculpey III® Kawaii Cat Figurine
Sculpey III® Kawaii Cat Figurine
Designed by Phoebe Doehring
Read More
Read Less
Sculpey III® teams up with Liquid Sculpey® Oven-Bake Clay Adhesive to help you create this Kawaii (cute) little cat figurine in a snap! We've created a Pink Glitter Kawaii cat, but you can make yours any color you wish!
ADDITIONAL SUPPLIES
- Acrylic Paints: White, Black, Red
- Paintbrush
- Clay dedicated knife
Project Instructions
- Getting Started:
Start with clean hands, unwrap and knead clay until soft and smooth, or condition by running clay though a Pasta Machine. We recommend using a designated machine for clay purposes only. When working with multiple colors, clean hands with soap and water or baby wipes (we have found that baby wipes work best) before switching colors. Shape clay, pressing pieces firmly together. Wash hands after use.
- Baking:
Roll a 1” sized ball of Pink Glitter clay for the cat’s head. Roll a 1.5” sized ball of Pink Glitter for the cat’s body. Roll two 1/4” sized balls of Pink Glitter for the cat’s hind feet.
Shape the ball of the head into a more oblong oval shape. Shape two pointed ears on the cat’s head with your fingertips. Use the end of your paintbrush to make indents in the center of each ear.
Shape the larger ball of Pink Glitter into an oval. Use your fingers and pull and shape a long rounded tail. Shape two front legs as well extending out as if your cat was lying down with his legs outstretched in front of him.

Use a bit of Liquid Sculpey® Oven-Bake Clay Adhesive and attach the head to the body just over the back of the front legs. Tilt the head slightly for a bit of whimsey. Attach the two hind feet on either side of the body in the back.

Roll a very thin, long snake of Red Hot Red clay. You are going to be cutting pieces off this snake to make the stripes on the kitty cat.
You will want to roll and point the ends of all the little pieces you cut off.
Cut the following off the long snake: Three 1/2” pieces for the stripes on the top of the head. Four 1/2” pieces for the stripes on either side of the head. Two 1/4” pieces for the stripes on the front legs. Four 1” pieces for the stripes along the back. Lastly, five little 1/4” pieces for the stripes along the tail.
Press the stripes on the listed areas of the cat. Flatten them as much as you can with your fingertips.

Bake in the oven at 275 degrees for 25 minutes. Allow to cool.
Paint a White face on your kitty cat with the White acrylic paint. Paint the ends of the cat’s paws and the tip of his tail White as well. Paint two White circle for the eyes. Allow paint to dry.
Paint a little Red nose in the center of his face.
Paint two Black pupil on top of the White circle eyes. Paint a little Black mouth.
Last of all paint some thin White whiskers and eyebrows. Allow to dry.

- Choosing a selection results in a full page refresh.
- Opens in a new window.