
Sculpey III® Jeweled Barrettes
Sculpey III® Jeweled Barrettes
Designed by Amy Koranek
Read More
Spend a fun and colorful afternoon creating these wonderful Sculpey III® faux-jewel barrettes and bobby pins. Invite your girl friends over and have a Create Party!!
COMPLETION TIME:
60 Minutes to make, bake, and assemble - extra drying time required for glue
Read Less
ADDITIONAL SUPPLIES
- 2” Barrette finding
- 3” Barrette finding
- Bobby Pins
- Silicone glue
Project Instructions
- Getting Started:
Start with clean hands, unwrap and knead clay until soft and smooth, or condition by running clay though a Pasta Machine. We recommend using a designated machine for clay purposes only. When working with multiple colors, clean hands with soap and water or baby wipes (we have found that baby wipes work best) before switching colors. Shape clay, pressing pieces firmly together. Wash hands after use.
- Baking (also called Curing):
Using the Acrylic Clay Roller, roll each Berry, Spring Green, and Peach into 1/4” thick sheets.
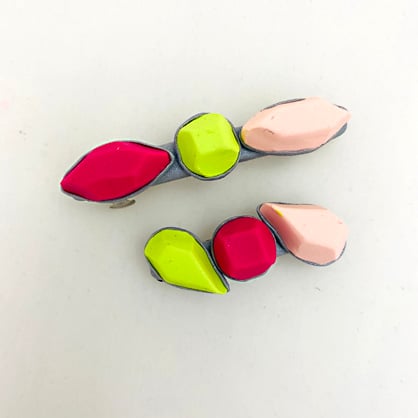
Use the geometric cutters to cut out jewel shapes. I have cut one each from each color of the marquis, teardrop, and circle shapes.
Use the geometric cutters to cut out jewel shapes. I have cut one each from each color of the marquis, teardrop, and circle shapes.

Roll the Silver to a 1/16” thin sheet. Cut out the same number of shapes from the Silver as you did from the colors in Step 2.

Holding the Clay Blade at an angle to the side of each “stone”, angle cut from the top surface to the base of each side creating a “faceted” stone look. Here is how the circle pieces turned out cutting four facets into each one. Each piece is still circular at the base but is now flat and squared on the top.

Do the same with the marquis shapes. Hold the blade at an angle so that you remove more clay from the top surface than you do at the bottom.

Repeat for the teardrop shapes. Hold the blade at an angle so that you remove more clay from the top surface than you do at the bottom.

Mount each jewel shape to a matching Silver base using fingertip pressure to hold them together.

Make small ropes of Silver and mount them to the top flat surface of each barrette finding. Make sure the Silver clay follows the curve of the barrette finding, if the finding is curved.

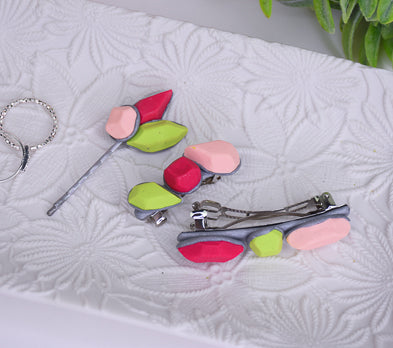
Arrange the jewel shapes as shown to the tops of the barrettes. Bake the barrettes following the baking instructions for Sculpey III®. Allow to cool completely. You may pop the clay off of the barrette finding and glue it on permanently with silicone glue after it is completely cool.
If you want to make Bobby pins, push the head of the pin into the bottom end of a marquis shaped stone.

Arrange more jewels around the base of the marquis shape and make sure they stick to each other using fingertip pressure.
Bake the Bobby pin following the baking instructions for Sculpey III®. Allow to cool completely before handling.
Bake the Bobby pin following the baking instructions for Sculpey III®. Allow to cool completely before handling.
