

Sculpey III® Butterfly Mobile
Sculpey III® Butterfly Mobile
Designed by Amy Koranek
Read More
In this tutorial I will describe how to make a hanging ring from Sculpey Premo™ Gold and Sculpey® Ultralight. If you have a metal ring between 4”-5” in diameter, you may use that instead. COMPLETION TIME:
2 Hours to make, bake and assemble
Read Less
ADDITIONAL SUPPLIES
- 4.25” Circle cookie cutter
- 5.25” Circle cookie cutter
- Butterfly shaped cutters
- 3” x 5” index cards (4)
- Clear nylon filament like fishing line
- Coordinating ribbon
- Scissors
- Ruler

Project Instructions
- Getting Started:
Start with clean hands, unwrap and knead clay until soft and smooth, or condition by running clay though a Pasta Machine. We recommend using a designated machine for clay purposes only. When working with multiple colors, clean hands with soap and water or baby wipes (we have found that baby wipes work best) before switching colors. Shape clay, pressing pieces firmly together. Wash hands after use.
- Baking (also called Curing):
Here are the instructions if you want to create your own hanging ring for the mobile.
Make a one-ounce ball of Sculpey® Ultralight (UL).
Otherwise, you can use a large metal or wooden ring and skip to Step 14.
Make a one-ounce ball of Sculpey® Ultralight (UL).
Otherwise, you can use a large metal or wooden ring and skip to Step 14.

Use the Acrylic Clay Roller to make a thin sheet of Premo™ Gold large enough to cover the UL ball.

Make sure the ball is completely covered and roll it in your palms to smooth it.

We are going to make the ring from this ball instead of a rope because the ring will be stronger if it does not have a seam.
Use the 12 mm Ball Tool to push a hole into the center of the ball.
Use the 12 mm Ball Tool to push a hole into the center of the ball.

Flip the ball over and push the 12 mm Ball Tool forcing the hole all the way through like a donut. The excess Gold clay should go into the center covering up the White clay inside.

Gently begin stretching the center hole.

Keep stretching the center hole.

When you can place a 4.25” circle cutter into the center, you have stretched enough.

Surround the Gold circle with the 5.25” circle cutter.

Place your hand on top of the smaller circle cutter, and carefully circulate the smaller cutter, pushing the clay ring up to the inner edge of the larger ring stretching the clay ring from the size of the smaller cutter to the size of the larger cutter.

Keep circulating the inner cutter until the Gold ring is the size of the outer cutter. Some of the White clay is coming through because the Gold clay is so thin. However, the White is only showing on this top side and not on the bottom- when I construct the mobile, I will make sure the solid Gold side is downward.

Use the sides of the smaller cutter to push the inner ring of the clay to flatten it. Bake the clay ring following the baking instructions for Sculpey Premo™. Allow to cool completely before handling.

While the Gold ring bakes, you can work on the butterflies.
Sheet 1/2 bar Berry Sculpey III® to a 1/8” sheet using the Acrylic Clay Roller.
Cut out as many butterfly shapes as possible.
Poke a small hole in each one using the Needle Tool. This hole only needs to be large enough to accommodate the fishing line.
Remove the scrap clay from the butterflies, sheet it again, and cut more butterflies from the scraps.
Repeat this process with 1/4 bar each of White, Ballerina, Princess Pearl, and Candy Pink.

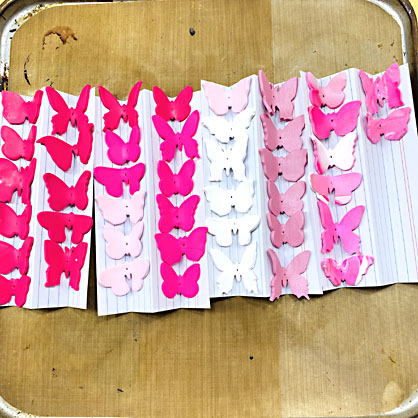
Accordion fold index cards as shown. These will be used to support the butterflies during curing.

Lay the butterflies on the index card baking tray so that the wings are supported as shown.

Combine all the scraps of clay together remaining from Step 14.

Marble the colors randomly.

Sheet the marbled clay. Cut out as many butterflies as possible from the marbled clays too.
Poke a hole in each butterfly for stringing.
Arrange all the butterflies on index cards. I made 43 butterflies as shown.
Poke a hole in each butterfly for stringing.
Arrange all the butterflies on index cards. I made 43 butterflies as shown.
Bake the butterflies as directed in step 1 above. Allow the butterflies to cool before handling.

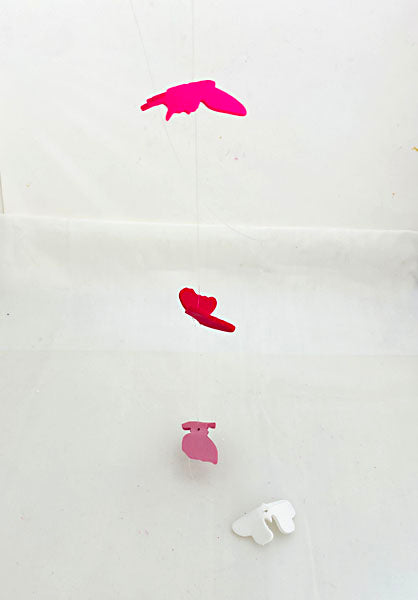
String series of butterflies onto fishing line.

Tie knots under each butterfly to keep space between them.
Keep making strands of butterflies to hang from the ring.
Keep making strands of butterflies to hang from the ring.
Take four 12” strands of ribbon and tie one end equal distantly around the ring.

Tie a knot in all four strands above the ring.

Tie the filaments with the butterflies to the ring as well. Hang and enjoy!
