
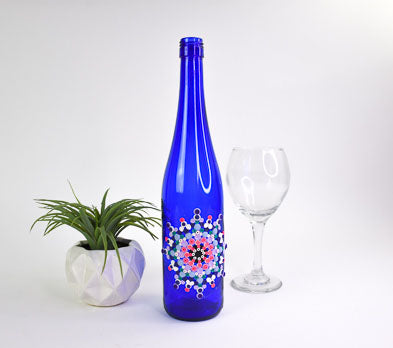
Sculpey III® & Liquid Sculpey® Dot Painted Wine Bottle
Sculpey III® & Liquid Sculpey® Dot Painted Wine Bottle
Designed by Amy Koranek
Read More
In this tutorial we will mimic the look of a dot painting on a recycled wine bottle. This really cool trend is easily worked out by making a cling of dots. The dots can be repositioned until you get the project just right. Then make your masterpiece permanent when you are ready by baking it in your home oven.
COMPLETION TIME:
90 Minutes to make and bake (2 bakings)
Read Less
ADDITIONAL SUPPLIES
- Empty and clean wine bottle with the label removed - a dark colored bottle will highlight the bright colors best
- Clean clear piece of glass
- Paper printed with grid markings
- Sharp craft knife
Project Instructions
- Getting Started:
Start with clean hands, unwrap and knead clay until soft and smooth, or condition by running clay though a Pasta Machine. We recommend using a designated machine for clay purposes only. When working with multiple colors, clean hands with soap and water or baby wipes (we have found that baby wipes work best) before switching colors. Shape clay, pressing pieces firmly together. Wash hands after use.
- Baking:
Our dot pattern will be applied to a cling of Clear Liquid Sculpey® (LS) so we will start by making a circle of Clear LS. Make sure your Clear LS is stirred really, really, well. Clear LS naturally settles so there will be sediment in the bottom of the bottle. Use any of your favorite stirring tools to work the sediment back into the liquid completely.
Pour some Clear LS into the center of a smooth clean glass baking sheet or dish. I’m using a recycled microwave glass turntable. I have saved a couple of these turntables in different sizes for just this purpose. The turntables are very thick and tempered, easy to clean, and best of all - smooth. Allow the Clear LS to naturally spread on the glass. Add more as needed to create a thin layer about 3”-4” in diameter.
Bake the glass with the Clear LS on it following the baking instructions for Liquid Sculpey®.

Allow the Clear LS to cool completely. At this point you will want to mark a center point in your design. You can easily do this by placing a piece of paper with a grid marked on it under your glass. Try to place the grid evenly under the Clear LS circle.
Designer’s Note: the grid that I am using has some angles marked on it because it is a grid that I have used for sewing projects. These angles are not necessary to this project.
Designer’s Note: the grid that I am using has some angles marked on it because it is a grid that I have used for sewing projects. These angles are not necessary to this project.

As close to the center of the Clear LS circle as possible, cut an “X” with a sharp craft knife. This mark is just to tell us where the center of the circle is because we are next going to transfer the circle onto the bottle.

Carefully peel the Clear LS circle from the glass baking surface and apply it like a cling to the front of the bottle. Make sure to take your time and burnish air bubbles out as you work the cling onto the bottle. If you look closely, you can see the “X” marked in the center of the cling.
Now we have a surface that the Sculpey III® dots will be able to stick to, but also this surface makes the dots easily repositionable. That way we can work out our design taking our time and getting it just right before baking it permanently to the cling. By working the design directly on the bottle, the dots will have a slightly curved back to them which will make them conform to the shape of the bottle better.
Now we have a surface that the Sculpey III® dots will be able to stick to, but also this surface makes the dots easily repositionable. That way we can work out our design taking our time and getting it just right before baking it permanently to the cling. By working the design directly on the bottle, the dots will have a slightly curved back to them which will make them conform to the shape of the bottle better.

To start the design and give ourselves a focal point with which to line everything up to, place a large dot of Black Sculpey III® in the center of the design directly on top of the “X”. Flatten the clay really well so the dot is nice and thin and conforms to the curve of the bottle. Ideally this dot should be 3/4” - 1” in diameter. Next, make little balls of White and flatten them to the outside edge of the Black circle. Make sure the dots touch the Black circle and are flat to the Clear LS. I’m working my design off of a pattern of eight dots. From here on the rule is - whatever you add to the design, you add eight times - keeping the entire design symmetrical. If you position a dot incorrectly, you can easily lift it back up and reposition it.

Now for the fun part! Add to your design. I started by adding a series of Pink Glitter dots next. In order to keep your rows of dots equal in size, here’s a tip: Roll a rope in the diameter that you want and keep the rope as even as possible. Then divide the rope in equal length pieces. This will give you dots that are equal in volume. Roll each little piece into a ball and then when you flatten them to the design, they will produce equal sized dots.
Always make sure the dots touch each other as you add them to the design. By touching them side to side you will control the spacing and be able to keep the design more even.
Here I have flattened Pink Glitter dots directly on top of the White dots. Then I added a row of smaller Pink Glitter dots just inside the original White ones. I also added a series of even smaller White dots inside the previous row.
I use the ball tool, or the flat end of the needle tool, or the poker end of the ball tool to seat each piece into place. The ball tool gives a nice divot to the dots and the poker makes a nice hole in the dots.

The larger dots around the outside edge are a 1:1 mixture of Purple and White. I placed the dots in position and then seated them in place with the ball tool.
The larger dots that look to be floating in between the Pink ones are a 1:1 mixture of Pink Glitter and White.
The larger dots that look to be floating in between the Pink ones are a 1:1 mixture of Pink Glitter and White.

The Pink Glitter/White dots from Step 8 have been flattened into place using the ball tool so that they touch the dots on either side.
The next row that is added is a series of four dots in each direction. These were added in clusters at the tip of each section. When the design gets larger like this, it will be more difficult to keep everything uniform. But making sure the dots connect to each other will help you control the spacing. Also trying to keep each series of dots uniform in size to each other helps with the spacing.
The next row that is added is a series of four dots in each direction. These were added in clusters at the tip of each section. When the design gets larger like this, it will be more difficult to keep everything uniform. But making sure the dots connect to each other will help you control the spacing. Also trying to keep each series of dots uniform in size to each other helps with the spacing.

Just keep adding rows and series of dots to your heart’s content. This next ring of flat dots is a 1:1 mixture of Turquoise Glitter and White. The larger dots were applied to the bottle and then flattened into place using the flat end of the needle tool.

Finally, I finished my design with a more complex series of dots around the outside. I used tiny Turquoise Glitter dots to fill in little spaces. Then I added rows of White, Purple/White, Purple/Turquoise Glitter, and Purple dots all around the outside. Then I repeated the Pink Glitter dots all the way around.
Just have fun with it and add as many rows and series of dots as you like to complete your pattern. As long as you add the same design details to each of the eight sections, your design will look complete.
Bake the bottle following the baking instructions for Sculpey III®. I laid my bottle on a baking sheet and used rolled towels on either side to keep it from rolling. Allow the bottle to cool completely before handling.

Since my design didn’t extend to the complete edge of the Clear LS circle, I used a sharp blade to cut around the outside of my design. Then I pulled the excess Clear LS off of the bottle.
