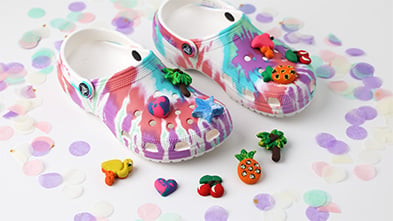


Sculpey Bake Shop® Colorful Shoe accessories
Sculpey Bake Shop® Colorful Shoe accessories
Designed by Amy Koranek
Read More
Endless color combinations, endless styles, endless possibilities. DIY accessories for your favorite casual shoes.
COMPLETION TIME:
90 Minutes to make and bake
Designer’s Tip:
With the wide variety of silicone ice cube, candy, and fondant molds that are available, it’s super easy to make fun and creative decorations for your favorite casual shoes. In my photos I’m using silicone ice cube trays for my design inspirations.
Read Less
Designer’s Tip:
With the wide variety of silicone ice cube, candy, and fondant molds that are available, it’s super easy to make fun and creative decorations for your favorite casual shoes. In my photos I’m using silicone ice cube trays for my design inspirations.
ADDITIONAL SUPPLIES
- Silicone ice cube trays or silicone candy making trays
- Silicone glue or instant drying glue

Project Instructions
- Getting Started:
Start with clean hands, unwrap and knead clay until soft and smooth, or condition by running clay though a Pasta Machine. We recommend using a designated machine for clay purposes only. When working with multiple colors, clean hands with soap and water or baby wipes (we have found that baby wipes work best) before switching colors. Shape clay, pressing pieces firmly together. Wash hands after use.
- Baking:
Making Marbled Clay
Some of your designs might look super cool if you marble different colors of clay together. Marbling can make styles look more realistic or just make them more exciting. You can marble any colors together any way you want to.
Take about 1/4 bar of Green and 1/4 bar of Yellow and make little logs.
Some of your designs might look super cool if you marble different colors of clay together. Marbling can make styles look more realistic or just make them more exciting. You can marble any colors together any way you want to.
Take about 1/4 bar of Green and 1/4 bar of Yellow and make little logs.

Twist the two logs together to create stripes.

Fold the twist together in half and then in half again. Roll to smooth and then twist to multiply the stripes. Repeat this same step as much as you want to get the colors as blended as you want.

First make a little log of Brown and press it into the trunk part of the mold.

Break off bits of the marbled Green/Yellow log and press them into the leafy areas. You can use the included knife tool to help push pieces down into the details.

Carefully turn the mold inside out to eject the clay. Make extra leaf shapes from the marbled clay.

Add leaves to the front of the palm tree. Score lines in the leaves with the knife tool.

Add brown coconuts if you like. This will be glued on after baking.)

Bake the palm tree following the baking instructions for Bake Shop®. When the tree is completely cool, glue the plastic piece on with silicone glue and allow to dry completely.

For the pineapple design, make a basic shape that will fill up the fruit area of the mold. I chose a Yellow ball and added brown spots to it. Press the spots to the ball really well.
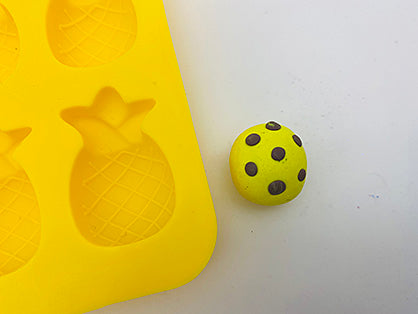
Push the spot side in first filling up the fruit area with the ball.

Add more of the Green/Yellow clay to the leaf shapes at the top.

Carefully turn the mold inside out to release the pineapple.

Use tools to add details to the design. Then bake following the baking instructions for Sculpey Bake Shop®. Glue plastic piece on after cooling.

Here’s some inspiration for making your own accessories!

- Choosing a selection results in a full page refresh.
- Opens in a new window.