

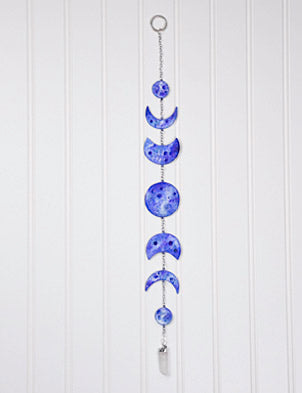
Sculpey Air-Dry™ Moon Phases Wall Hanging
Sculpey Air-Dry™ Moon Phases Wall Hanging
Designed by Linda Hollander
Read More
Read Less
Sculpey Air Dry helps make this project a great idea to do with your tween or even your BFF!
ADDITIONAL SUPPLIES
- DecoArt Multi-Purpose Sealer; Matte Varnish
- Jo Sonja’s Artists Colors: Aqua, Blue Violet, Dioxazine Purple, Titanium White`
- Paint brushes: flat/shader; round, stiff brush such as an old toothbrush or denture brush
- Sponge backed sanding block: medium/fine grit
- Jewelry Findings (silver tone) chain with medium sized links that can be separated, eye pins, jump rings, 1” texture ring, crystal charm
- Needle nose pliers (2 pair)
- Plastic Wrap
Project Instructions
- Getting Started:
Start with clean hands, unwrap and knead clay until soft and smooth. Wash hands after use. Wrap any extra clay in then wrapper and then put in an air tight container.
Clay Tips from the Designer
• Use water on fingertips to help smooth clay as needed.
• Use a hard surface such as a large tile or piece of glass to roll out clay.
• When rolling clay sheets, use the Super Slicer to lift the sheet and turn over after each roll to prevent the clay from sticking to your work surface.
• Lightly sand dried clay to smooth out imperfections.
Use the Clay Blade to cut off a piece of clay off the brick then roll into a ball. Use the clay roller to roll a sheet approximately 3/16” thick.
Lay a sheet of plastic wrap over the clay and use the 2” cutter to cut 5 moons and the 1.25”cutter to cut 2 moons. The plastic wrap will give your edges a pleasing bevel. Remove the plastic wrap and gently lift the moons with the Super Slicer. Use the 2” cutter to cut off a piece of clay from 4 moons to form the 1/4 and 3/4 moons. Smooth the edges with light finger pressure and/or a damp brush.
Use the detail tools to make craters and other indentations. Use the pliers to cut down eye pins to best fit each shape then insert into the moons as shown.

Lay on a flat surface to dry. Flip clay shapes over occasionally to promote drying. When dry lightly sand edges as needed.
Apply a coat of Multi-Purpose sealer to both sides of the shapes.
Apply a coat of Multi-Purpose sealer to both sides of the shapes.
Painting the Moons: Let each step dry before proceeding. Use water to wet brushes then blot off on a paper towel.
1. Use the flat brush to basecoat the moons with Blue Violet + Titanium White. Pick up Blue Violet then dip into the Titanium White and allow the colors to blend as you paint. This will give you a slightly marbled look.
2. Use the round brush and Blue Violet to paint the craters. Repeat until sufficiently dark.
3. Use the round brush with a little water to dribble Dioxazine Purple randomly here and there. Repeat with Aqua.
4. Use Titanium White thinned slightly with water to dribble the highlights. Use your finger to mute the wet paint as desired.
5. Thin Titanium White slightly with water. Use the round brush to dribble highlights. Use your finger to mute the highlights as needed. Load the stiff brush with the thinned paint and tap or spatter lightly over the moons.
Apply a coat of varnish to one side. Let dry then repeat on the other side.

To open and close jump rings and chain links: Use both pairs of pliers to open the jump rings. Position the pliers at 9:00 and 3:00 with the cut at 12:00. Pull one pair toward you and the other away from you. To close the ring or link, reverse the process.
Separate 8 lengths of chain to connect the moons, hanger, and charm. Use jumps rings to connect each element with the chain sections.
Separate 8 lengths of chain to connect the moons, hanger, and charm. Use jumps rings to connect each element with the chain sections.

- Choosing a selection results in a full page refresh.
- Opens in a new window.