
premo! Miniature Clay Desserts
premo! Miniature Clay Desserts
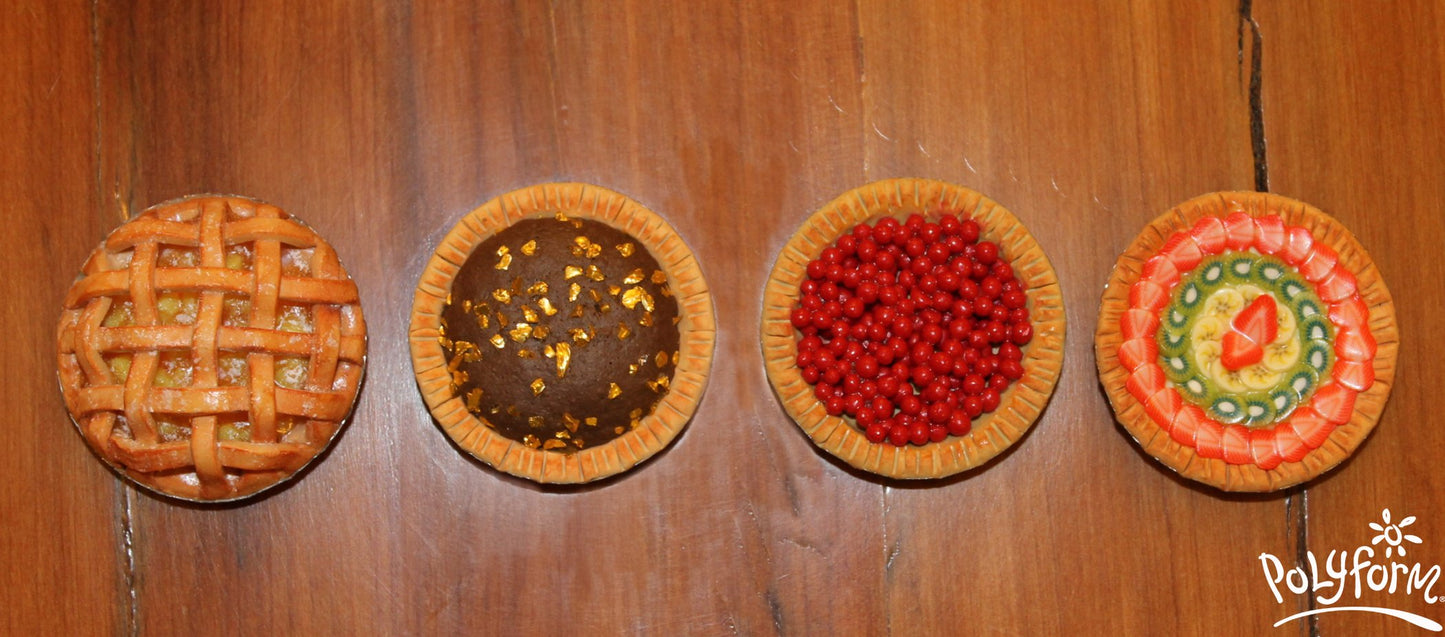
 Cherry Pie
  Chocolate Pie
  Fruit Tart
bottlecaps
flat nosed pliers
little painting-palette-knife spatula (or something similar for mixing TLS)
nail dotting tool (or the back side of Super Slicer rigid blade)
chalk pastels: white, yellow, yellow ochre, light orange, orange, red, brown, dark brown
1 soft paintbrush, 1 little paintbrush
nail art fruit canes (here I use strawberry, banana and kiwi)
gold glass-glitter
brown acrylic craft paint (or brown oil paint)
baking powder (yes! baking powder normally used for rise a REAL cake! Baking soda works just as well)|bottlecaps
flat nosed pliers
little painting-palette-knife spatula (or something similar for mixing TLS)
nail dotting tool (or the back side of Super Slicer rigid blade)
chalk pastels: white, yellow, yellow ochre, light orange, orange, red, brown, dark brown
1 soft paintbrush, 1 little paintbrush
nail art fruit canes (here I use strawberry, banana and kiwi)
gold glass-glitter
brown acrylic craft paint (or brown oil paint)
baking powder (yes! baking powder normally used for rise a REAL cake! Baking soda works just as well)
Polymer clay may stain. CLAY MAY DAMAGE UNPROTECTED FURNITURE OR FINISHED SURFACES. DO NOT USE polymer clay on unprotected surfaces. We recommend working on the Sculpey clay mat, wax paper, metal baking sheet, or disposable foil. Start with clean hands and work surface area. Knead clay until soft and smooth. For best results, clean your hands in between colors. Shape clay, pressing pieces together firmly. Bake on oven-proof glass or metal surface at 275°F (130 °C) for 30 minutes per ¼" (6 mm) thickness. For best baking results, use an oven thermometer. DO NOT USE MICROWAVE OVEN. DO NOT EXCEED THE ABOVE TEMPERATURE OR RECOMMENDED BAKING TIME. Wash hands after use. Baking should be completed by an adult. Begin by preheating oven to 275 °F (130 °C). Test temperature with oven thermometer for perfectly cured clay. For best results, condition all clay by running it through the Clay Conditioning Machine for several passes on the widest setting. Fold the clay in half after each pass and insert the fold side into the rollers first.
Use a flat nosed pliers to shape flat edges of a bottlecap.


(Fruit-tart) create a fake pie-crust base repeating step 2 & 3 and shade the edges with a soft paintbrush using yellow ochre, light orange, brown and dark brown chalk pastels.
Notes: Information for Polyform - Fruit-tart and Chocolate-pie
- Choosing a selection results in a full page refresh.
- Opens in a new window.