
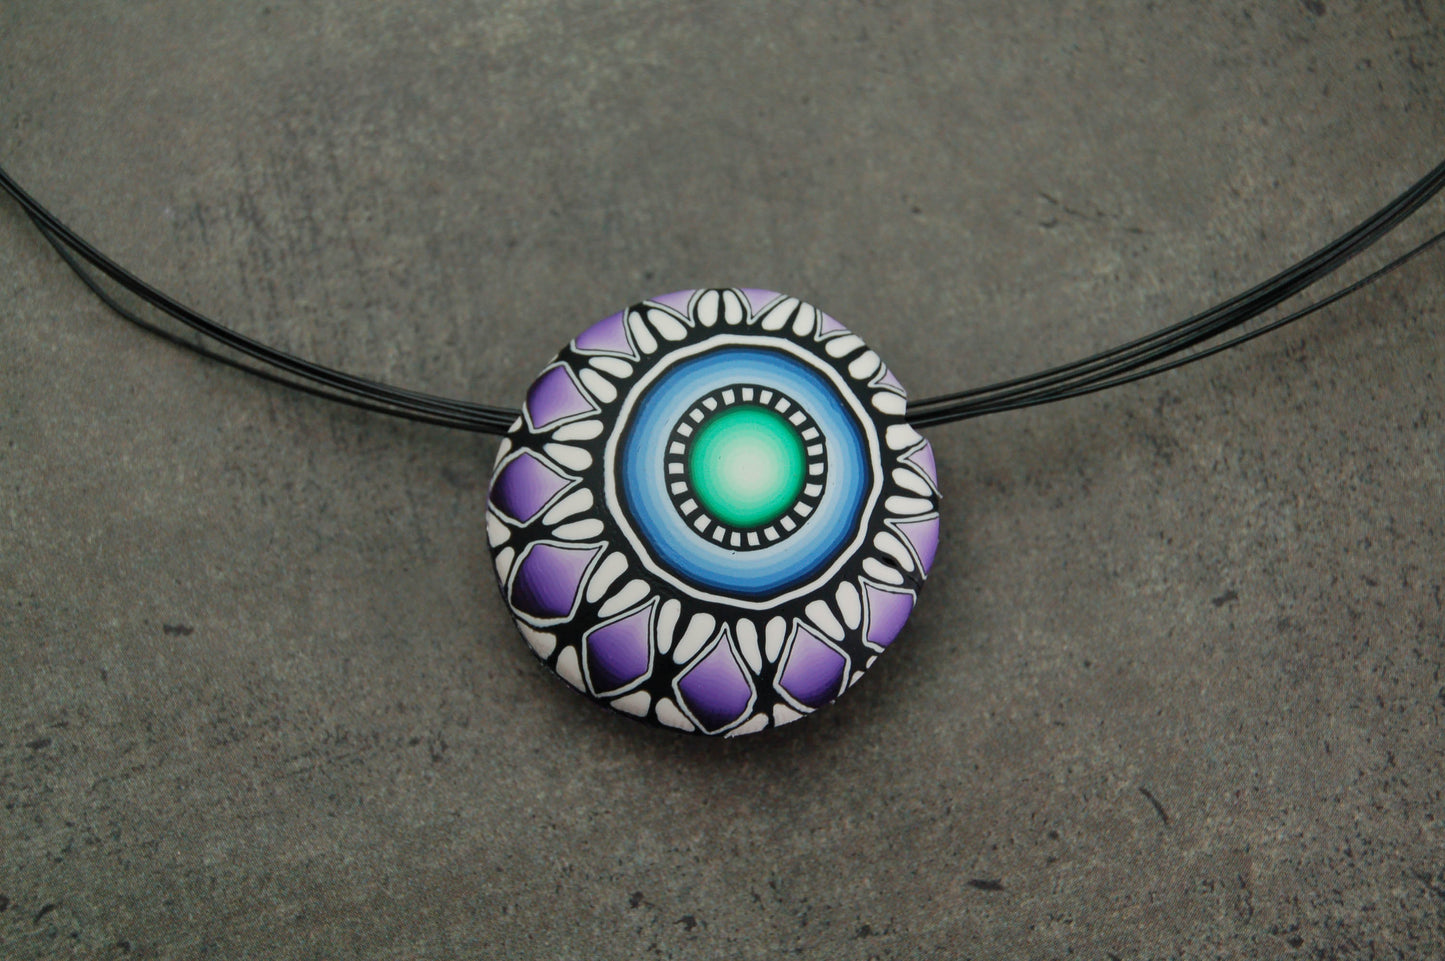
premo! Evening Sky Cane Pendant
premo! Evening Sky Cane Pendant
Read More
Cool colors outlined in Black make the design of this caned hollow bead just POP! With basic polymer clay techniques this cane is a breeze to create.
Created by Ivy Niles
Read Less
ADDITIONAL SUPPLIES
Craft knife
Bead cord/ wire|Craft knife
Bead cord/ wire
Project Instructions
Getting StartedPolymer clay may stain. CLAY MAY DAMAGE UNPROTECTED FURNITURE OR FINISHED SURFACES. DO NOT USE polymer clay on unprotected surfaces. We recommend working on the Sculpey® Work ‘n Bake Clay Mat, wax paper, metal baking sheet, or disposable foil. Start with clean hands and work surface area. Knead clay untilsoft and smooth. For best results, clean your hands in between colors. Shape clay, pressing pieces together firmly. Bake on oven-proof glass or metal surface at 275°F (130 °C) for 30 minutes per ¼" (6 mm) thickness. For best baking results, use an oven thermometer. DO NOT USE MICROWAVE OVEN. DO NOT EXCEED THE ABOVETEMPERATURE OR RECOMMENDED BAKING TIME. Wash hands after use. Baking should be completed by an adult. Begin by preheating oven to 275 °F (130 °C). Test temperature with oven thermometer for perfectly cured clay. For best results, condition all clay by running it through the Clay Conditioning Machine for several passes on the widest setting. Fold the clay in half after each pass and insert the fold side into the rollers first.
Create a Skinner blend with 2 oz White and 2 oz Green, but replace the narrowest White corner with Black clay before blending, as shown. (Skinner Blend Instructions - https://blog.sculpey.com/project/how-to-create-a-skinner-blend/)


Roll this Skinner blend into a cylinder, 2 inches tall. Wrap the cylinder in a thin strip of Black clay (#3 setting).

Make a 2 inch wide striped stack using 1 oz each of White and Black clay (#1 setting). Cut the stack into 1/8" slices, and arrange around the Green cylinder. Wrap again with a thin strip of Black clay (#3 setting). Reduce this cane to 4" long.

Make a Skinner blend as in Step 1, this time using Blue clay. Create an elongated strip with the blend, 4" wide, and run this through the Clay Conditioning Machine on the #3 setting. Wrap this around the Green cylinder. Now wrap with Black (#4 setting), then White (#3 setting), and again with Black (#4 setting).


Reduce this cane to 8" long. Cut in half. Reserve half of this cane.

Make a Skinner blend as in Step 1, this time using Purple clay. Create an elongated strip with the blend on the #1 setting, about 2" wide. Create a stacked loaf.

Reshape the stacked loaf into a circle, and then pinch the lightest and darkest parts into corners. Pinch 2 more corners to form a square. Now wrap with Black (#3 setting), then White (#1 setting), and again with Black (#3 setting). Reserve one slice of this cane for the back of the pendant. Reduce this square cane to 6" long.

Make a cylinder with 2oz of White clay. Create a right-angle triangle with 2 oz of Black clay, 3 times as long as the cylinder. Cut into 3 equal parts, and place around the cylinder. Reduce as a right-angle triangle cane to 24" long.

Cut into 4 sections, 6" long each. Place these on the sides of the purple square as shown. Reduce this to 56" long, making the side of the square with the lightest Purple slightly narrower than the dark side. Cut into 14 segments, 4" long each.

Wrap the Green and Blue cylinder with these segments, with the light purple side down. Reduce to 1.5” diameter.

Slice off a piece of the Purple cane you created in Step 8. Use the 1.5” cutter to cut out the Purple section. Cut a slice off the Green/Blue /Purple cane. Bake both slices on the Hollow Bead Baker as directed above.


Use Wet/Dry sandpaper sand the edges of both sides of your bead.

Use a ruler to mark the sides of the bead where you’ll want the stringing hole. Use your craft knife to carve a groove on each side at the mark you have drawn. Fit the 2 sides of the bead together and mark where the carved grooves are and cut the other side of the bead.


Glue the bead together with fast drying clear glue. Wire may be added before or after bead is glued.

Getting StartedPolymer clay may stain. CLAY MAY DAMAGE UNPROTECTED FURNITURE OR FINISHED SURFACES. DO NOT USE polymer clay on unprotected surfaces. We recommend working on the Sculpey® Work ‘n Bake Clay Mat, wax paper, metal baking sheet, or disposable foil. Start with clean hands and work surface area. Knead clay untilsoft and smooth. For best results, clean your hands in between colors. Shape clay, pressing pieces together firmly. Bake on oven-proof glass or metal surface at 275°F (130 °C) for 30 minutes per ¼" (6 mm) thickness. For best baking results, use an oven thermometer. DO NOT USE MICROWAVE OVEN. DO NOT EXCEED THE ABOVETEMPERATURE OR RECOMMENDED BAKING TIME. Wash hands after use. Baking should be completed by an adult. Begin by preheating oven to 275 °F (130 °C). Test temperature with oven thermometer for perfectly cured clay. For best results, condition all clay by running it through the Clay Conditioning Machine for several passes on the widest setting. Fold the clay in half after each pass and insert the fold side into the rollers first.
Create a Skinner blend with 2 oz White and 2 oz Green, but replace the narrowest White corner with Black clay before blending, as shown. (Skinner Blend Instructions - https://blog.sculpey.com/project/how-to-create-a-skinner-blend/)
Roll this Skinner blend into a cylinder, 2 inches tall. Wrap the cylinder in a thin strip of Black clay (#3 setting).
Make a 2 inch wide striped stack using 1 oz each of White and Black clay (#1 setting). Cut the stack into 1/8" slices, and arrange around the Green cylinder. Wrap again with a thin strip of Black clay (#3 setting). Reduce this cane to 4" long.
Make a Skinner blend as in Step 1, this time using Blue clay. Create an elongated strip with the blend, 4" wide, and run this through the Clay Conditioning Machine on the #3 setting. Wrap this around the Green cylinder. Now wrap with Black (#4 setting), then White (#3 setting), and again with Black (#4 setting).
Reduce this cane to 8" long. Cut in half. Reserve half of this cane.
Make a Skinner blend as in Step 1, this time using Purple clay. Create an elongated strip with the blend on the #1 setting, about 2" wide. Create a stacked loaf.
Reshape the stacked loaf into a circle, and then pinch the lightest and darkest parts into corners. Pinch 2 more corners to form a square. Now wrap with Black (#3 setting), then White (#1 setting), and again with Black (#3 setting). Reserve one slice of this cane for the back of the pendant. Reduce this square cane to 6" long.
Make a cylinder with 2oz of White clay. Create a right-angle triangle with 2 oz of Black clay, 3 times as long as the cylinder. Cut into 3 equal parts, and place around the cylinder. Reduce as a right-angle triangle cane to 24" long.
Cut into 4 sections, 6" long each. Place these on the sides of the purple square as shown. Reduce this to 56" long, making the side of the square with the lightest Purple slightly narrower than the dark side. Cut into 14 segments, 4" long each.
Wrap the Green and Blue cylinder with these segments, with the light purple side down. Reduce to 1.5” diameter.
Slice off a piece of the Purple cane you created in Step 8. Use the 1.5” cutter to cut out the Purple section. Cut a slice off the Green/Blue /Purple cane. Bake both slices on the Hollow Bead Baker as directed above.
Use Wet/Dry sandpaper sand the edges of both sides of your bead.
Use a ruler to mark the sides of the bead where you’ll want the stringing hole. Use your craft knife to carve a groove on each side at the mark you have drawn. Fit the 2 sides of the bead together and mark where the carved grooves are and cut the other side of the bead.
Glue the bead together with fast drying clear glue. Wire may be added before or after bead is glued.