
Premo! "Bumps" Beads
Premo! "Bumps" Beads
Read More
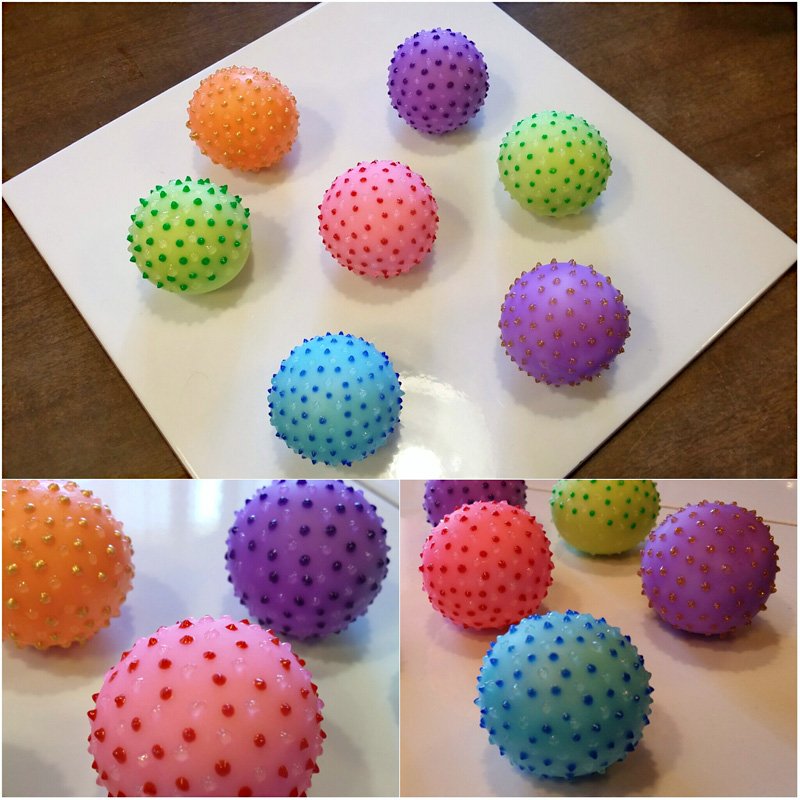
Sculpey UltraLight clay forms the heart of these colorful "bump" beads, while Premo! Accents Translucent helps create the colorful outside of the bead. Notice that UltraLight white color under translucent clay layer enhances the satin effect to resemble frosted glass and creates contrast with glossy “bumps”!
Designed by Alessio Gila https://www.facebook.com/YargoCreations)
Read Less
ADDITIONAL SUPPLIES
Sculpey Ultra Light clay, Marabu Relief Paste Glass Outliner Transparent, 20 ml – 101 Crystal clear (easy to find on Amazon.com), Marabu Relief Paste Glass Outliner Transparent, 20 ml – 057 Gentian (or other color), Alcohol Inks (any color you like, I prefer lighter colors), Spatula, Aluminum Pans, Cornstarch,|Sculpey Ultra Light clay, Marabu Relief Paste Glass Outliner Transparent, 20 ml – 101 Crystal clear (easy to find on Amazon.com), Marabu Relief Paste Glass Outliner Transparent, 20 ml – 057 Gentian (or other color), Alcohol Inks (any color you like, I prefer lighter colors), Spatula, Aluminum Pans, Cornstarch,
Project Instructions
step 1
Getting Started Polymer clay may stain. CLAY MAY DAMAGE UNPROTECTED FURNITURE OR FINISHED SURFACES. DO NOT USE polymer clay on unprotected surfaces. We recommend working on the Sculpey clay mat, wax paper, metal baking sheet, or disposable foil. Start with clean hands and work surface area. Knead clay until soft and smooth. For best results, clean your hands in between colors. Shape clay, pressing pieces together firmly. Bake on oven-proof glass or metal surface at 275°F (130 °C) for 30 minutes per ¼" (6 mm) thickness. For best baking results, use an oven thermometer. DO NOT USE MICROWAVE OVEN. DO NOT EXCEED THE ABOVE TEMPERATURE OR RECOMMENDED BAKING TIME. Wash hands after use. Baking should be completed by an adult. Begin by preheating oven to 275 °F (130 °C). Test temperature with oven thermometer for perfectly cured clay. For best results, condition all clay by running it through the Clay Conditioning Machine for several passes on the widest setting. Fold the clay in half after each pass and insert the fold side into the rollers first.step 2
From a package of Sculpey UltraLight cut out a slice about 2/3” (1.5 mm) divide in half and roll into a ball using both your palms.
step 3
If you own Sculpey Hollow Bead Maker gently lay uncured beads on the concave side to preserve spherical shape. Bake according to directions (here I baked 4 pieces at 275°F/130°C for 30 minutes) and allow to completely cool.
step 4
You will need ¼ of a standard 2 oz package of Premo! to create 2 halves to cover a bead. Cut ¼ of white translucent and roll out a sheet on the #5 setting on the clay conditioning machine. Squeeze 1 drop of alcohol ink (2 drops only for lighter colors) on the translucent clay sheet. Using a spatula or your gloved finger, spread the ink all over the surface.
step 5
Allow to dry for about 30 minutes, please not less! You should wait until all the alcohol has evaporated. Knead tinted clay well and then make a couple of passes through pasta machine until the color is completely uniform. Roll into a ball and divide in half: this is enough for covering one bead.
step 6
Roll out a very thin sheet on the #7 setting on the clay conditioning machine. To prevent roller lines, streaks or breakage on the clay remember to start at a wider setting (#4 or #5) then spread a little bit of cornstarch on the surface, roll the clay on #6 setting and finally #7: your sheet will be perfect! Cut out 2 identical discs using the widest Circle Graduated Cutter (2”).
step 7
Now you are ready to cover your bead! Place one clay disc on the palm of your hand, position the bead over it and gently press, lift up and rotate a little, press and again lift, rotate, press. Repeat these movements until the clay disc completely adheres to the UltraLight bead.
step 8
You will notice some points where the clay rises and bends over causing unattractive folds: fix them by pressing gently and sliding your thumb (or another finger as well) on the surface to reduce translucent clay thickness. Repeat these movements along the edges.
step 9
Cut clay excess to leave bead just half covered. Roll in your palms (as in step 3) pressing slightly to get a smooth surface.
step 10
Place second clay disc on your hand palm, take the half-covered bead and lay over. Repeat the movements explained in step 8 (press, lift, rotate and press again) until the disc completely adheres overlapping the previous 2 to 3 mm. Repeat step 9.
step 11
Smooth all the surface by rolling through your palms but this time pressing very lightly to avoid air bubbles. Gently rub with cornstarch to remove fingerprints. Place your bead, completely covered by cornstarch, between two aluminum pans to prevent scorching and bake at 275°F/130°C for 20 minutes, allow to completely cool. Decoration will help to cover imperfections or uneven color areas!step 12
Let’s start decorating! Marabu Relief Paste is a thick water-based paint used on glass/porcelain for outline painting. It dries in 3-4 hours, depending on how much and how thick is used. Using the built-in fine paint tip, lines and points can be traced precisely. It comes in 14 colors including transparent/metallic/glitter shades. Here I used gentian blue and crystal clear colors. You may place your bead on a Circle Graduated Cutter to be comfortable during decorations.
step 13
Start with crystal clear paste, squeezing little or big “bumps” (not too close from each other) on the surface until half bead is covered. Let it dry completely. Turn on the other side and cover the remaining area. Let it dry completely (3/4 hours). Repeat this process with the gentian blue paste and it’s done! Now you can pierce/drill holes and transform your “bump” bead into a bijoux piece or use a bunch of them as home ornaments, they even float on water! Try using different colors and shapes…feel free to experiment! Notice that white color under translucent clay layer enhances satin effect to resemble frosted glass and creates contrast with glossy “bumps”!