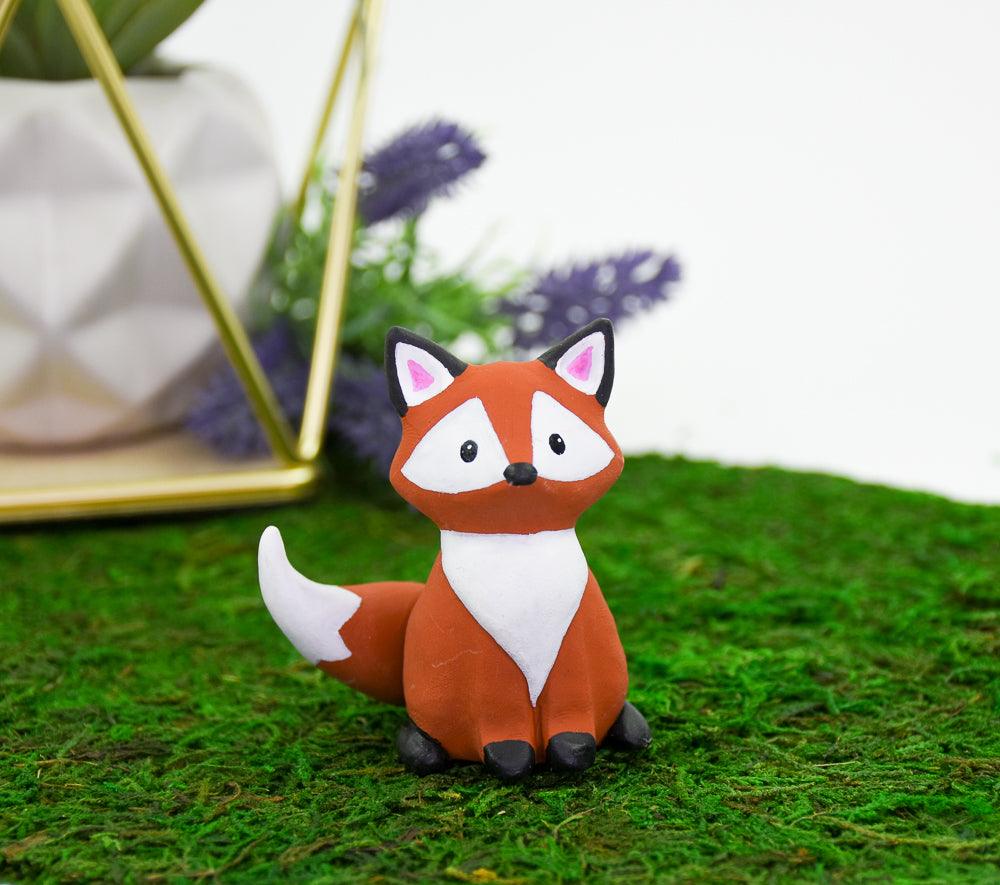
Original Sculpey® Terra Cotta Fox Pair
Original Sculpey® Terra Cotta Fox Pair
Designed by Phoebe Doehring
Read More
You can create this clever pair of foxes for your desktop in under 2 hours!
TIME TO COMPLETION:
1 hour to create 30 minutes to bake
Read Less
TIME TO COMPLETION:
1 hour to create 30 minutes to bake
ADDITIONAL SUPPLIES
- Acrylic Paints: Black, White, Pink
- Paint brushes

Project Instructions
Step 1
- Getting Started:
Start with clean hands, unwrap and knead clay until soft and smooth, or condition by running clay though a Pasta Machine. We recommend using a designated machine for clay purposes only. When working with multiple colors, clean hands with soap and water or baby wipes (we have found that baby wipes work best) before switching colors. Shape clay, pressing pieces firmly together. Wash hands after use.
- Baking (also called Curing):
Step 2
For each fox figurine you are going to need to roll the following:• Two 1” balls for the head and the tail • One 1-1/2" ball for the body • One 1/2" ball for the front furry chest area • Four 3/8” balls for the ears and the back feet

Step 3
Shape one of the 1” balls into a more oblong shape. Pinch and shape a pointed nose in the front and create soft points on either side of the head for the fox’s furry cheeks. Use your thumbs to press down on either side of the nose to make the eye area a bit flat. Set the head aside for a moment.Take two of the 3/8” balls and flatten them and make them into triangular ear shapes. Attach the ears to the head. Marry the seams using the side edge of your pointed 5 in 1 tool attachment or a toothpick. Finish and smooth with your fingertips. Set aside.
Shape the large 1-1/2" ball into an oblong body shape. Make the top narrower than the bottom. Flatten the top slightly and attach the head to the body. Marry the seams once again by using the side of your 5 in 1 tool and finish by smoothing with your fingertips.
Create two front legs for the fox by making a line halfway down the middle of the body using your 5 in 1 tool. Use the end of a paintbrush to push the clay on either side of this middle line to create and shape two front legs. Use your fingertips to press out two front feet. The end of the paintbrush can help with this too by pressing down. After creating the two front legs you may have to re-do the center line between the two front legs as it may have come together as you were making the legs.
Flatten and shape your 1/2" ball into a triangle shape that will fit right under the chin of your fox and come down over the top of the front legs a bit.

Step 4
Press on and marry the seam under the chin.Roll your remaining 1” ball into a cone shape for the tail.
Lastly, roll your last two 3/8” balls into ovals. We will attach these in the next steps

Step 5
Flatten one end of the tail a bit and press onto the rear of your fox. Marry the seams the same way you have been doing. Once the tail is securely attached bend it to one side and curl the tail up.Attach the oval balls to either side of the fox’s body for the back feet.
Use the end of your paintbrush and create indents in the front of each ear.
Smooth and refine.

Step 6
Repeat this process again for the second fox. Change the fox’s position slightly for interest if you want. Bake the fox figurines according to the package directions. Allow to cool completely before painting on the details
Step 7
Paint the fox’s eye area, chest, inside of the ears and the tip of tail White. You will need at least two coats maybe 3. Allow the paint to dry completely between coats.Paint the front feet, back feet, and backs of the ears Black.
Paint a little Black nose and two Black eyes.
Paint the inside of the ears Pink.
