
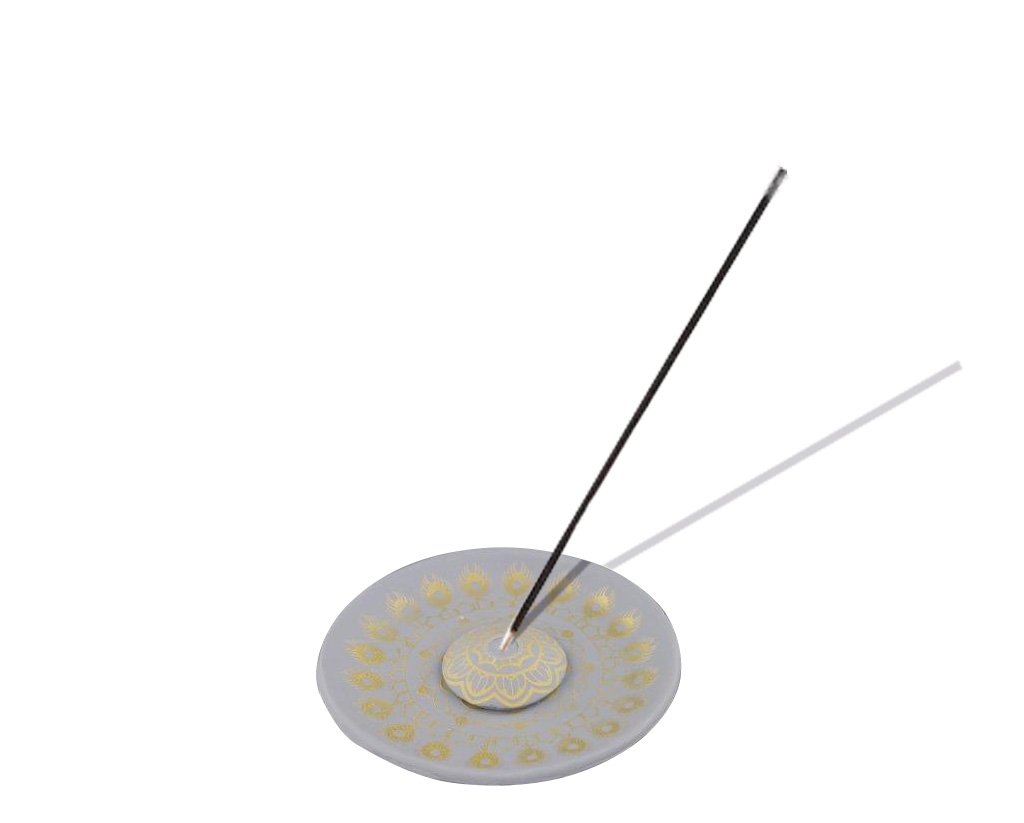
Original Sculpey Incense Holder
Original Sculpey Incense Holder
Read More
Create one of a kind piece with beautiful details like this incense holder!
Read Less
ADDITIONAL SUPPLIES
Kemper Circle Cutter - 3/8”6” Diameter Globe Glass Bowl/Vase with a flat bottom
5” Round Circle Cutter
Painter’s Tape
Incense Stick
Shallow dish filled with lukewarm water
Project Instructions
Getting Started
Polymer clay may stain. CLAY MAY DAMAGE UNPROTECTED FURNITURE OR FINISHED SURFACES. DO NOT USE polymer clay on unprotected surfaces. We recommend working on the Sculpey ® clay mat, wax paper, metal baking sheet, or disposable foil. Start with clean hands and work surface area. Knead clay until soft and smooth. For best results, clean your hands in between colors. Shape clay, pressing pieces together firmly. Bake on oven-proof glass or metal surface at 275°F (130°C) for 30 minutes per ¼" (6 mm) thickness. For best baking results, use an oven thermometer. DO NOT USE MICROWAVE OVEN. DO NOT EXCEED THE ABOVE TEMPERATURE OR RECOMMENDED BAKING TIME. Wash hands after use. Baking should be completed by an adult.
Begin by preheating oven to 275°F (130 °C). Test temperature with oven thermometer for perfectly cured clay. For best results, condition all clay by running it through the Clay Conditioning Machine for several passes on the widest setting. Fold the clay in half after each pass and insert the fold side into the rollers first.
Set the Clay Conditioning Machine to the widest setting. Condition a large amount of clay and roll out a sheet of clay that is approximately 5.5†square. Use the large circle cutter to cut out a 5†diameter circle.
Center the large circle of clay over the flat bottom of the bowl/vase. Press the clay circle onto the glass making certain that the clay is not only pressed onto the flat bottom but also up the sides. Set to the side to be baked at a later time.

Note: It is important that each time you silk screen that you lift the screen off of the clay and immediately set it into a dish or lukewarm water and/or rinse clean under warm water. Leaving the paint covered screen out in the open will allow the paint to dry in the screen which will render the screen unusable.Roll out a sheet of clay that is about 3†square. Center the silk screen over the square of clay and gently smooth the screen onto the surface of the clay. Spread the gold paint through the screen, lift the screen from the clay, and immediately place the screen into a dish of water or rinse clean under running water. Allow the paint to dry on the clay. Once the paint has dried center the 1.5†circle cutter over the center of the silk screen pattern and cut out a 1.5†circle. Next use the 3/8†Kemper circle cutter to cut a hole out of the middle of the pattern.

Press the patterned circle of clay onto the 1.5†size dome on the Hollow Bead Maker and gently press onto the form so that the clay is making contact all of the way around. Leave the clay on the Hollow Bead Maker and bake this assembly along with the clay on the glass/bowl/, made in Step 2, for 25 minutes. Let cool completely and remove the baked clay from the forms. Set the forms to the side.

Use the painter’s tape to block off the open pattern sections on the silk screen which are located at the corners and top and bottom edge of the screen. The goal is to leave only the main circular portion of the pattern uncovered with the rest blocked off. Roll out another large sheet of clay that is at least 6†square. Smooth the screen onto the surface of the clay and spread the gold paint through the screen. Remember to immediately lift the screen from the clay and either set into a dish of water or rise clean under running water. Let the paint dry on the clay.

Once the paint had dried center the 5†circle cutter over the silk screened pattern and cut out a circle of clay.

Rub a thin coat of Bake & Bond onto the concave side of the clay piece that was baked on the glass bowl/vase (from Step 2). Center the silk screened circle of clay over the concave circle of clay. Starting from the center and working toward the outside edge gently press the silk screened piece into place. Once the circle is firmly pressed into place use your fingers to roll the excess clay over the edge and blend so the two pieces look to be one solid piece of formed clay. Bake this assembly for 20 minutes and let cool completely.

Pick up the small domed piece of clay made in Steps 3 & 4. Rub a thin coat of Bake & Bond into the inside (concave side). Roll a large ball of the Gray clay and press into the inside of the dome. Make sure that the clay does not press out of the hole in the center of the dome. If it has started to press through use your finger to press it back into the hole so it is flush. Use the Super Slicer blade to trim the excess clay away from the bottom of the dome. The goal is to have the dome back-filled with a solid layer of clay. Rub a thin coat of Bake & Bond onto the bottom of the dome. Carefully position the dome of clay over the center of the pattern in the bottom of the 5†round dish piece that was completed in Step 7. Take extra time to make sure that the pattern on the dome lines up with the pattern in the bottom of the dish. A good way to see if you are lined up well is to look straight down at the assembly. When looking straight down it should look like the pattern seamlessly flows over the dome and onto the dish. Once you have everything lined up firmly press the dome onto the dish.

Pick up one of the incense sticks and push the end down through the center of the hole in the top of the dome. Gently wiggle the incense stick around to enlarge the hole. Enlarging the hole will help ensure that the incense stick will still fit the hole even after the clay has been baked. Remove the incense stick. Bake the assembly for 40 minutes and let cool completely.

Since you will need to dump the incense ashes from the dish and may also rinse the dish with water to clean it out it is a good idea to protect the paint. Regular exposure of the paint to water and being rubbed will eventually wear the paint off of the dish. A couple of thin coats of Sculpey Stain or Glossy Glaze will help protect the paint.