
Liquid Sculpey® Sea Glass & Sea Shells Necklace
Liquid Sculpey® Sea Glass & Sea Shells Necklace
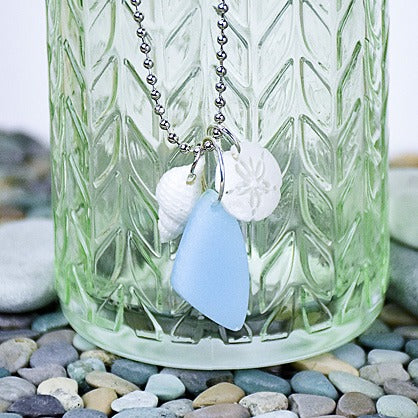
Designed by Amy Koranek
Read More
Read Less
Translucent Turquoise Liquid Sculpey® is the perfect match for mimicking sea glass. Combine that with some Pearl shells and you have a simply sea look.
TIME TO COMPLETE:40 Minutes to make and bake
ADDITIONAL SUPPLIES
- Paper towel
- Optional Silicone miniature cupcake liner
- 10mm Bright silver tone jump ring
- 8mm Bright silver tone jump rings (2)
- 18”-24” Bright silver tone ball chain with clasp
- Flat nose pliers
Project Instructions
- Getting Started:
- Baking:
Remove the lid from the Translucent Turquoise Liquid Sculpey® (TTLS). Stir the liquid completely with the knife or the blunt pointed tool. Replace the cap and wipe the tool clean with paper towel.
Fill the cavity of your choice in the Jewelry Mold with TTLS. Make sure to just fill the mold flush and not overflow. Tap the mold gently on the work surface to release air bubbles
Fill the cavity of your choice in the Jewelry Mold with TTLS. Make sure to just fill the mold flush and not overflow. Tap the mold gently on the work surface to release air bubbles

Remove the lid from the Pearl LS. Stir the liquid completely with the knife or the blunt pointed tool. If the Pearl LS is very thick you can thin it slightly with just a drop of Liquid Clay Softener. To thin you would want to pour just enough of the LS out into a silicone mini cupcake liner. Add a drop of the softener and stir completely. That way you do not thin the entire contents of the bottle. After all, you may want the Pearl LS in its current thickness for future projects.
Be sure to replace the cap on the Pearl LS and clean the tool with paper towel. Fill the sand dollar and the seashell with Pearl LS as shown. You can use the little squeegee provided to remove excess if the mold is overflowing.
Be sure to replace the cap on the Pearl LS and clean the tool with paper towel. Fill the sand dollar and the seashell with Pearl LS as shown. You can use the little squeegee provided to remove excess if the mold is overflowing.

Bake both molds following the baking instructions for LS. When the molds are completely cool, gently flex to remove the pieces.

Poke a hole in the seashell with the needle tool to make way for the jump ring. Add jump rings to all three components and string them onto ball chain for instant beauty.
