


Liquid Sculpey® Flowers Bracelet
Liquid Sculpey® Flowers Bracelet
Designed by Amy Koranek
Read More
You can preserve a grouping of flowers in Liquid Sculpey®. Flowers can be purchased or you can dry your own flowers for a keepsake. Make sure flowers are completely dried before sealing them inside Liquid Sculpey®.
TIME TO COMPLETE:
60 Minutes to make, bake, and assemble
Read Less
ADDITIONAL SUPPLIES
- Paper towel
- Oven safe silicone baking tray or clean clear glass
- Silver tone hexagon shaped connectors (6)
- Dried flowers
- Tweezers
- Heat gun
- Small sharp scissors
- 6 mm Silver tone jump rings (8)
- Silver tone lobster clasp
- Flat nose jewelry pliers

Project Instructions
- Getting Started with Liquid Sculpey®:
- Baking:
- It is important to use oven thermometer when you bake the liquids so that you can ensure your oven is at the correct temperature.
- Do not microwave the liquids. They must be baked in a Preheated oven at 275 ºF (130 ºC) for liquid colors and 300 ºF (149 ºC) for Clear – Do not exceed baking temperatures.
- If your piece is less than 1/4” bake for 15 minutes. For thicker pieces that are 1/4” or above bake for 30 minutes.
- If your liquid project has become yellowed or discolored in the oven, when you remake it, tent it by placing either – folding an index card in half and placing your project under it by using aluminum foil over your project.
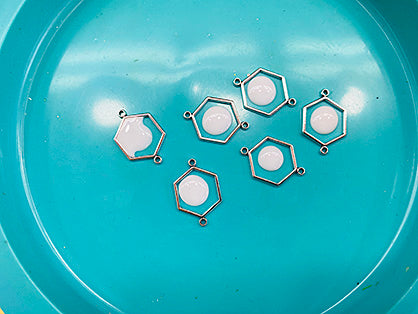
When baking Liquid Sculpey® inside of open bezels you can bake on either a silicone baking mat (pictured) or on a piece of clean clear glass. I prefer the silicone baking mat because I feel that the Liquid Sculpey® (LS) travels underneath the open bezels less than with the glass.
Lay the hexagon open bezels on the mat or glass. You will need at least one per inch with an extra inch allowance for the clasp and the jump rings. So for 6 hexagon bezels I can make a 7” bracelet.
Lay the hexagon open bezels on the mat or glass. You will need at least one per inch with an extra inch allowance for the clasp and the jump rings. So for 6 hexagon bezels I can make a 7” bracelet.

Make sure that Clear Liquid Sculpey® is stirred as completely as possible. Place a large drop of Clear LS in the center of each bezel. They don’t need to be full yet.
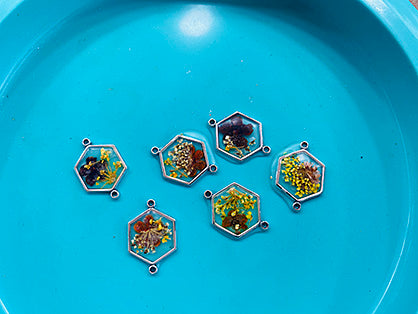
Place a series of larger flowers in the Clear LS drops.

Add another drop of Clear LS on top of each large flower.
Add smaller flowers over the top. Use tweezers to make sure the flowers are sinking into the liquid.
Add smaller flowers over the top. Use tweezers to make sure the flowers are sinking into the liquid.

Add one more drop of Clear LS. By this time the bezels will most likely be full. Once again check with tweezers that the flowers have the liquid on top of them to seal them.

Bake following the baking instructions for Liquid Sculpey®.
Remove from the oven using hand protection and go immediately to your heat gun area. Turn the heat gun on high and apply heat to each bezel until the Clear LS really turns glossy. Then immediately turn off the heat. Allow the pieces to cool completely before handling.
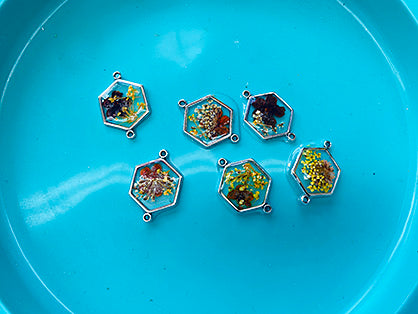
When removing from the mat or the glass, you may notice that some of the bezels have excess baked LS around the outside edges. If so, you can carefully remove this excess by trimming with small sharp scissors. Also make sure each connecting loop is open by testing with the Needle Tool.
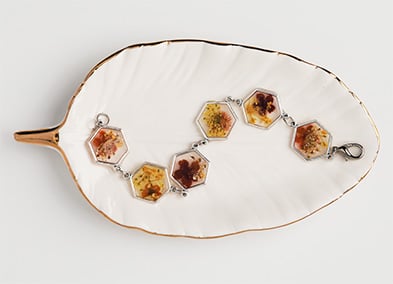
Lay the pieces out as you would like to assemble them.
Lay the pieces out as you would like to assemble them.

Connect each bezel to the one next to it with a jump ring using flat nose pliers.
Add an extra jump ring to the end of the bracelet.
Connect the lobster clasp to the bracelet with a jump ring.
Add an extra jump ring to the end of the bracelet.
Connect the lobster clasp to the bracelet with a jump ring.
