
Liquid Sculpey® Dimensional Silkscreened Earrings
Liquid Sculpey® Dimensional Silkscreened Earrings
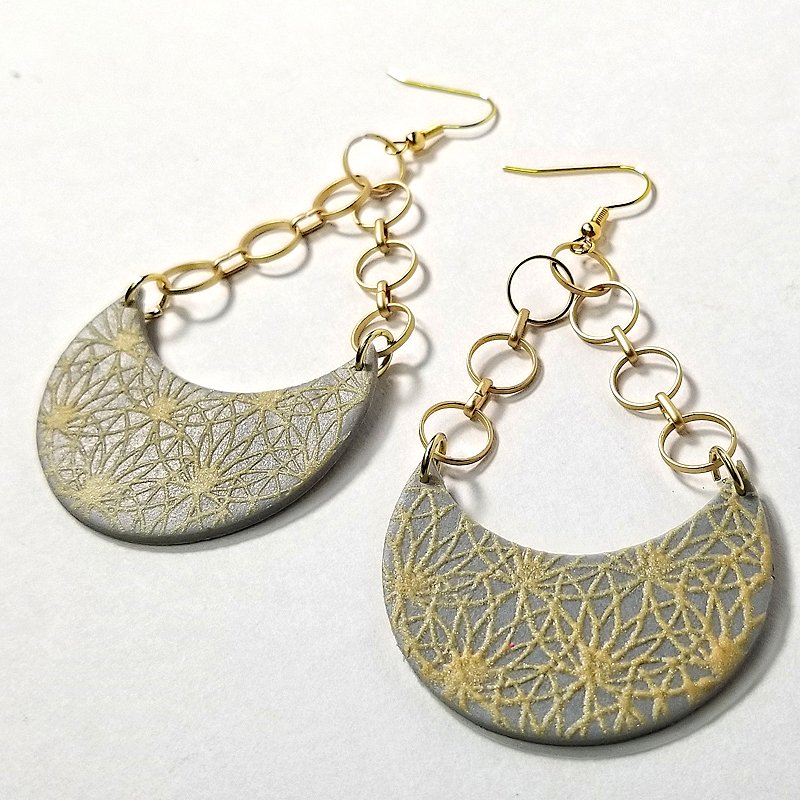
Designed by Syndee Holt
Read More
Read Less
Liquid Sculpey clay (LS) and silkscreens? Why yes, they DO play well together! You can use the LS as a paint or add a little calcium carbonate (the ingredient that makes chalk paint chalky) and you thicken the mixture enough that the silkscreen image has body and dimension.
ADDITIONAL SUPPLIES
- Calcium carbonate (Salt Wash)
- Small disposable mixing bowl (silicone is great becauase you can bake them and quickly peel the baked clay mix out)
- Small disposable paddle to mix and apply (bamboo cocktail fork)
- 1 inch silicone brush (Optional)
- Baby wipes
- Hand sanitizer
- Scrap white paper to work on
- Smooth tile
- Small drill and bit (for drilling after baking)
- 7-9mm jump rings (6)
- Ear wires (2)
- 8 inches of an interesting chain
- Jewelry pliers
Project Instructions
- Getting Started:
Start with clean hands, unwrap and knead clay until soft and smooth, or condition by running clay though a Pasta Machine. We recommend using a designated machine for clay purposes only. When working with multiple colors, clean hands with soap and water or baby wipes (we have found that baby wipes work best) before switching colors. Shape clay, pressing pieces firmly together. Wash hands after use.
- Baking:
Mix the Gold Liquid Sculpey (LS) in the bottle with a thin stirring stick (I use an Etch n’ Pearl for this!) Pour a small amount of the Gold into your mixing cup. Carefully add 2 small scoops of the calcium carbonate to the bowl as shown. Stir the powder into the LS thoroughly. You may add more powder, if needed, to make a thick, but pliable LS. NOTE: How much Calcium Carbonate you add is dependent on the viscosity of the LS before mixing. So, if your LS is thinnish, you may need to add more. If your LS is thickish, you may need to add less. Think about how a soft peak frosting would look..


Sheet out 1/2 block of the conditioned Souffle Concrete on the middle setting on your clay conditioning machine. Place the sheet of clay on a sheet of clean paper. You may want to cut the sheet in half so that you have enough room to screen your selected mandala design twice. Position the selected screen (shiny side down) onto one of the clay pieces. Spread the LS mixture over your screen, leaving a larger layer as in the screen on the left. Use the plastic paddle provided with the silkscreen or a silicone brush as I have to help even out the layer of LS on the screen. Do NOT scrape it completely off the screen like you would paint. Now, LET IT SET FOR A FEW MOMENTS - I *know* this is counter-intuitive to silkscreening, but remember that the LS will not dry. What you are looking for is the LS to "sink in" to the screen, so that you can see an imprint of the silkscreen pattern in the LS applied to the surface.


Slowly peel a small portion of your screen up to check if you have the dimensionality you were looking for. You can actually lay the screen back down if you haven’t removed it too far. Once you remove the screen completely, set the screen on a piece of scrap paper -OR-You can now position the screen on your second piece of clay – without cleaning it – and repeat the process, adding clay if necessary. TO CLEAN THE SCREEN: Once you have two screens, you can remove the screen to the scrap paper and then GENTLY scrape off as much of the LS mixture as you can. Then clean the screen with a baby wipe and a little hand sanitizer. Wipe the front and back of the screen gently, changing the scrap paper as often as you need to. The screen should clean very quickly!

You can either allow the screened clay to sit overnight until the LS mixture has dried on the surface of the clay (the plasticizer in the LS absorbs into the sheeted raw clay). OR, if you are like me and you hate to wait, put the sheet of clay on a smooth tile and use the circle cutter that fits the mandalas exactly (should be the 1.75 inch one). Carefully remove the cutter. The clay SHOULD stick to the tile. If the clay sticks to the cutter, use an Exacto knife to carefully press the pointed end just inside the cutter a couple of times to loosen the clay. If the clay behaves and sticks to the smooth tile, use your Super Slicer blade to carefully side under it and move it to a clean sheet of paper until you have cut the second screen out.

Put BOTH screened pieces back onto the smooth tile. Use the next smaller round cutter (or cutter of your choice) to cut the notch in the top of each of the screen pieces. I find that having the two screened pieces side by side made it easier for me to cut the notches the same. Keep those pieces you cut out – they will make nice smaller earrings if you wish!Bake both pieces according to the directions above.


Once the clay has baked and cooled, use a small hand drill (or a sharp needle tool) to place a hole in each side of the notch. Souffle is SUPER EASY to drill after baking! Place one of the jump rings through each of the holes and attach your chain. Measure the same amount of chain for the other side and repeat on the other side. Slide the top ends of the chain through a jump ring and add the ear wire. Repeat for the second earring. NOTE: If you don’t happen to have any chain that you wish to use, you can use gold eyepins and even add some beads, as shown.