
Liquid Clay Challenge: Hollow Bead Necklace
Liquid Clay Challenge: Hollow Bead Necklace
Designed by Anke Humpert
Read More
Read Less
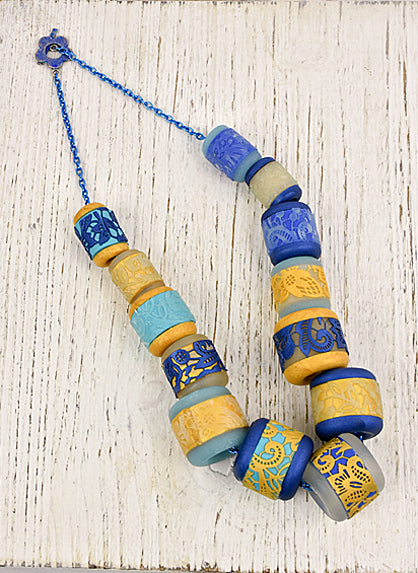
Making big hollow beads is always a great idea for a statement necklace. They are much easier to make than they look. Using liquid clay and the right tools makes this project accessible even for advanced beginners.
ADDITIONAL SUPPLIES
- Chain and closure to string the beads into a necklace
- Index cards and paper
- Scissors, pen, ruler
- Jewelry pliers
Project Instructions
Clay
Start with clean hands, unwrap and knead clay until soft and smooth, or condition by running clay though a Pasta Machine. We recommend using a designated machine for clay purposes only. When working with multiple colors, clean hands with soap and water or baby wipes (we have found that baby wipes work best) before switching colors. Shape clay, pressing pieces firmly together. Wash hands after use.
- Getting Started:
Start with clean hands, unwrap and knead clay until soft and smooth, or condition by running clay though a Pasta Machine. We recommend using a designated machine for clay purposes only. When working with multiple colors, clean hands with soap and water or baby wipes (we have found that baby wipes work best) before switching colors. Shape clay, pressing pieces firmly together. Wash hands after use.
- Baking:
- Getting Started:
- Baking:
First, we will work on the round ends of the beads. Use the Sculpey Cabochon mold and liquid clay for that. We will need a number of these doughnut shapes so if you have more than one mold that will speed up your curing process! I made 5 big beads, 4 medium and 4 small ones. Each bead needs 2 doughnuts in the same clay color. Since the translucent clay needs a higher curing temperature I cure all my translucent pieces separately.

Carefully stir the liquid clay in it´s bottle (without adding any air bubbles to it!) and pour it in the doughnut shapes. Cure at 275°F/130°C for the colored clay and at 300°F/149°C for the translucent clay, each for 30 min. Repeat that process until you have enough doughnut pieces to make all your required bead ends.
These are the doughnuts for 12 beads. I made two more of the big shapes to get 5 big beads to have a more balanced necklace with 5 big beads in the middle.
These are the doughnuts for 12 beads. I made two more of the big shapes to get 5 big beads to have a more balanced necklace with 5 big beads in the middle.

For the outside decoration of the beads we need lace made with the Sculpey lace mold. You will need one lace of each color: Clear, Navy Metallic, Translucent Turquoise, and Gold. Pour the liquid clay on the mold and distribute it evenly with the squeegee that is provided in the package. You only need a very small amount of clay for that! Try to only have the clay in the indentations of the mold and not much around. That way you will get a much cleaner lace. Remove the excess clay with the squeegee and put it back in the bottle of liquid clay.

NOTE! In case your lace is not flexible enough to be bend around the beads you can add a drop of clay softener to the liquid clay to make it very flexible! I like to mix my liquid in a cabochon mold, that I use as a mixing palette. It can be cured with my other pieces and easily cleaned after the remains of the clay are cured!

Cure at 275°F/130°C for the colored clay and 300°F/149°C for the translucent clay for 30 min each. Repeat that process until you have a piece of lace in all 4 colors. If possible, cure the lace together with the doughnut pieces to save on curing time!

The bead cores for this necklace are made with solid clay. Select clay colors that are similar to the liquid clay you use! I checked with test pieces of liquid clay if I liked the colors together. For my beads I used: Premo Accent Gold, Premo Translucent, Soufflé Cornflower and Soufflé Robin´s Egg.

To make the cores of the beads we will use the round cookie cutters as our form. The 3 smallest cutters can be used for the 3 different sizes of doughnuts. They are just a little smaller, so when a layer of clay is wrapped around each of the cookie cutters and cured it is perfectly sized for our bead cores!

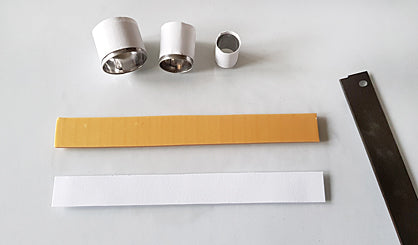
Use a strip of paper to wrap around the 3 round cookie cutters (the 3 smallest in the set). Use your paper, ruler and scissors for that. Make the paper a little higher that the actual cookie cutters are! That will help you to remove the clay from the cutters later.
Also cut out a strip of cardboard that has the height of your cookie cutter. The length does not matter. You can use this strip as a template for all three sizes of bead cores and the clay strip will be cut on the cutter.
Now condition your solid clay (all colors separately). Roll the clay out on the thickest setting of your clay condition machine. Use the cardboard template to cut a clay strip out for each color.
Wrap your clay strip around the cutter covered with paper. Cut your clay with a beveled cut and join it together, so you have a even thickness of clay around your cutter. Use your finger to smear over the cut line to disguise it.

Repeat this process until you have covered all 3 cookie cutters (or is you have more than one set: do it with all of them!)

Now use the clay strip template to cut the cured lace to the right size. I made the beads the height that I was able to have 3 stripes of lace from one cured lace piece.

I mixed and matched the colors of the bead ends, the bead and the lace on them. So each bead will look different although they are all made with the same components.

The lace is very thin and flexible so it is easy to cut the stripes with a regular pair of scissors. Adjust the length of the stripes according to which cutter they will be placed on.

Try to have one side that is a straight cut of the lace and is exactly where the background clay is also cut straight. Wrap the lace stripes around the uncured clay and roll it a little on your work surface to attach the lace to the core.

Cure at 275°F/130°C for 30 min. Let cool completely. Then use the pliers to take the bead core of the cutters.

Now you need to remove the bits of the lace that are bigger than the clay background. You can use your scissors to just cut them off.
The bead core ring of the beads and the lace need to be flush, so the bead ends (the doughnuts) can be added to the beads.
The bead core ring of the beads and the lace need to be flush, so the bead ends (the doughnuts) can be added to the beads.


Use the clear liquid clay and apply a thin layer of clay to the side of the core of the beads.
Place it on one of the clay doughnuts and add another layer of clay to the other side of the core ring. Place the second doughnut on top.
Do the same process to all your beads and cure them at 300°F/149°C for 30 min. Let cool completely.
Place it on one of the clay doughnuts and add another layer of clay to the other side of the core ring. Place the second doughnut on top.
Do the same process to all your beads and cure them at 300°F/149°C for 30 min. Let cool completely.


After curing the clear liquid will not be seen any more.

Arrange all your finished beads in a pleasing manner and string them on a thin metal chain. Add a closure to finish your piece. Use both in a color that goes well with the colors of your beads.

