

Sculpey Premo™ Heirloom Photo Transfer Pendants
Sculpey Premo™ Heirloom Photo Transfer Pendants
Designed by Syndee Holt
Read More
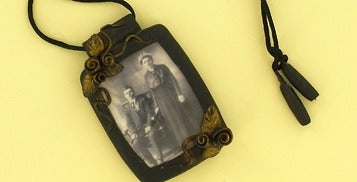
This handsome photo is of the designer’s Great Grandparents in-law who immigrated to the United States near the turn of the century. Making jewelry with family history is quite meaningful.
Read Less
ADDITIONAL SUPPLIES
- "Photo to transfer—sized approx. 1-3/4” x 2-1/2” printed with inkjet printer
- Matte finish photo paper (Epson Matte S041062)
- Coarse sandpaper or sponge
- Heat embossing tool
- PearlEx mica powder Antique Bronze
- Small round paintbrush
- 30” black satin rattail cord
Project Instructions
- Getting Started:
Start with clean hands, unwrap and knead clay until soft and smooth, or condition by running clay though a Pasta Machine. We recommend using a designated machine for clay purposes only. When working with multiple colors, clean hands with soap and water or baby wipes (we have found that baby wipes work best) before switching colors. Shape clay, pressing pieces firmly together. Wash hands after use.
- Baking:
Size and print the photo onto the matte finish paper. Apply enough Liquid Sculpey to the surface of the photo that it can be spread in an even layer with a palette knife.

Using the heat tool, heat the surface of the Liquid Sculpey to cure it. Watch the surface carefully. As it heats, first a thin skin will form and the surface will turn matte. As you continue heating, the surface will return to a shiny, slightly pebbled look. Keep the heat tool moving slowly across the surface so as not to scorch the piece. When the entire surface is shiney and the photo is clearly seen, it is completely cured.

Trim the excess paper from the edges of the transfer. Dip the transfer into soapy water and let soak for one minute. Peel the paper off the back of the cured transfer. It will not come off in one piece, rather, it will need to be scrubbed off with an old soft toothbrush to remove all the paper fibers. When all the paper is removed, the transfer will appear as a thick piece of film.
Roll a walnut sized ball of White clay into a flat sheet slightly larger than the transfer and slightly thinner at the edges than in the center. Apply a very small amount of Liquid Sculpey to the surface and spread it smooth. Apply the transfer to the surface, being very careful not to trap any air bubbles. Trim the edges in a slightly rounded line about 1/8” larger than the photo edges. Bake according to the manufacturer’s instructions on the clay package.

Roll the Black clay to a sheet 1/16” thick. Cut one solid piece slightly larger then the white base. Cut a second and cut a center rectangle out for the frame. Apply these pieces to the front and back of the image and blend the seams. Texture the entire surface by pressing the piece against a clean, coarse sanding sponge or paper. Retrim the interior frame edges if necessary.

Roll a small piece of clay 1/16” thick and 1” x 2”. Wrap this sheet around a pencil or bamboo skewer and trim the ends and edges to form a tube. Roll the tube against the sanding sponge to texture it. Press the tube against the top of the pendant. Reinforce this area with a thin bead of Liquid Sculpey.

Form leaves by shaping a small ball of clay into a flattened teardrop and incising vein lines with a needle tool. Make roses by flattening an oval shape and rolling it up and cuttting the lower edge straight. Make several thin snakes for a bit of vine. Apply the vines, the leaves, and the roses at opposite corners of the piece. Brush a small amount of gold powder over these elements, being careful not to apply it over the textured background.

Thread the satin cord through the tube and tie knots in each end. Roll the knotted ends into a small sheet of clay to make cord ends. Texture the clay and trim the edges straight.

Bake the piece again, at 275 °F for 30 minutes.
- Choosing a selection results in a full page refresh.
- Opens in a new window.