

premo Cane Series - Leaf Cane
premo Cane Series - Leaf Cane
Read More
Project and Video by Amy Koranek
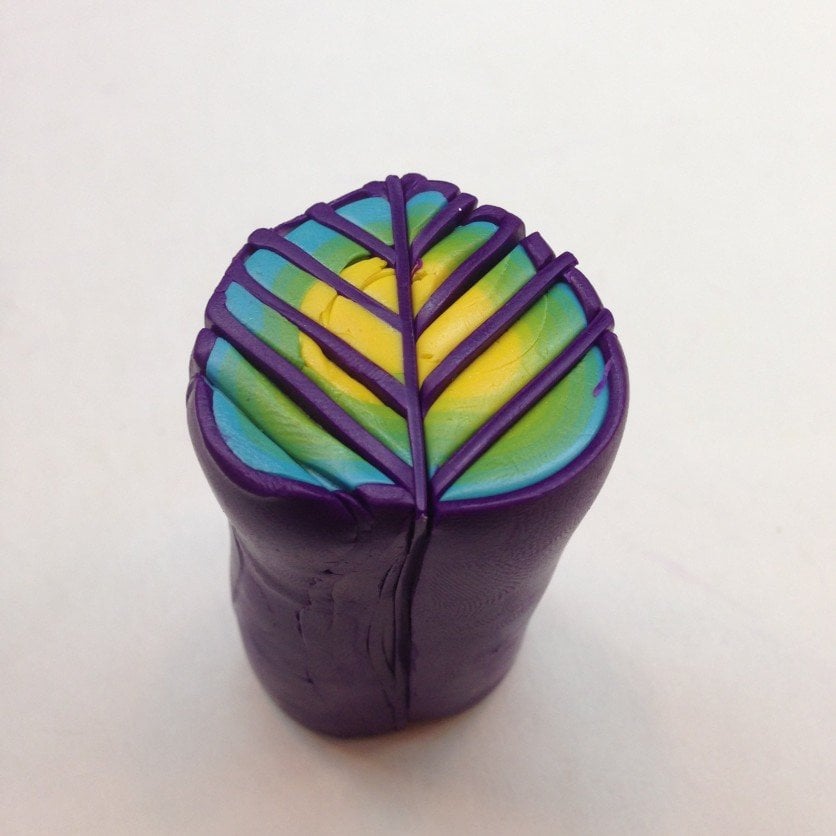
The Leaf Cane is one of the most basic and simple canes. It’s a combination of a Skinner Blend Jelly Roll Plug, a Bulls’ Eye Cane. The cane is then sliced and reassembled. The Leaf Cane is different from the others in the Basic Canes series because it is triangular in shape instead of round. Practicing good technique is important to creating accurate canes. Once you have mastered making simple canes with good technique, you will be able to combine your simple canes together to create more complex ones.
Read Less
ADDITIONAL SUPPLIES
Project and Video by Amy Koranek
The Leaf Cane is one of the most basic and simple canes. It’s a combination of a Skinner Blend Jelly Roll Plug, a Bulls’ Eye Cane. The cane is then sliced and reassembled. The Leaf Cane is different from the others in the Basic Canes series because it is triangular in shape instead of round. Practicing good technique is important to creating accurate canes. Once you have mastered making simple canes with good technique, you will be able to combine your simple canes together to create more complex ones.
Project Instructions
Getting Started:
Please make sure your work area is covered and you are not working on an unprotected surface. We recommend working on the Sculpey® Work ‘n Bake Clay Mat, wax paper, metal baking sheet, or disposable foil. Uncured clay may damage unprotected furniture or finished surfaces. Be sure to cover your crafting area appropriately.
Start with clean hands, unwrap and knead clay until soft and smooth, or condition by running clay though a Pasta Machine. We recommend using a designated machine for clay purposes only. When working with multiple colors, clean hands with soap and water or baby wipes (we have found that baby wipes work best) before switching colors. Shape clay, pressing pieces firmly together. Wash hands after use.
Baking:
Begin by preheating oven to 275 °F (130 °C). After you are done creating; for best results bake clay on an oven-proof surface such metal, aluminum foil, an index card or the Sculpey® Clay Mat at 275°F (130 °C) for 30 minutes per ¼" (6 mm) thickness according to package directions. Oven safe glass or ceramic surfaces are also acceptable for baking; however please note that the baking times may take longer as the glass or ceramic surfaces take longer to heat up. For best baking results, use an oven thermometer. DO NOT USE MICROWAVE OVEN. DO NOT EXCEED THE ABOVE TEMPERATURE OR RECOMMENDED BAKING TIME.
Designer’s Note - In this instruction we are starting with a Two Color Skinner Blend Sheet of Cadmium Yellow and Turquoise. Complete instructions are available on the Sculpey Website.Start with a Skinner Blend sheet of Cadmium Yellow and Turquoise that has been pressed through the Sculpey® Clay Conditioning Machine on the thickest setting (1/8â€).

Fold the sheet in half so that yellow is touching yellow and blue touching blue. Roll over with the Sculpey® Acrylic Clay Roller to smooth out air bubbles.

Turn the folded sheet so that one of the narrow ends is pressed through the Sculpey® Clay Conditioning Machine first. Press the sheet through on the thickest setting to lengthen.

From a scrap of Cadmium Yellow, form a little log 1/4†thick and as long as the Skinner sheet is wide. Cut a straight edge across the yellow end of the sheet. Line the log up with the straight edge.

Roll the log up in the sheet to make a Skinner Blend plug. Roll on your work surface a few times to smooth.

Sheet Purple through the Sculpey® Clay Conditioning Machine on the third thickest setting. Trim a straight edge across the Purple. Lay the Skinner Blend plug across the straight edge. Trim the edges of the purple to match the length of the plug. Roll the plug up in the Purple sheet.

When the straight edge of the Purple sheet touches the Purple at the back it will make a little mark. Trim just inside this mark. Smooth the seam with your fingers.

Stand the log up in front of you. Slice down through the center of the log evenly to create two half circles.

For the next steps you will need to make several thin slices down through the cane. This is most easily done if you steady the half circle log by sticking it to the side of a block of clay.

Slice down through the half circle several times in parallel cuts.

Sandwich a #3 sheet of Purple between each of the slices.

With the cane standing up in front of you, slice down through it at an angle from the top of the first Purple line to the bottom of the last Purple line.

Flip one side of the cane so that both of the small sections are lined up at the top and both of the large sections are lined up at the bottom.
