
Today I would like to tell you a little bit about my new clay love: Liquid Sculpey®! It does work a bit different then regular polymer clay and you need to get used to the different way of working with it at first. So, to make it easier for you I thought I share a couple of ideas where you could start. I will show you what I came up with and of course you can add your own twist to these ideas! And maybe you want to show me what you do? #HowDoYou Sculpey
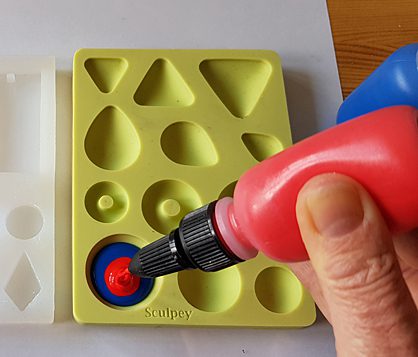
Most of us do love all the colors of polymer clay. And I am very happy to say that Liquid Sculpey® colors can be as well and you can make your own custom colors. I like to use my Sculpey® Silicone Bakeable Cabochon Mold as a mixing tray. I pour in the colors mix them, use them in the molds of choice and cure my mixing tray with all my pieces. Makes it much easier to clean than in its liquid state! Anyway: pour the colors you want to mix in the mold and use a spatula or other tool to stir until you get an even color. You can add more of one or the other color until you get your desired result.
To show you that you can get all the colors you want, I mixed yellow, red and blue colors from the Liquid Sculpey® Primary Set (the leaves in the inner circle) to get orange, purple and green. Then I mixed all 6 colors each with white to get brighter tones of all my colors (the outer circle). Of course you could also use black to tone the colors down. These are just examples and I think they show that you can get all the colors you want when mixing the right Liquid Sculpey® colors together, exactly as you need them!

If you want translucent colors, you want to use Clear Liquid Sculpey® as your base and translucent colors to tint the clay with: I used alcohol inks to do that. In the picture you can see some of my samples. Try out the alcohol inks you already have with clear liquid clay and see what colors you can come up with! With alcohol inks you definitely want to start with only a few drops and add more if needed!
The next technique you might want to try out is marbling with Liquid Sculpey®. For my sample pieces I poured a background color into a silicone cup (white for the lower discs and gold for the upper disc) and added a couple of colors in lines, drops or circles on top. These colors “sit” on the background color and can be dragged with a toothpick or needle tool to make the marble patterns. You can use these as coasters, or if you fill a metal or glass tray with that technique as a decor piece.

The next idea is to use your silicone mold and fill them with more than one color of Liquid Sculpey® in one go. That is especially nice when making natural shapes, like the nautical pieces I used here. Before I poured in the Liquid Sculpey®I also added a bit of glitter powder with a brush. Don’t you think they look more interesting that way? I also added a bit of glitter powder with a brush. Don’t you think they look more interesting that way?


Of course you can also pour your colors into a mold in a much more controlled way, as you can see with the earrings that I made here with the 3D Jewelry Mold. I used red and white and my base colors and a pink, that I mixed with the red and white, in between. The liquid clay is thick enough that the colors can sit on top of each other without mixing, if you do not stir them.
As you have already seen with my nautical shapes you can add powders to Liquid Sculpey®. And you can also add metal foil, pearls, beads and stones into the liquid clay! For the first pair of earrings I used gold foil and trapped air in it, to have an irregular shape, and then poured Peacock Pearl Liquid Sculpey® on top in the mold.

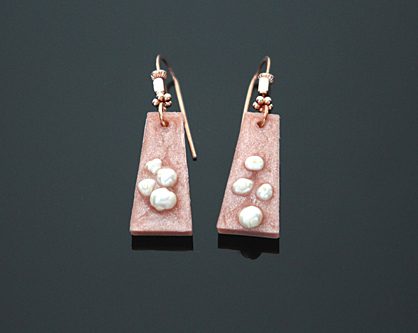
The Rose Gold pair of earrings have pearls added to the Rose Gold Liquid Sculpey®. I am sure there are a lot more embellishments you can use with liquid clay!
There is another technique I really like with Liquid Sculpey®: fill a mold with one color, cure it and then cut the piece. The clay is soft enough that you can easily use your blade for that. After cutting the piece I place it back into the mold and fill the gaps with a different clay color and cure it again. Of course, you can also do this with multiple times and/or with a number of clay colors!


A tip for that technique: sometimes the second clay color gets under your already cured pieces. While I try to avoid that with making sure the pieces sit really well in the mold, it still is not a big deal if the leakage happens! Cured Liquid Sculpey® can be sanded just like regular clay and so you can get your crisp line again! The black and white cabochons in the picture needed to be sanded quite a bit to get the pattern back like you see it now. Of course, you can also play with using opaque and Clear Liquid Sculpey® to create nice contrasts in your pieces.
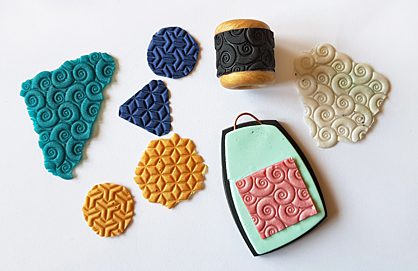
If you pour Liquid Sculpey® on rubber stamps you can get nice crisp patterns! Only use real rubber stamps for this technique however. Clear stamps can not hold the heat of the curing! Pour some liquid clay on a stamp and spread it out a little bit, then cure it. You will get thin sheets with a pattern, that can be used on regular clay. Cut them in shape with your scissors. Since these sheets are quite thin they also can be bend easily, as you can see on the black and gold bead.

Finally I would like to show you that Clear Liquid Sculpey® can be used as a “glaze" on regular clay. My sample pieces have been stamped and, to better show the texture, I applied powders. to make sure the glitter powders stay where they are and to also add a glass like shine to the top, I applied a layer of Clear Liquid Sculpey® and cured the piece.
Of course there are many more ways how you can use Liquid Sculpey® in your projects. I hope I have shown you a couple of ideas that you will try out and add to your repertoire! This is how I use Liquid Sculpey®, and #HowDoYouSculpey?
