Skip to product information
1 of 1

Sculpey Soufflé™ Watercolor Fun Earrings

Sculpey Soufflé™ Watercolor Fun Earrings

Designed by syndee holt
Read More
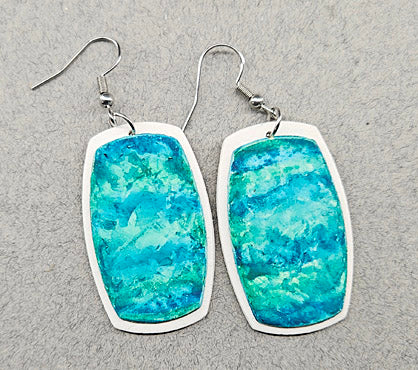
Since the 2026 Color of the Year was announced as Cloud Dancer “a soft airy white” my mind went immediately to Soufflé Igloo as a perfect match to that description. An extra bonus is that I’ve been playing with watercolor paints on Soufflé Igloo (as well as any of the other Soufflé lighter colors). I’m an old pro photograph retoucher so I tend to use TINY brushes, but there is such a plethora of brushes available now that we can really get exotic with our brush strokes. For this project though I stuck for a smaller brush. NOTE: I’ve also used watercolors on other colors of both Soufflé and Premo (particularly the metallics)
Read Less
ADDITIONAL SUPPLIES

Have on hand:

  • 2 cutters of same shape, just slightly different sizes.  This shape is a real “go to” for me – I find them on Etsy using the phrase “fat rectangles”.  I’ve used these for both earrings and bracelet  pieces over the years.
  • Watercolor set – Mine are Derwent Inktense paint Pan Set #02 for this project. 
  • Watercolor brush – I recommend using a size you are comfortable with.  My brush is a #1
  • Earring findings
View full details
Project Instructions

Step 1

Getting Started:

Please make sure your work area is covered and you are not working on an unprotected surface. We recommend working on the Sculpey® Oven Safe Work Mat, wax paper, metal baking sheet, or disposable foil. Uncured clay may damage unprotected furniture or finished surfaces. Be sure to cover your crafting area appropriately.

Start with clean hands, unwrap and knead clay until soft and smooth, or condition by running clay though a Pasta Machine. We recommend using a designated machine for clay purposes only. When working with multiple colors, clean hands with soap and water or baby wipes (we have found that baby wipes work best) before switching colors. Shape clay, pressing pieces firmly together.  Wash hands after use.

Baking (also called Curing):

Begin by preheating oven to 275 °F (130 °C). After you are done creating; for best results bake clay on an oven-proof surface such as metal, aluminum foil, an index card or the Sculpey® Oven Safe Work Mat at 275°F (130 °C) for 30 minutes per ¼" (6 mm) of thickness according to package directions. Oven safe glass or ceramic surfaces are also acceptable for baking; however please note that the baking
times may take longer as the glass or ceramic surfaces take longer to heat
up. For best baking results, use an oven thermometer. DO NOT USE MICROWAVE
OVEN. DO NOT EXCEED THE ABOVE TEMPERATURE OR RECOMMENDED BAKING TIME.

Step 2

I sheeted out my Igloo on my usual medium thickness(#3) on my pasta machine
and set aside half of the sheet.  Then I sheeted the remaining half on a #4 thickness for a slightly thinner sheet. 

NOTE! I used the larger of my cutters to cut out the background mount from the #3 sheet and set them aside while I used the smaller cutter on the thinner #4 sheet for my watercolors AND I cut out about 5 pieces so I could experiment with different techniques.

Step 3

Once I had my watercolor sheets ready, I put 2 on my workspace, prepared a small plastic water dish, wet my brush and selected my 2 colors to work with.  If you aren’t sure of your color palette, I recommend brushing the colors onto a small sheet of
white printer paper- that will help you not only select the actual color, but the intensity of the color you want to work with.  OR use a scrap piece of clay if you wish!

Step 4

I applied my first areas of paint color, trying to mirror as best as possible on the two
pieces.  BUT they don’t have to be perfect!

Step 5

I quickly added my second color to create some (rather rough) striping.

Step 6

Experiment time! I sprayed my a test piece shown on the right side with rubbing alcohol that I keep in a small spray bottle on my table just to see what happened.  It nicely mottled the colors and the stripes for me. I sprayed the second piece with water in a small spray bottle.  BOTH methods yielded interesting effects! (I ultimately went with the water version for both earrings - THAT's why I made multiple pieces to experiment with)

Step 7

I ultimately went with the quick spray of water and then used a clay wrapper to VERY LIGHTLY spread/texture the colors and remove a little excess paint.

Step 8

I let the paint colors dry on the clay for a few minutes before adding them to the larger background shape of clay.  NOTE! Don’t forget to paint the edges of the shapes before mounting them in the next step!

Step 9

Spread a little bit of Oven Bake Clay Adhesive (or other LS color since it won’t show) to help adhere the top painted piece to the larger background piece.  Make sure to leave space at the top for the assembly holes!

Step 10

NOTE! I drill my holes after baking.  If you chose not to do this, please make your
holes now before baking/curing!

Step 11

Here are a pair of my pieces on the baking tray. I wanted to show you how different you can create with just the same two watercolors. The pair on the right were just light strokes of the same colors


Step 12

Now before I use my little hand drill to put the assembly holes in the tops of these I DO use my hand sander to quickly run around the edges of the cured backing sheet to
smooth and finish.  (YES, this is actually a USB powered pet nail grinder from Amazon).

Step 13

Here is the layout for my final assembly and the final completed earrings:

Step 14

So what else is on my assembly desk you ask?  MORE watercolor styles!

1.  Another wonderful stamp on Premo 18k painted after firing.

2.  Circles of Premo Gold. I added fine feather strokes of green watercolor around the edges, then some Red Etch n’ Pearl “ornaments”.  I sheeted the remaining red out on a thin layer and cut strips to make the ribbons.  Each ribbon is TWO strips – the 1st are the loops and the 2nd strip wraps around the center of the looped ribbon.

3.  Watercolor with black and gold marking pens used after curing

4. Watercolor background and then I painted the non-cutting edge of my small oval cutter with purple and gently pressed it to the unbaked clay.  (yes, add the color every time you use it!) And finally some gold dots with my small Etch n’ Pearl dipped into a puddle of gold paint on an old clay wrapper. 

5.   Leftover pieces of a similar style to 4 that I pressed onto a darker background color sandwiched between 2 sheets of paper so that I could press on it and not
smear the small pieces.  Then I cut out my final earring shapes.

6.  OH!  Those hearts on my drilling block? A light rose color painted onto Premo Pearl and then I added the darker purple watercolor to the edge of my ruler and tapped the color onto the surface, adding paint for each tap.