

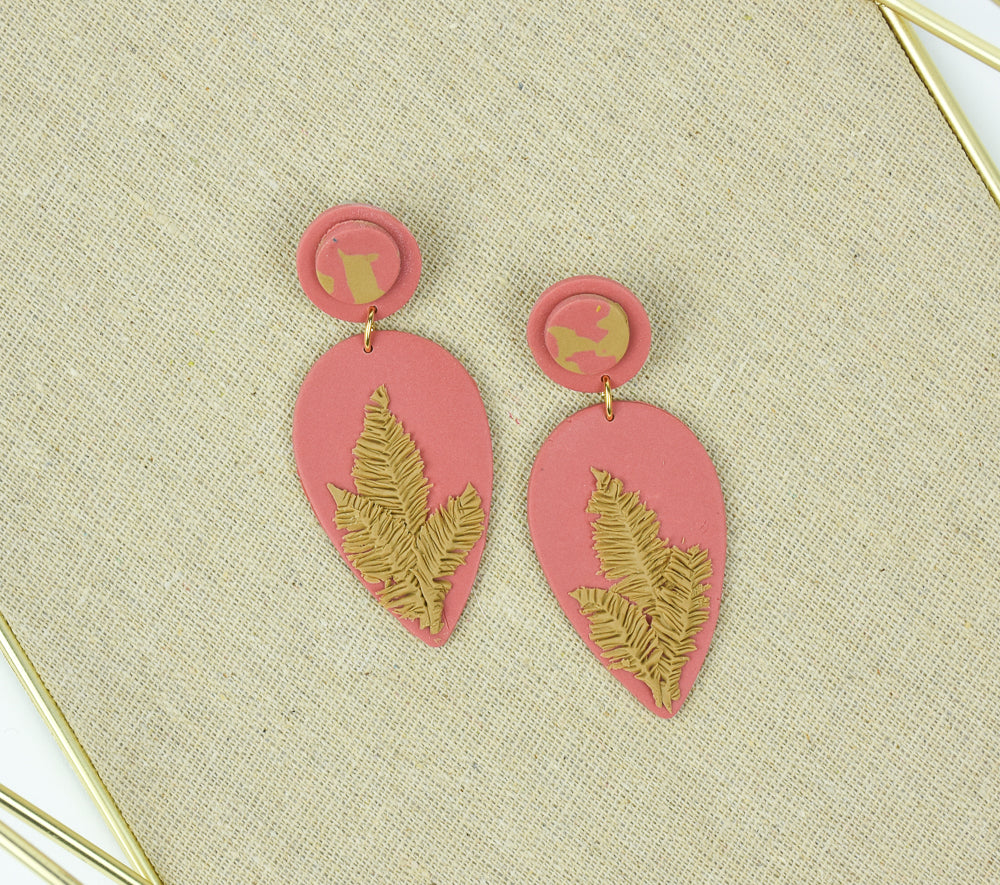
Sculpey Soufflé™ Sedona Pampas Grass Earrings
Sculpey Soufflé™ Sedona Pampas Grass Earrings
Designed by syndee holt
Read More
Soufflé™ Sedona and Latte team up to create these intricate looking earrings that will be sure to become a favorite in your jewelry collection! The colors just seem to go with any colors or styles.
TIME TO COMPLETION: 40 minutes to create 30 minutes to bake
Read Less
ADDITIONAL SUPPLIES
- Stainless steel posts (2)
- Gold-toned jump rings (2) NOTE: I prefer oval jump rings
- Needle tool
- Craft knife like Exacto
- Small smooth tile
- 3 small pieces of cardboard, glued together at the corners
- 2 pieces of Patty paper or clean white paper
- Coffee press or other smooth round tool at hand to press the clay
Project Instructions
- Getting Started:
Start with clean hands, unwrap and knead clay until soft and smooth, or condition by running clay though a Pasta Machine. We recommend using a designated machine for clay purposes only. When working with multiple colors, clean hands with soap and water or baby wipes (we have found that baby wipes work best) before switching colors. Shape clay, pressing pieces firmly together. Wash hands after use.
- Baking (also called Curing):
Sheet out a small piece of the Latte clay on a very thin setting (7 on my Atlas 180).
Place the sheet of clay on your small tile and use your craft knife to cut out 2 each of 3 different size long leaf type shapes a shown.
Place the sheet of clay on your small tile and use your craft knife to cut out 2 each of 3 different size long leaf type shapes a shown.

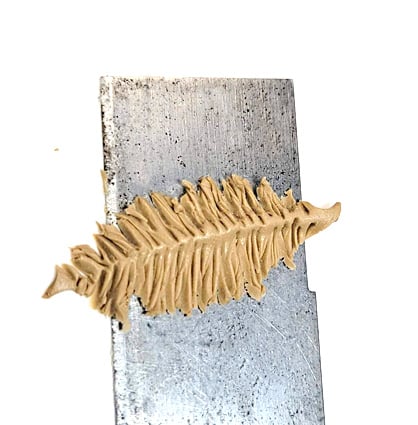
Roll a tiny snake of the Latte clay and place it under the largest leaf shape. It doesn’t have to be exactly in the center – in fact the final leaf will look more natural if it isn’t!

Use the rubber chisel tool to make tiny lines from the center of the leaf to the edge. These should be placed very close together.
Once you have completed both sides, go back over each side moving the chisel a little more into the raised center vein. The second pass with the tool should help tear some of the fringed pieces or gap the fringed pieces for a more natural look!
Once you have completed both sides, go back over each side moving the chisel a little more into the raised center vein. The second pass with the tool should help tear some of the fringed pieces or gap the fringed pieces for a more natural look!

Gently slide your blade underneath the leaf and place on a small sheet of paper.
Repeat steps 4 and 5 for all your leaves.
Repeat steps 4 and 5 for all your leaves.
Sheet out a small piece of the Sedona clay on a middle setting and use the largest teardrop cutter to cut out your earring back.
I LIGHTLY placed my smallest leaf on the left, then I placed my longest piece towards the center and finally my medium leaf on the right.
You can gently lift the tops of the leaves to curve them slightly before you press more into place.
I LIGHTLY placed my smallest leaf on the left, then I placed my longest piece towards the center and finally my medium leaf on the right.
You can gently lift the tops of the leaves to curve them slightly before you press more into place.
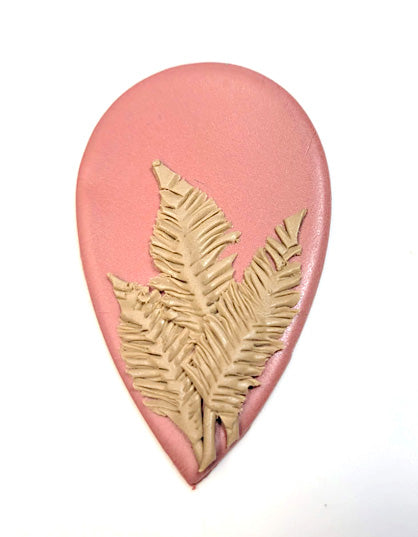
Repeat step 6 but reverse the positions of the small and medium leaves. They are not going to be exactly the same, but THAT’S NATURE!
Use your needle tool to place the holes for hanging. (I drill my holes after baking, but I digitally add the holes for your reference). Set aside to build the top of the earrings now.
Use your needle tool to place the holes for hanging. (I drill my holes after baking, but I digitally add the holes for your reference). Set aside to build the top of the earrings now.

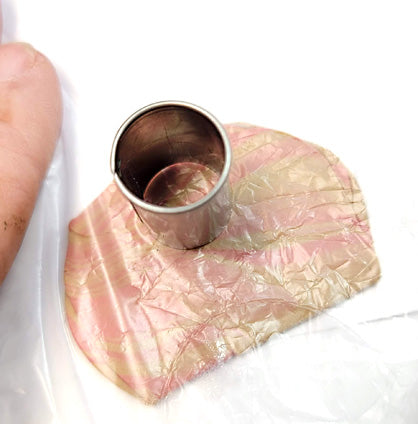
Chop up a small section of your remaining Latte and Sedona and mix together. Once the clay is mixed, chop it again and remix!

Place the mixed bits on a small piece of patty paper or clean white paper and cover with another sheet. I like to use a coffee tamper for this but and smooth roundish surface (or even an acrylic roller) will work. Just push straight down on the clay and repeat all across the chopped clay. We want to press it down to about the same thickness as the widest setting on our clay machine.

Gently peel the paper off and use the circle cutter from the Geometric Mini Cutter set to cut out two circles for the top of the earring post.
NOTE: I have a sheet of deli paper over my clay so that when I press the cutter into the clay, it will gently round the corners of the clay in this photo. I opted to NOT use the paper and just cut out the circles instead.
NOTE: I have a sheet of deli paper over my clay so that when I press the cutter into the clay, it will gently round the corners of the clay in this photo. I opted to NOT use the paper and just cut out the circles instead.
Use the smallest cutter in the Sculpey Nested Circle Cutters (3/4-inch circle cutter) to cut out 2 circles from a sheet of Sedona clay (sheeted on a middle setting on the clay machine).

Use a large needle tool to put several holes through the 3 stacked layers of cardboard.
Push the post through the Sedona circle of clay and drop the post into one of the holes in the cardboard.
Add a small dot of Sculpey Clay Adhesive (or any color of Liquid Sculpey!) about the size of the post as shown.
Gently press your smaller circle in position on top of the post. Then use your needle tool to add the hole for assembling the final earrings.

Place the cardboard with the posts onto your baking surface with your completed teardrop earrings and bake according to the directions in Step 1 above. Allow the clay to cool.
Assembly is simple! Just add your gold-toned jump ring to connect the two pieces and your post back!
Assembly is simple! Just add your gold-toned jump ring to connect the two pieces and your post back!

Here is a look at my final earrings.

- Choosing a selection results in a full page refresh.
- Opens in a new window.