Skip to product information
1 of 1

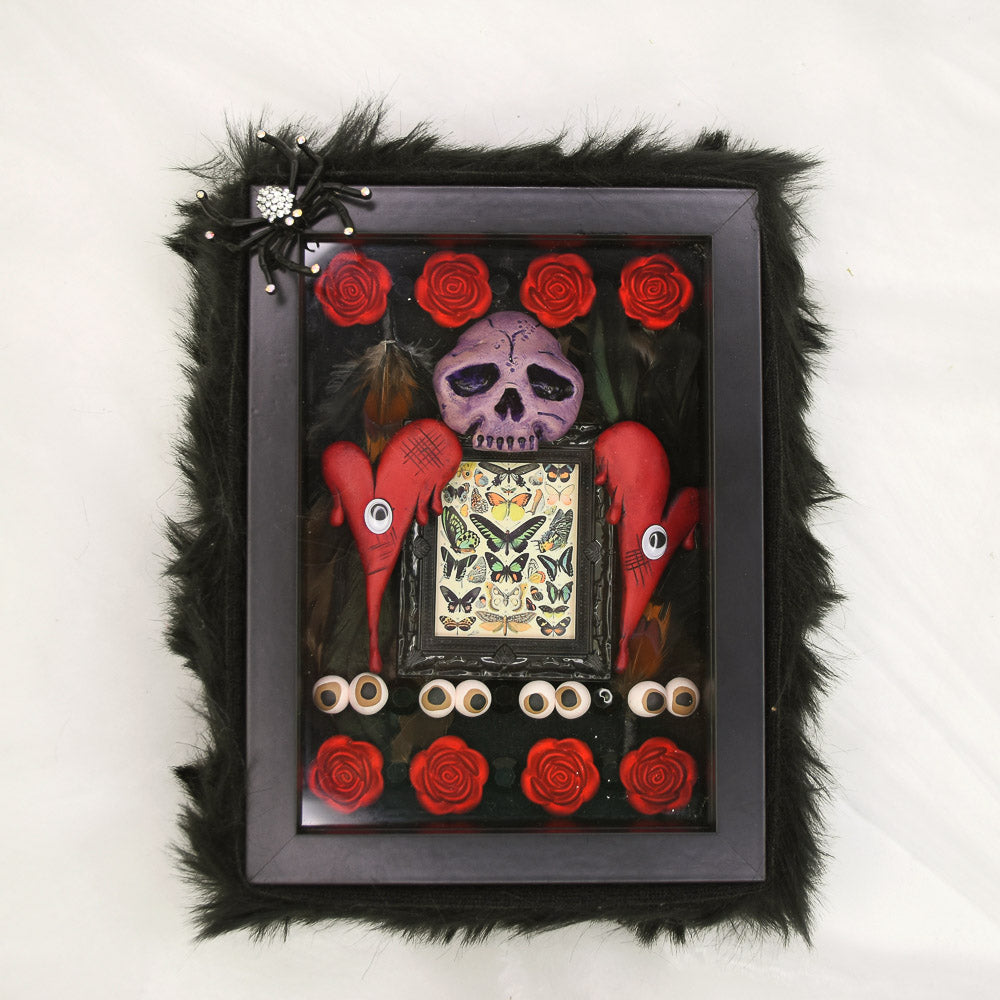
Sculpey Soufflé™ Halloween Shrine Box

Sculpey Soufflé™ Halloween Shrine Box

Designed by Amy Koranek
Read More
Fill your shadow box display with some handmade items along with other found objects. Creepy good fun! COMPLETION TIME: 2 Hours to make, bake, arrange, and assemble. Some extra time needed for stains and glue to dry.
Read Less
ADDITIONAL SUPPLIES
  • Dark colored acrylic paint to be used as stain. I used Dioxazine Purple. Black or Brown will work well too,
  • Paintbrush
  • Water basin
  • Small shadow box - mine is about 5” x 7” and came with a deep frame and black felt lined backing,
  • Feathers
  • Black faceted crystals (9)
  • Google eyes (2)
  • Rose beads (8)
  • Silicone glue
  • Hot glue
  • Faux fur
View full details
Project Instructions

Step 1

Getting Started:

Please make sure your work area is covered and you are not working on an unprotected surface. We recommend working on the Sculpey® Oven Safe Work Mat, wax paper, metal baking sheet, or disposable foil. Uncured clay may damage unprotected furniture or finished surfaces. Be sure to cover your crafting area appropriately.

Start with clean hands, unwrap and knead clay until soft and smooth, or condition by running clay though a Pasta Machine. We recommend using a designated machine for clay purposes only. When working with multiple colors, clean hands with soap and
water or baby wipes (we have found that baby wipes work best) before switching colors. Shape clay, pressing pieces firmly together.  Wash hands after use.

 Baking (also called Curing:)

Begin by preheating oven to 275 °F (130 °C). After you are done creating; for best results bake clay on an oven-proof surface such as metal, aluminum foil, an index card or the Sculpey® Oven Safe Work Mat at 275°F (130 °C) for 30 minutes per ¼" (6
mm) of thickness according to package directions. Oven safe glass or ceramic
surfaces are also acceptable for baking; however please note that the baking times may take longer as the glass or ceramic surfaces take longer to heat up. For best baking results, use an oven thermometer. DO NOT USE MICROWAVE OVEN. DO NOT
EXCEED THE ABOVE TEMPERATURE OR RECOMMENDED BAKING TIME.

Step 2

First lay out some of your found elements to see how much room you will have in your shadow box to fill in with clay pieces. This is the background of my shadow box frame which came finished with black felt. I’m sampling how it might look with this little pre-made frame, feathers, and red rose beads.

I have decided that along with this layout I will be making a clay skull, bleeding hearts, and eyeballs.

Skip ahead to the end to see how mine turned out as a guideline for what you may need and want for your shadow box.

Step 2

Step 3

Start by making the skull first. From 1/4 bar Almond Rose, make an egg shape that is flat on the back.

Step 3

Step 4

Use your fingers to pull down an elongated chin.

Step 4

Step 5

Use your fingers to flatten the chin.

Step 5

Step 6

Flatten out the face area to make the cheeks wider.

Step 6

Step 7

Use the 6 mm Ball Tool to push in eye sockets.

Step 7

Step 8

Use a tool to push up creases between the chin and the cheeks.

Also shape the forehead by pushing it up a bit higher.

Keep shaping the eyes with the Ball Tools so they are deep and form a heavy brow.

Step 8

Step 9

Use the Blunt Point Tool from the Clay Tool Starter Set to push in and pull up two nostrils that meet at the top like an upside-down heart shape.

Step 9

Step 10

Cut off the bottom of the chin and smooth the cut area with fingertips.

Shape the forehead with fingertips.

Step 10

Step 11

Use the 2 mm Ball Tool to make impressions across the mouth mimicking the look of teeth.

Step 11

Step 12

Use a Needle Tool to scribe in some scratches in the skull. Use the 2 mm Ball Tool to make some divots. Set the skull aside to bake later.

Step 12

Step 13

For the bleeding hearts use 1/4 bar Cherry Pie. Divide this amount in half to make two hearts. For each heart, divide the 1/8 bar amount into a large lobe that is 2/3 and a small lobe that is 1/3.

Step 13

Step 14

Shape the lobes into long skinny teardrops.

Step 14

Step 15

Push the lobes together.

Step 15

Step 16

Flatten the lobes to the work surface with fingers and smooth the seam down the middle. Pull the point long and skinny.

Step 16

Step 17

Now make little tiny teardrops of blood from more Cherry Pie.
Attach these to the heart like they are dripping. Smooth all seams with fingertips where the drips attach to the hearts.

Step 17

Step 18

Use a Clay Blade to score hash marks in the heart.

Step 18

Step 19

Impress a google eye into the heart enough to make a mark where it will go after baking.

Step 19

Step 20

Remove the google eye because it cannot go into the oven.

Step 20

Step 21

Make another bleeding heart that is flipped the opposite direction. Set the hearts aside to bake later.

Step 21

Step 22

Now make some wonky eyeballs. I used 1/8 bar Igloo and divided it into 8 equal pieces for eyeballs. Note that I didn’t bother to clean my hands between colors so the pinkness adds a bit of bloodshot look to the eyeballs.

Step 22

Step 23

Make flat Latte irises and push them onto the eyeballs. I intentionally make mine imperfect.

Step 23

Step 24

Push imperfect pupils onto each eye in Poppyseed. Push the eyes together in pairs. Bake the eyes in stuck together pairs.

Bake the skull and bleeding hearts as well following the baking instructions for Sculpey
Soufflé™. Allow to cool completely before handling.

Step 24

Step 25

After the pieces have cooled, add stain to the bleeding hearts and the skull. Stain just one item at a time so that the paint doesn’t get too dry on each one. Cover a piece in the dark paint. Then use paper towels to remove as much as you like.

Step 25

Step 26

Here is how the skull and hearts look with the stain. I left my eyeballs unstained. Make sure the paint is dry before continuing.

Step 26

Step 27

Glue the google eyes onto the hearts with silicone glue.

Step 27

Step 28

Now for the shadow box assembly. Here is my final layout. I decided to use only 4 of the rose shaped beads at the top and the bottom to make sure the backer would fit back into the frame. Glue these elements in place with hot glue.

Step 28

Step 29

Finally glue the clay pieces in place with either hot glue or silicone glue. Generally silicone glue holds clay pieces best. However some of my pieces are actually angled over other elements and the best way to get this to hold in place quickly was with hot glue.

Step 29

Step 30

Put the frame back together. Trim the outside of the frame with faux fur using hot glue to attach it.

Step 30

Step 31

For the corner detail I’m gluing on a spider brooch. I cut the pin bar off of the back of the brooch with wire cutters. Make sure all glue is dry before displaying your collection.

Step 31