

Sculpey Premo™ Mirror Moon Phase Wall Hanging
Sculpey Premo™ Mirror Moon Phase Wall Hanging
Designed by syndee holt
Read More
Read Less
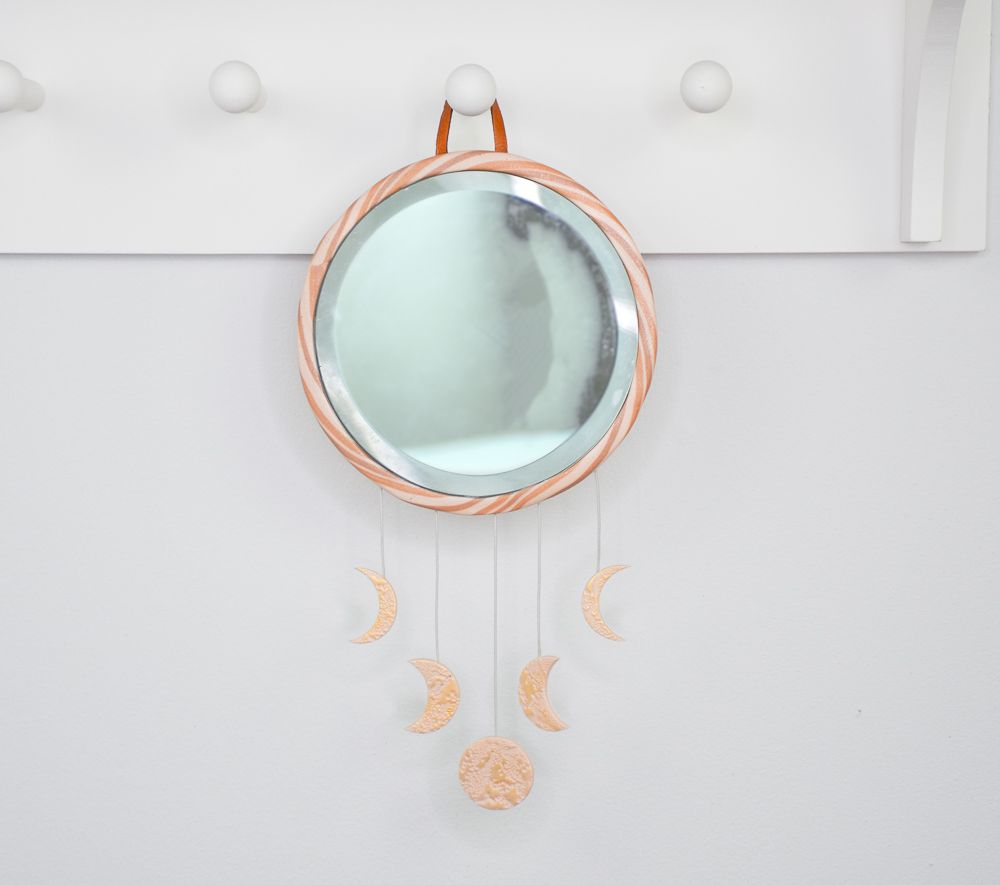
Premo™ Champagne Pearl brings the ethereal light and sparkle to this gorgeous mirror frame featuring hanging moon phases.TIME TO COMPLETION:50 minutes to make/assemble and 30 minutes to bake/cure
ADDITIONAL SUPPLIES
- 5 inch round unmounted mirror (I found mine in the candle section of the craft store!)
- Random texture stamp or piece of sandpaper to texture the moons
- Small spray bottle of water
- Cording to hang your moon phases (about a yard will be plenty)
- Small piece (about 5 inches) of leather cording for the hanger
- Epoxy glue (I’m using Goop for Plumbing)
- Couple toothpicks
- Craft knife (like Exacto)
- Plastic wrap or Deli wrap
- Optional: sheet of craft foam in beige color to make a final backing
- Optional: Gold mica powder for the moons (I’m using Pearl Ex brand)
- Optional: graphing paper, reference photo for moon phases (search Google images for moon phases)
Project Instructions
Step 1
- Getting Started:
Start with clean hands, unwrap and knead clay until soft and smooth, or condition by running clay though a Pasta Machine. We recommend using a designated machine for clay purposes only. When working with multiple colors, clean hands with soap and water or baby wipes (we have found that baby wipes work best) before switching colors. Shape clay, pressing pieces firmly together. Wash hands after use.
- Baking (also called Curing):
Step 2
Condition and sheet out a small piece of the Premo™ Champagne Pearl on a medium setting on your clay conditioning machine.Lightly spray your chosen texture and press the clay against the texture. (My stamp is a Judikins stamp available from CreateAlong).

Step 3
Use the 1.25 inch cutter to cut out 5 circles, then use the same cutter to cut into 4 of the circles for the phases. Notice that I’m using the graphing paper to help me cut the matching pairs!
Step 4
I wanted to add a warm glow to the moon pieces, so I rubbed each one with a little gold mica powder. I chose gold instead of silver because I wanted to enhance the warm glow of the Champagne Pearl.Set the completed moon phases aside for now.

Step 5
I wanted the brown tones to play a very minor role in the marble, so I add just a tiny bit to these 1x1 inch plugs of conditioned Champagne Pearl. Start with less and add more as you condition to get the tones that are perfect for you!
Step 6
How gorgeous are these mixes? Sort of hot cocoa and a mocha color, right?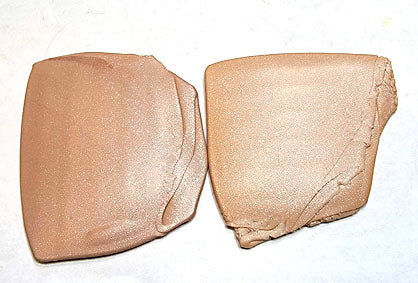
Step 7
Again, less is more, so you can see in this photo that I have a plug of Champagne Pearl that is 3 inches long and 1 inch wide and just 2 little snakes of each of my blended colors from Step 6 attached to it.
Step 8
Make a clean, clear area for you to roll out a length long enough for the mirror (my math told me about 16 inches would be a comfortable length). Twist the plug slightly and start to lengthen by rolling it on your worksurface, occasionally stopping to twist the colors .I rolled my length out so that the marbled clay was a little less than 1 cm in width – about the width of a colored pencil or pen barrel. Let the clay rest.

While the marbled clay was resting, I used the scraps left to create a thin layer for a backing. Notice that I’m cutting this layer just a little larger than the mirror. This will be where the marbled clay will partially rest.

Add a small amount of the Sculpey Oven Bake Adhesive along this clay edge using a toothpick.

I’ve moved my mirror onto a sheet of thin plastic so I can easily rotate the plastic to add the twisted clay.
Cut the clay ends at an angle (taking care not to cut through the back sheet if you can!) and smooth the edges with your finger.
Cut the clay ends at an angle (taking care not to cut through the back sheet if you can!) and smooth the edges with your finger.

Place another sheet of plastic wrap on top of the mirror and use your fingers to gently press down on the marbled cord to start to flatten it and press it against the backing.

Use the acrylic roller to continue to flatten and smooth the twisted clay. It does NOT have to become level with the mirror though!
Carefully move the mirror and the moon phases onto your baking tray (remove the plastic wrap). Take a moment to clean the mirror surface with a Baby Wipe or damp towel and bake/cure the clay as directed in Step 1 above. Allow to cool completely in the oven.
Carefully move the mirror and the moon phases onto your baking tray (remove the plastic wrap). Take a moment to clean the mirror surface with a Baby Wipe or damp towel and bake/cure the clay as directed in Step 1 above. Allow to cool completely in the oven.

Once the clay has baked and cooled, you can use a toothpick to glue the cording to the backs of the moon phases and allow the glue to dry. I used about 10 inch pieces on each.
While the glue was drying on the moon backs. I took a pen (or pencil would work) to measure and draw the center line on the clay covered mirror back. That would be where I positioned my full moon and worked out to each edge. (I’m using lined paper to help me make sure that the moons are level.)
I glued my cords carefully in place about 2 inches inside the back.

I opted for a shorter leather loop for the top to hang the mirror, and I also glued that into place.
Let all the glued pieces dry thoroughly before the next step
Let all the glued pieces dry thoroughly before the next step

Once the glues are dry you can trim an excess cording from the moons. I still thought the back was a little messy, so I got a sheet of crafting foam and traced around the mirror. Then I cut just inside the trace so that the piece was slightly smaller. I added glue to the edges and carefully positioned it. MAKE SURE TO PULL YOUR CORDS INTO POSITION! I haven’t done this yet in this staged photo.
Allow the backing glue to dry and you are ready to hang your new wall decoration!
Allow the backing glue to dry and you are ready to hang your new wall decoration!