

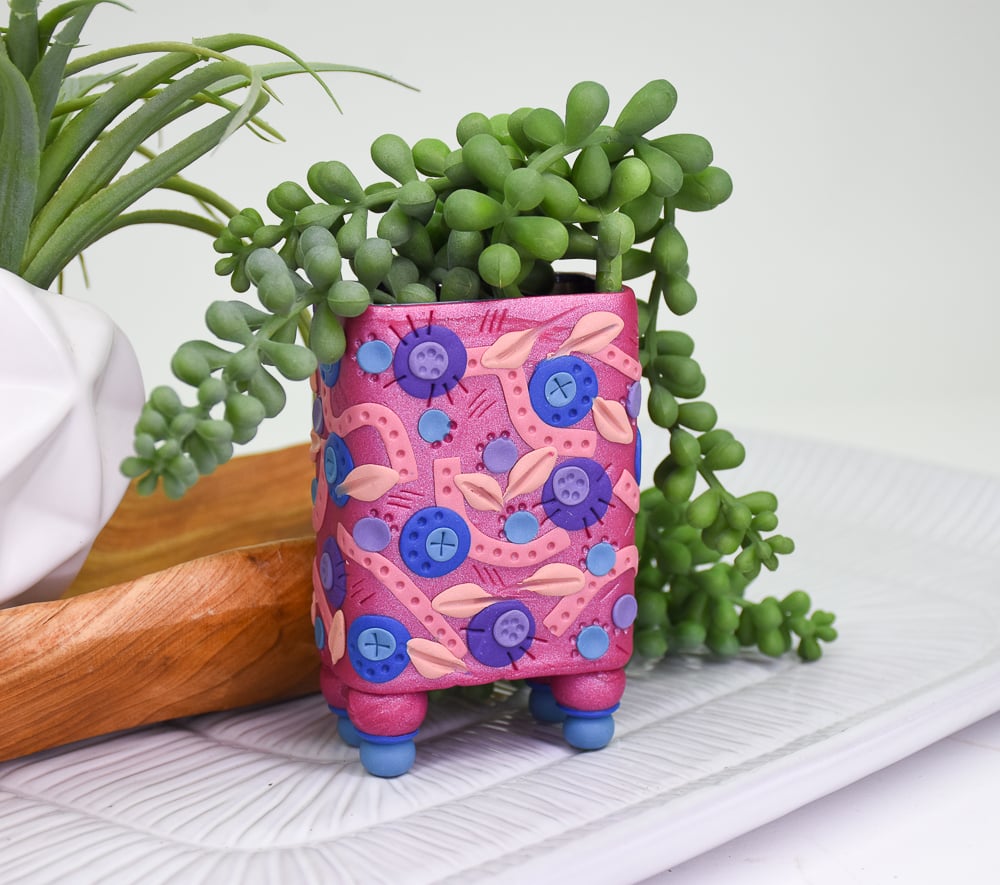
Sculpey Premo™ Footed Planter Box
Sculpey Premo™ Footed Planter Box
Designed by Amy Koranek
Read More
Little pots like these are easy to construct from recycled boxes and cans. Just poke holes in the bottom for some drainage if you Inter to use as a planter. They also make great little display vessels for air plants which don’t require any dirt.COMPLETION TIME:
60 Minutes to make and bake.
Read Less
ADDITIONAL SUPPLIES
- Small clean recycled box - I used a small spice box that originally had a plastic lid - this box is approximately 3” Tall X 2.5” Wide X 1” Deep
- Flat nose pliers
- Hammer
- Heavy duty needle tool, awl, or small nail
Project Instructions
- Getting Started:
Start with clean hands, unwrap and knead clay until soft and smooth, or condition by running clay though a Pasta Machine. We recommend using a designated machine for clay purposes only. When working with multiple colors, clean hands with soap and water or baby wipes (we have found that baby wipes work best) before switching colors. Shape clay, pressing pieces firmly together. Wash hands after use.
- Baking (also called Curing):
First prepare the box by making sure it’s clean and dry. Remove the lid with flat nose pliers or carefully pry it off.
Then pierce a few drainage holes in the bottom with a heavy needle tool, awl, or nail and a hammer. This design also makes a cute desk top organizer.
Then pierce a few drainage holes in the bottom with a heavy needle tool, awl, or nail and a hammer. This design also makes a cute desk top organizer.

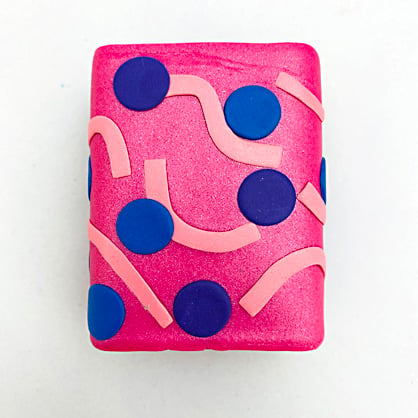
The method for creating this design will be to cover the box with a wrap of clay. Then we will decorate the background with a slab style design. That way we only create what we need for the project without creating a lot of scrap slab.
No adhesive is needed between the box and the clay.
Roll or sheet 1 bar Premo™ Berry Pearl to a little less than 1/8” thick sheet that will be a good shape to wrap the little box in. You can use the Acrylic Clay Roller or a pasta machine on the second thickest setting.
Starting with the bottom first, place a thin layer of the sheeted Berry Pearl on the bottom. Use fingertips to smooth it into place following whatever seams your box may have. Poke the holes through the clay that we pierced into the metal in Step 2.

Wrap the remaining sheet of Berry Pearl around the outside of the box. Cut straight edges for the seams and smooth the seam with fingertips.
Trim the top and bottom edges with the Clay Blade. Smooth the seam between the sides and the bottom with fingertips.
Trim the top and bottom edges with the Clay Blade. Smooth the seam between the sides and the bottom with fingertips.

Mix custom colors as follows using small equal amounts:
Berry Pearl + Ecru 1:1 = Berry Ecru
Midnight Blue + Ecru 1:1 = Blue Ecru
Royalty + Ecru 1:1 = Purple Ecru
Berry Ecru + Ecru 1:1 = Light Berry Ecru
Sheet Berry Ecru to a thin sheet about 1/16” thick.
Use the Clay Blade to cut narrow strips about 1/8” wide by 1.25” long.
Berry Pearl + Ecru 1:1 = Berry Ecru
Midnight Blue + Ecru 1:1 = Blue Ecru
Royalty + Ecru 1:1 = Purple Ecru
Berry Ecru + Ecru 1:1 = Light Berry Ecru
Sheet Berry Ecru to a thin sheet about 1/16” thick.
Use the Clay Blade to cut narrow strips about 1/8” wide by 1.25” long.

Bend the strips in a random pattern around the box pressing them flat to the background.

Make very thin sheets of both Midnight Blue and Royalty. Cut out 1/2” circles from both colors. Press them flat randomly to the background.
Make some small flat circles of Blue Ecru and Purple Ecru by hand (custom colors from Step 5). Press them into the centers of the darker circles.
Push a divot into each one with the 6 mm Ball Tool.
Push a divot into each one with the 6 mm Ball Tool.

Place more Blue Ecru and Purple Ecru dots randomly on the design and divot these as well.
Make small flat teardrop shapes from the Light Berry Ecru (custom color from Step 5).
Press these randomly to the pattern.
Make small flat teardrop shapes from the Light Berry Ecru (custom color from Step 5).
Press these randomly to the pattern.

Score each leaf shape with the Needle Tool.

Now go crazy and use your tool tips to really elevate the design with texture. It’s a good idea to be consistent with your marks so it doesn’t look too wild but still looks random.
If you put Blunt Point dots in one of the Berry Ecru ribbons, then repeat that pattern in every Berry Ecru ribbon.
If you put Chisel Point X’s in the center of the Blue Ecru dots, then do that consistently.
Finally score some cool markings in the background as well.
If you put Blunt Point dots in one of the Berry Ecru ribbons, then repeat that pattern in every Berry Ecru ribbon.
If you put Chisel Point X’s in the center of the Blue Ecru dots, then do that consistently.
Finally score some cool markings in the background as well.

Next let’s build some little feet for our planter. Make four equal sized Berry Pearl balls - 1/2” in diameter and press one onto each corner of the bottom of the box.

Make four very flat discs of Midnight Blue and press those on next.

Turn the box upside down and very carefully push divots into the bottom of each ball. This will create a little well for the final balls to snug into.

Make 3/8” balls of Blue Ecru and place them into the divots.

Really carefully stand the box upright on its new legs and make sure it stands squarely on its own. Make whatever adjustments needed to keep it standing upright.
Bake following the baking instructions for Sculpey Premo™ and allow to cool completely before handling.
Bake following the baking instructions for Sculpey Premo™ and allow to cool completely before handling.

- Choosing a selection results in a full page refresh.
- Opens in a new window.