

Sculpey Premo™ Delicate Charm Bracelet
Sculpey Premo™ Delicate Charm Bracelet
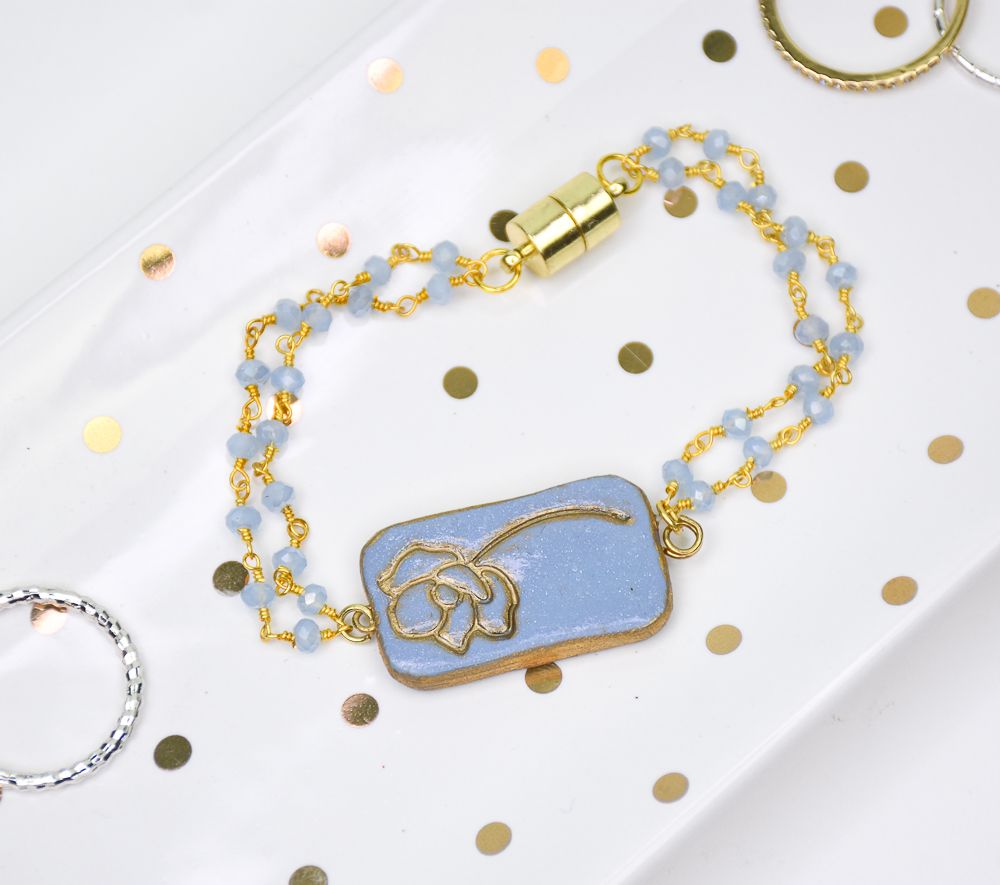
Designed by Amy Koranek
Read More
Read Less
This little bracelet will feel at home on your wrist at work or play! The soft color tone of the Sculpey Premo™ Ice Blue Pearl is an interesting twist on a neutral. COMPLETION TIME: 90 Minutes to make, bake, and assemble
ADDITIONAL SUPPLIES
- 2” Gold tone eye pin
- Delicate flower stamp
- Gold paint marker
- Coarse sandpaper or rubber stair tread
- 12” Coordinating beaded chain
- Gold tone magnetic clasp
- 4 mm Gold tone jump rings (2)
- Flat nose pliers
- Round nose pliers
- Wire cutters
- Paintbrush
Project Instructions
Step 1
- Getting Started:
Start with clean hands, unwrap and knead clay until soft and smooth, or condition by running clay though a Pasta Machine. We recommend using a designated machine for clay purposes only. When working with multiple colors, clean hands with soap and water or baby wipes (we have found that baby wipes work best) before switching colors. Shape clay, pressing pieces firmly together. Wash hands after use.
- Baking (also called Curing):
Step 2
Make a thin sheet of Ice Blue Pearl, about 1/16” thick and cut two pieces to 3/4” x 1.5”.
Step 3
Embed the eye pin in one of the pieces of clay with the eye barely sticking out of one end.
Step 4
Sandwich the eye pin in place with the second piece of clay.
Step 5
Carefully, trim the corners with the Clay Blade and smooth them with your fingertips to make rounded corners.
Step 6
Texture just one side of the clay with either coarse sandpaper or rubber stair tread.
Step 7
Place a layer of gold paint from the paint marker onto the texture stamp.
Step 8
Place the textured side of the clay rectangle back on the sandpaper of stair tread.Push the stamp on top of the clay. Carefully push the stamp into the clay to impress it.

Step 9
Carefully remove the stamp from the clay.The stamp can be cleaned with rubbing alcohol.

Step 10
Paint the edges of the clay piece with the paint marker.
Step 11
Bake the clay piece following the baking instructions for Sculpey Premo™.Allow to cool completely before handling.
Use the wire cutters to trim the tail of the eye pin leaving a 3/8” tail.
Use the round nose pliers to curl an eye into the tail pin tightly to the clay.

Step 12
Paint a thin layer of Sculpey® Satin Glaze on the surface of the clay with a paintbrush.Allow the glaze to dry completely.
Layout the assembly of the bracelet.
You can use wire cutters to cut the beaded chain between the glass beads.
Here I have 1/2 of the magnetic clasp, a 4 mm jump ring, two 3” strands of beaded chain, another 4 mm jump ring, the clay piece and then the exact same layout on the opposite side.

Step 13
Connect the clay piece to two pieces of crystal chain with 4 mm jump rings on both sides of the clay piece.
Step 14
Connect both crystal chains to the magnetic clasp with a 4 mm jump ring.
Step 15
Repeat the connection on the other side of the clay piece.The bracelet can be easily worn with the magnetic clasp as shown.
