

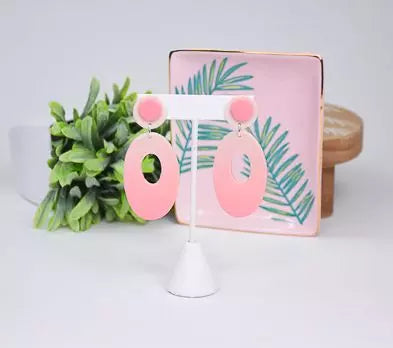
Sculpey Premo™ Champagne Pearl Skinner Blended Earrings
Sculpey Premo™ Champagne Pearl Skinner Blended Earrings
Designed by syndee holt
Read More
Read Less
This project is a Sculpey team effort using Sculpey Premo™ Champagne Pearl and Sculpey Soufflé™ Guava to create this great Skinner blend that almost mimics a final glimpse of a sunset on a Summer afternoon.TIME TO COMPLETION: 30 minutes to make/assemble, 30 minutes to bake
ADDITIONAL SUPPLIES
- Cardboard box flap
- Silver-toned jump rings (2)
- Brush for glaze
- Graphing paper (optional)
- Needle tool to place holes for assembly or drill after baking
Project Instructions
Step 1
- Getting Started:
Start with clean hands, unwrap and knead clay until soft and smooth, or condition by running clay though a Pasta Machine. We recommend using a designated machine for clay purposes only. When working with multiple colors, clean hands with soap and water or baby wipes (we have found that baby wipes work best) before switching colors. Shape clay, pressing pieces firmly together. Wash hands after use.
- Baking (also called Curing):
Step 2
On a medium thickness setting on the clay conditioning machine, create a right-angle triangle for each color that is about 2 inches wide at base and 4 or 5 inches in length. Put the triangles together as shown to create a rectangle.
Step 3
Fold the rectangle as shown, matching up the ends of the rectangle. The folded edge will go against the rollers of the clay conditioning machine and one edge against the left edge of the rollers.Roll the sheet through the machine on the same setting on the machine.

Step 4
Fold the sheet in the same manner, matching the edges and repeat this process several times. Always folding the short edge to short edge.
Step 5
You can see how the colors are starting to smoothly blend. A couple more rolls and this blend will be complete!
Step 6
Once you are satisfied with your blend, use the largest of the oval cutters to cut out two ovals.Take care to cut them from the same area of the blend!

Step 7
I prefer to lay my earrings out on graphing paper to make sure that I cut the same areas of each oval using the small oval cutter from the Mini Cutters-Geometric.Artist Tip: Not only do I use the graphing paper, but I stand up to make sure I’ve centered and then press the cutter while standing.

Step 8
This is my favorite way to create the post top of the earring.I cut a cardboard box flap into 3 small pieces and glue just the corners together. Then I punch holes through all the layers using a large needle tool, like an Etch n’ Pearl.
Roll a small amount of each of the original colors out on a medium thin setting. Use the smallest cutter in the Sculpey Round Cutter set (3/4 inch) to cut out the background circle.
Use the small circle cutter in the Sculpey Mini Geometric set to cut out the small top circle of out of the small, thinner Sculpey Soufflé™ Guava sheet.
Press the post through the larger circle (I slightly off-center towards the top to make room for the assembly hole).
Add a small drop of Sculpey Oven Bake Adhesive (or other Liquid Sculpey) to the top of the post and gently press the smaller circle in place.
Repeat for the other post.

Step 9
Use your needle tool to place the holes for assembly and then bake the clay according to the directions in Step 1 above.
Step 10
After the clay has baked and cooled, add a thin layer of Sculpey Gloss Glaze to heighten the pearly glow of the blended colors.
Step 11
Once the glaze is dry, just add your silver-toned jump rings!