

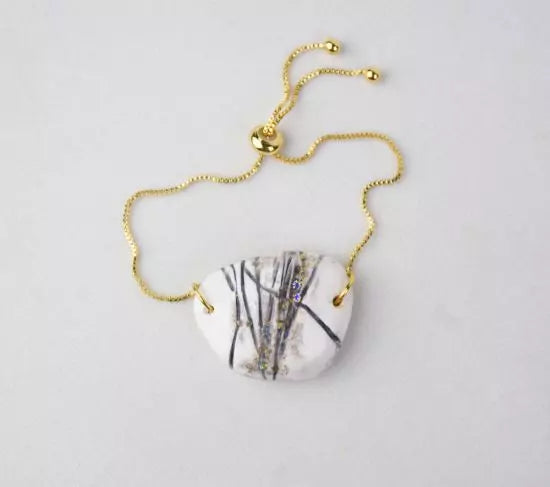
Sculpey Premo™ and Liquid Sculpey® Charcoal Metallic Faux Stone Bracelet
Sculpey Premo™ and Liquid Sculpey® Charcoal Metallic Faux Stone Bracelet
Designed by Amy Koranek
Read More
Read Less
This stunning bracelet will be a great accessory for any color outfit!
DIFFICULTY:
Beginner/Intermediate
DIFFICULTY:
Beginner/Intermediate
ADDITIONAL SUPPLIES
- 91% Rubbing alcohol
- Paper towel
- Chunky gold glitter
- Small sharp scissors
- Adjustable Goldtone chain
- 6mm Goldtone jump rings (2)
- Flat nose pliers
Project Instructions
Step 1
- Getting Started:
Start with clean hands, unwrap and knead clay until soft and smooth, or condition by running clay though a Pasta Machine. We recommend using a designated machine for clay purposes only. When working with multiple colors, clean hands with soap and water or baby wipes (we have found that baby wipes work best) before switching colors. Shape clay, pressing pieces firmly together. Wash hands after use.
- Baking (also called Curing):
- Getting Started with Liquid Sculpey®:
- Baking:
- It is important to use oven thermometer when you bake the liquids so that you can ensure your oven is at the correct temperature.
- Do not microwave the liquids. They must be baked in a Preheated oven at 275 ºF (130 ºC) for liquid colors and 300 ºF (149 ºC) for Clear – Do not exceed baking temperatures.
- If your piece is less than 1/4” bake for 15 minutes. For thicker pieces that are 1/4” or above bake for 30 minutes.
- If your liquid project has become yellowed or discolored in the oven, when you remake it, tent it by placing either – folding an index card in half and placing your project under it by using aluminum foil over your project.
Here’s a tip for baking perfectly in silicone molds. Dampen a dish towel with water and wring out as much of the water as you can. Fold the damp towel so that the molds can sit level on top of it. The damp towel will slow down the curing process so that the LS will cure evenly throughout and avoid warping.
Step 2
From 1/8 bar White Premo™ make an organic shape. Dome the edges and flatten the back on the work surface so it lays nicely. Lay the shape on your wrist to make sure you like the way it lays. Make any shape adjustments that are necessary.
Step 3
Make some scribes across the clay with the Needle Tool.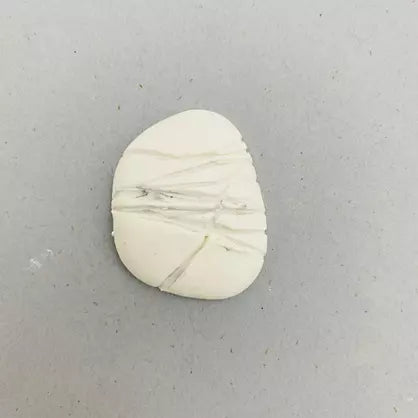
Step 4
Fill in the scribes with Charcoal Metallic Liquid Sculpey® (LS).
Step 5
Fold a paper towel into a thick flat pad. Douse the towel with rubbing alcohol.
Step 6
Wipe the clay with the paper towel to clean up the raised areas and leave LS in the lines.
Step 7
I added a few more scribed lines and repeated Steps 4-6.
Step 8
Tap little bits of chunky gold glitter onto your stone. The glitter will stick to the clay.
Step 9
Decide where you will attach the stone to the bracelet and poke holes for assembly after baking.Bake the bead following the baking instructions for Premo™.
Allow to cool completely before handling.

Step 10
Add a layer of Clear LS and bake again following the baking instructions for LS.Allow to cool completely before handling.
There is a little excess Clear LS that ran off of the surface.

Step 11
The excess can be carefully trimmed away with scissors.
Step 12
Use flat nose pliers to open and close jump rings to assemble the bracelet.
Step 13
Here is a look at the finished bracelet!