

Sculpey III® Octopus Charm
Sculpey III® Octopus Charm
Designed by Amy Koranek
Read More
Read Less
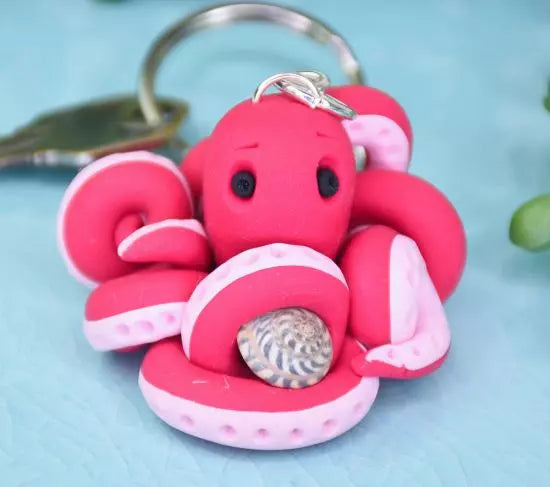
How cute is this lil octopus? Make yourself (or your bestie?) a clever one-of-a-kind key chain in about an hour using this clever tutorial. COMPLETION TIME: 45 Minutes to make, bake, and assemble
ADDITIONAL SUPPLIES
- Scrap paper
- Small seashell
- 8m Silver tone jump ring
- Silver tone split ring
- 2” Silver tone chain
- Flat nose pliers
Project Instructions
Step 1
- Getting Started:
Start with clean hands, unwrap and knead clay until soft and smooth, or condition by running clay though a Pasta Machine. We recommend using a designated machine for clay purposes only. When working with multiple colors, clean hands with soap and water or baby wipes (we have found that baby wipes work best) before switching colors. Shape clay, pressing pieces firmly together. Wash hands after use.
- Baking (also called Curing):
Step 2
To make the octopus, we will use just 1/2 the bar of Berry. Set 1/2 the bar aside for other projects.Divide the remaining 1/2 bar into 1/3 and 2/3.
The 2/3 piece will be used for the eight legs. Divide the 2/3 into two equal pieces and roll each piece into a 2” rope.
Press a thin rope of Ballerina onto each Berry rope.
Roll the Berry striped ropes to 4” long.

Step 3
Cut each rope into four 1” sections so you have eight equal size pieces.
Step 4
Roll a taper in both ends of each piece. From point to point each piece should be 2”-3” long.
Step 5
Place the eight legs on a piece of scrap paper as shown. The scrap paper will make the octopus easy to move around as you work on it.
Step 6
Take the 1/3 piece from Step 2 and shape it into an oval with your hands.Press the head on top of the joint where all the legs meet.

Step 7
Randomly curl the legs all around the body.Tuck a seashell into the curls of the legs and make sure it’s held in place by the legs.

Step 8
Push the jump ring halfway into the top of the head. Pinch the clay around the jump ring trapping it into place.
Step 9
Poke holes in the head for the eyes using the Blunt Point Tool. Push little bits of Black clay into the holes for eyes.Poke holes along each tentacle.
Prick little eyebrows above the eyes with the Knife Tool.
Bake the octopus following the baking instructions for Sculpey III.
Allow to cool completely before handling.

Step 10
Here’s the layout of the pieces needed to assemble the keychain.
Step 11
Assemble the keychain using flat nose pliers to connect the chain to the jump ring in the octopus and to the split key ring.