Skip to product information
1 of 1

Sculpey III® Monochromatic Diorama

Sculpey III® Monochromatic Diorama

Designed by Amy Koranek
Read More
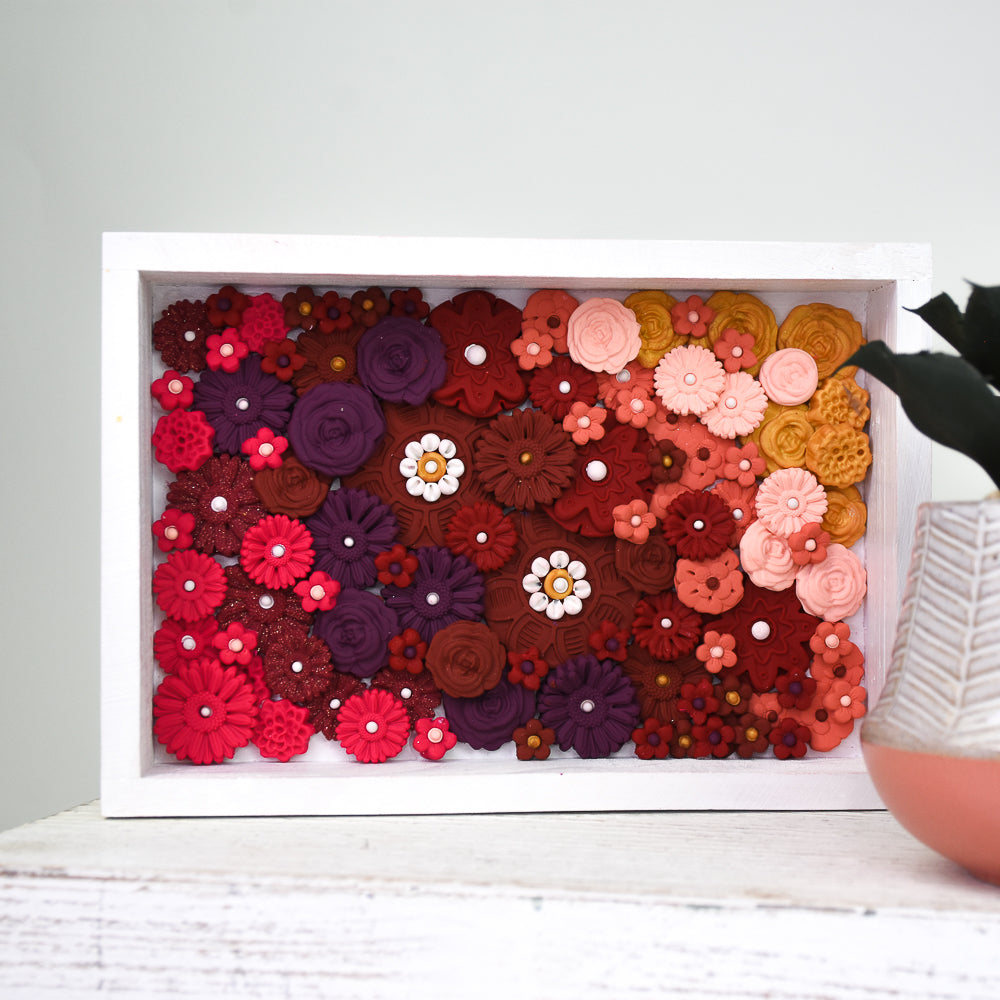
Rainbowed colors are the stars of this gorgeous floral shadowbox diorama! This is perfect to hang on a wall or even stand on a key table so that all can enjoy! COMPLETION TIME: 2.5 Hours to prepare, make, and bake
Read Less
ADDITIONAL SUPPLIES
  • Wooden shadow box frame about 5” x 8” with deep sides
  • 260 Grit sandpaper
  • White acrylic paint
  • Paintbrush
  • Silicone flower shaped molds
View full details
Project Instructions

Step 1

Getting Started:

Please make sure your work area is covered and you are not working on an unprotected surface. We recommend working on the Sculpey® Oven
Safe Work Mat, wax paper, metal baking sheet, or disposable foil. Uncured clay may damage unprotected furniture or finished surfaces. Be sure to cover your crafting area appropriately.

Start with clean hands, unwrap and knead clay until soft and smooth, or condition by running clay though a Pasta Machine. We recommend using a designated machine for clay purposes only. When working with multiple colors, clean hands with soap and water or baby wipes (we have found that baby wipes work best) before switching colors. Shape clay, pressing pieces firmly together.  Wash hands after use.

Baking (also called Curing):

Begin by preheating oven to 275 °F (130 °C). After you are done creating; for best results bake clay on an oven-proof surface such as metal, aluminum foil, an index card or the Sculpey® Oven Safe Work Mat at 275°F (130 °C) for 15 minutes per ¼" (6 mm) of thickness according to package directions. Oven safe glass or ceramic surfaces are also acceptable for baking; however please note that the baking
times may take longer as the glass or ceramic surfaces take longer to heat up. For best baking results, use an oven thermometer. DO NOT USE MICROWAVE OVEN. DO NOT EXCEED THE ABOVE TEMPERATURE OR RECOMMENDED BAKING TIME.

Step 2

Prepare the shadow box by sanding rough areas as needed. Paint
the exterior sides and inside walls with white acrylic paint. Set the box aside to dry while making the flowers.

For the flowers I’m using a couple of different styles of silicone fondant molds for the flowers. The same process is used for creating all the flowers no matter what molds you have.

Make a ball that is generally the size of the flower well to be molded.

Step 4

To release flowers from the mold, just gently flex the mold and the clay will come right out.


Step 5

We are not baking the clay in the mold so that we can use the molds immediately over and over to reproduce multiple flowers.

Step 6

Take your time and make a series of flowers with all the colors of clay except White. Lay them out in the order that you would like to display them in a monochromatic fashion. I have my darkest colors in the middle
which I used with larger flower shapes. To help the flowers blend into each other not just by color but also by shape, I repeated similar shapes throughout the design.

Step 7

Audition how the flowers will arrange in the dried frame. This will help you make sure you have enough flowers to fill the box. Take a photo when you like your layout because next we have to remove them all!

Step 8

Using your photo as a guide, add a dot of White Liquid Sculpey® (LS) to the back of each flower like glue. The LS likes to stick to acrylic paint so this will work perfectly for adhering the photos to the box.

Arrange the flowers following your photo and starting in the middle of the box.

Step 9

When the flowers are installed in the box, we will add centers. The pressure from adding the centers inside the box will allow the flowers to connect well with the box and also with each other.

Here I’ve added Jewelry Gold dots to the center of each flower and seated them with the 6 mm Ball Tool.

Step 10

For smaller flowers, you can seat a pearl detail in the center with the Small Etch ‘n’ Pearl.

Step 11

Add White dots to the centers of larger flowers as well.

Step 12

Keep adding flowers working from the center out. Where there are gaps in base flowers, add a coordinating lump of clay to help attach flowers above.

Step 13

Keep working from the center out layering flowers.

Step 14

Keep adding dots and centers to the flowers while they are in the box to help top flowers connect to base flowers as you go.

Step 15

Keep working adding flowers until the box is filled. Use White
and Jewelry Gold to add centers to dark flowers. Use darker colors to add centers to light colored flowers.

Bake following the baking instructions for Sculpey III® in the box.

Allow to cool completely before handling.