

Sculpey Bake Shop® Self Portrait Necklace
Sculpey Bake Shop® Self Portrait Necklace
Designed by Shelley Kommers
Read More
Read Less
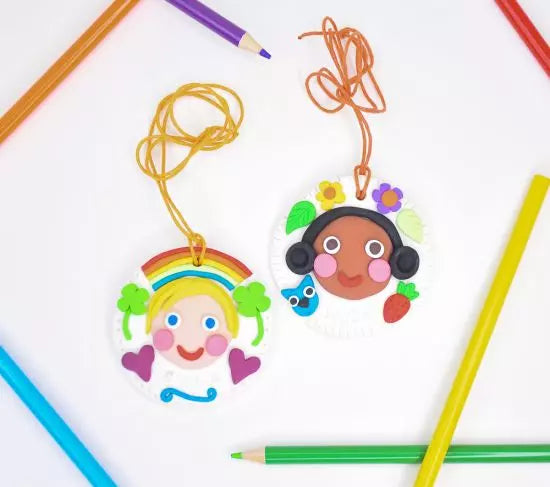
I created a self-portrait necklace of myself for the first day of a sculpture class I was teaching. Not only did my students remember my name right away, but the kids immediately asked if they could make one, too! I begin this lesson by asking about what makes each student unique: what color is their hair, eyes, and skin? What is their favorite food, color, sport, hobby? This project is a great ice breaker on the first day of school or camp, and it’s a super fun “name tag” for teachers!
TIME TO COMPLETION: 30 minutes to make /15 minutes to bakeNOTE: Products can purchased in a BYO class pack set
TIME TO COMPLETION: 30 minutes to make /15 minutes to bakeNOTE: Products can purchased in a BYO class pack set
ADDITIONAL SUPPLIES
- Small letter stamps
- Necklace cording
- Scissors
Project Instructions
Step 1
Getting Started with Sculpey Bake Shop® clays:• Bake at 275 °F (121 °C), 15 minutes per 1/4 inch (6 mm) thickness.
• DO NOT MICROWAVE.
• DO NOT EXCEED THE ABOVE TEMPERATURE OR RECOMMENDED BAKING TIME.
Please make sure your work area is covered and you are not working on an unprotected surface. We recommend working on the Sculpey Tools™ Oven-Safe Work Mat, wax paper, metal baking sheet, or disposable foil. Uncured clay may damage unprotected furniture or finished surfaces. Be sure to cover your crafting area appropriately.
Step 2
Begin with a 1 1/4” ball of white clay, and push down onto work surface, creating a flat, round cookie shape about 2 1/2” in diameter.
Step 3
Using small amounts of beige, brown, yellow, orange, and red clay, have students experiment mixing the colors to achieve a skin color that is close to their own.
Step 4
Once the desired skin color has been mixed, form a 1/2” ball, and push flat on to work surface, creating a round, flat cookie. Place in the center of the white circle.
Step 5
Using small amounts of black, brown, yellow, orange, and red clay (some students might want to mix colors) create hair.Straight hair can be made by rolling clay into long, thin snakes and cutting to desired length with the knife tool; curly hair can be started the same way, then finished by twisting or rolling the snakes into spirals and curls.
Have students experiment with various clay tools to see what types of hair they can create.
Attach hair to head.

Step 6
Make two very tiny balls of white for eyes, and two even tinier balls of color (black, brown, blue, green) for pupils.Attach to face.

Step 7
Create two tiny balls of pink clay, push flat into cookies, and attach as cheeks.Roll out a tiny amount of red clay into thin snake, cut into desired length with the knife tool, curl into a smile, and attach as mouth.

Step 8
Pass out tiny alphabet stamps.Have students carefully stamp their name below their face. (TIP: Encourage students to begin stamping their name further to the left than they think they need to so that name is centered)

Step 9
Pass out different clay colors for students to share.This is for creating small personal details that reflect their personality and interests.
Some ideas:
• natural items, such as flowers, leaves, rainbow, trees, moon, star, sun
• animals such as a cat, dog, snake, bear
• foods, such as pizza, a strawberry, grapes
• hair accessories such as a bow, hat, crown
• colored border around the edge with their favorite color
• hearts, swirls, circles
Attach personal details around the edges of the necklace.

Step 10
Add texture and design elements using various clay tools and create a hole at the top of the necklace for hanging.Make sure the hole is placed about 1/4” from the top of the necklace and is large enough for the cord you’ll be using.
Bake the necklace at 275 °F for 20 minutes and allow necklace to cool completely before handling

Step 11
Cut necklace cording to desired length with scissors.String necklace, and finish with a knot.
