

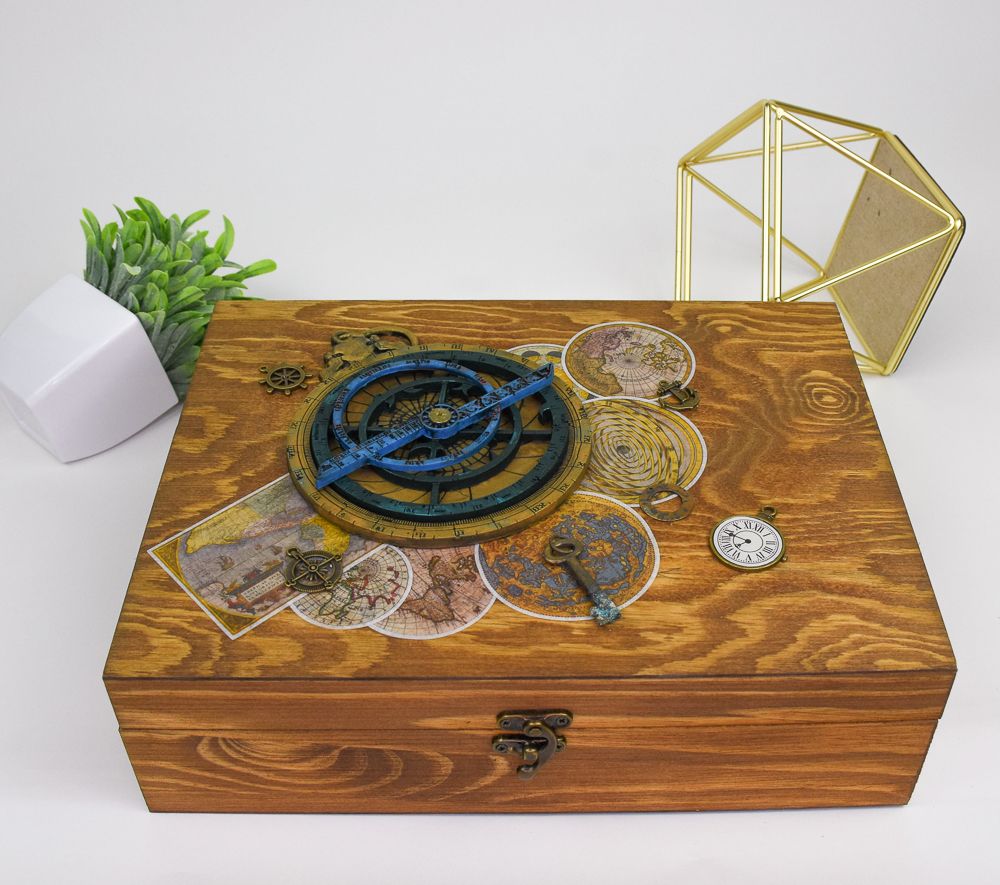
Liquid Sculpey® Mariner’s Jewel Antique Box
Liquid Sculpey® Mariner’s Jewel Antique Box
Designed by syndee holt
Read More
Read Less
Liquid Sculpey® teams up with Zuri Designs Mariner’s Jewel Silicone Mold to create this fantastic “ancient mariner” box.
NOTE: I made a second jewel for myself and every guy that sees it wants it! It would be an excellent addition to a bookshelf just on its own.
Time to create: about 2 hours
NOTE: I made a second jewel for myself and every guy that sees it wants it! It would be an excellent addition to a bookshelf just on its own.
Time to create: about 2 hours
ADDITIONAL SUPPLIES
- Metal baking sheet
- Washcloth – dampened
- Toothpicks
- Bamboo skewers to stir the Liquid Sculpey
- Dark Grey acrylic craft paint and brush
- Paper towels, dampened
- Baby Wipes for cleanup
- Small map stickers (I found these on Amazon)
- Largish unfinished wood box – mine is 12x9 from Amazon (NOTE: you can also used a prefinished box you have on hand since the box is NOT baked!)
- Wood stain, disposable gloves, and a small rag to stain with
- Small brass nautical charms
- Clear Silicone glue or your favorite craft glue
Project Instructions
Step 1
- Getting Started with Liquid Sculpey®:
- Baking:
- It is important to use oven thermometer when you bake the liquids so that you can ensure your oven is at the correct temperature.
- Do not microwave the liquids. They must be baked in a Preheated oven at 275 ºF (130 ºC) for liquid colors and 300 ºF (149 ºC) for Clear – Do not exceed baking temperatures.
- If your piece is less than 1/4” bake for 15 minutes. For thicker pieces that are 1/4” or above bake for 30 minutes.
- If your liquid project has become yellowed or discolored in the oven, when you remake it, tent it by placing either – folding an index card in half and placing your project under it by using aluminum foil over your project.
Here’s a tip for baking perfectly in silicone molds. Dampen a dish towel with water and wring out as much of the water as you can. Fold the damp towel so that the molds can sit level on top of it. The damp towel will slow down the curing process so that the LS will cure evenly throughout and avoid warping.
Step 2
Place Sculpey Work Mat on a metal baking sheet, then place the dampened towel on top of the baking sheet and finally the mold on the very top.Once I had stirred my Liquid Sculpey® Amethyst Pearl, I started to fill the mold, moving the bottle around the mold while squeezing it gently.
Fill all the molds to the top surface.

Step 3
Once my mold is filled with the LS, I use a toothpick to scoop under bubbles and lift them to the surface. I also use the toothpick to “nudge” the LS into fine details of the mold.
Step 4
Use a small piece of flexible plastic, like an old credit card to gently scrape along the top surface of the mold to remove any excess LS. A baby wipe can also be used for larger areas.FILL THE MOLD TO THE TOP SURFACE OF THE MOLD.

Step 5
I filled the smaller mold next with the stirred Liquid Sculpey® Emerald Metallic, again using a toothpick to gently nudge the LS into finer detail areas and to help remove bubbles.Fill the mold to the top surface.
Use your piece of flexible plastic to remove any excess LS.

Step 6
The largest part of the mold needs 2 oz of LS, so I mixed my bottle of Gold LS and Bronze LS together using the mixing cup and the supplied stirrer.NOTE: You can stir both of these colors first and then just gently mix the colors together to get a subtle marbling effect in the mold!
(I had previously measured 2 oz of water into the mixing cup and poured into the mold to see if that would be the correct amount for the mold. Then I thoroughly dried both the cup and the mold.)

Step 7
Pour the mixed LS into the center of the largest mold and use the stirring stick to move the LS into the mold.Fill level with the top surface of the mold and use a toothpick to gently guide the LS into detailed areas of the mold and to remove bubbles.

Step 8
Gently pick up the baking tray about an inch off your worktable and drop it back to the table, keeping the mold as level as possible. This will help move any other bubbles to the top of the mold for you to remove. Repeat a couple of times. (I held my breath the ENTIRE time!)Notice that I have my dampened towel under the mold on the baking tray as described in Step 1 above! I have the silicone baking mat between the tray and the dampened towel.
Place the bake tray in your pre-heated oven (275 degrees) and bake for 30 minutes. Remove the tray and allow the mold to cool to room temperature before de-molding the clay. (this step required a LOT of pacing for me!)

Step 9
While the clay is baking, you can stain your box if needed! I put my box on a trash bag and rubbed the wood stain on with my gloved hands and a small rag.I chose just a stain on the raw wood box to create a more rugged look to the project.
Allow to dry.

Step 10
If you notice any areas where a bubble created a small hole, you can use a needle tool or a toothpick to add some LS into the hole and rebake the molded clay for 10 minutes.I found that small bubble holes added to the authenticity of the ancient look! (YES, I meant to do that! lol)

Step 11
Dab and brush your selected antiquing color of paint onto the mold, pushing the brush into the recessed areas, then wipe the excess paint off with a dampened paper towel.
Step 12
Continue working the paint into the details and removing the excess paint while working in small areas at a time. Allow the paint to dry thoroughly. The detail is AMAZING…
Step 13
Use the same method on Peacock Pearl piece. Allow the piece to dry thoroughly.
Step 14
Lightly rub some of the Venetian Gold paste on the edges and details of the largest piece.
Step 15
Repeat on the other pieces using the Phoenix Blaze on the Peacock Pearl piece and the Venetian Gold on the Emerald Metallic piece.NOTE: I actually used a brush to daub some of the Venetian Gold down into the details of the Emerald Metallic piece for a different look and to highlight the gorgeous color of the LS.

Step 16
Assemble the Mariner’s Jewel with the hardware included with the mold. Set aside for now
Step 17
Glue your map pieces into place.Glue the Mariner’s Jewel into place.
I opted to glue several small brass nautical themed charms as well.
Allow the glue to dry and enjoy!
