Skip to product information
1 of 1

Liquid Sculpey® Marbled Moon Earrings

Liquid Sculpey® Marbled Moon Earrings

Designed by Amy Koranek
Read More
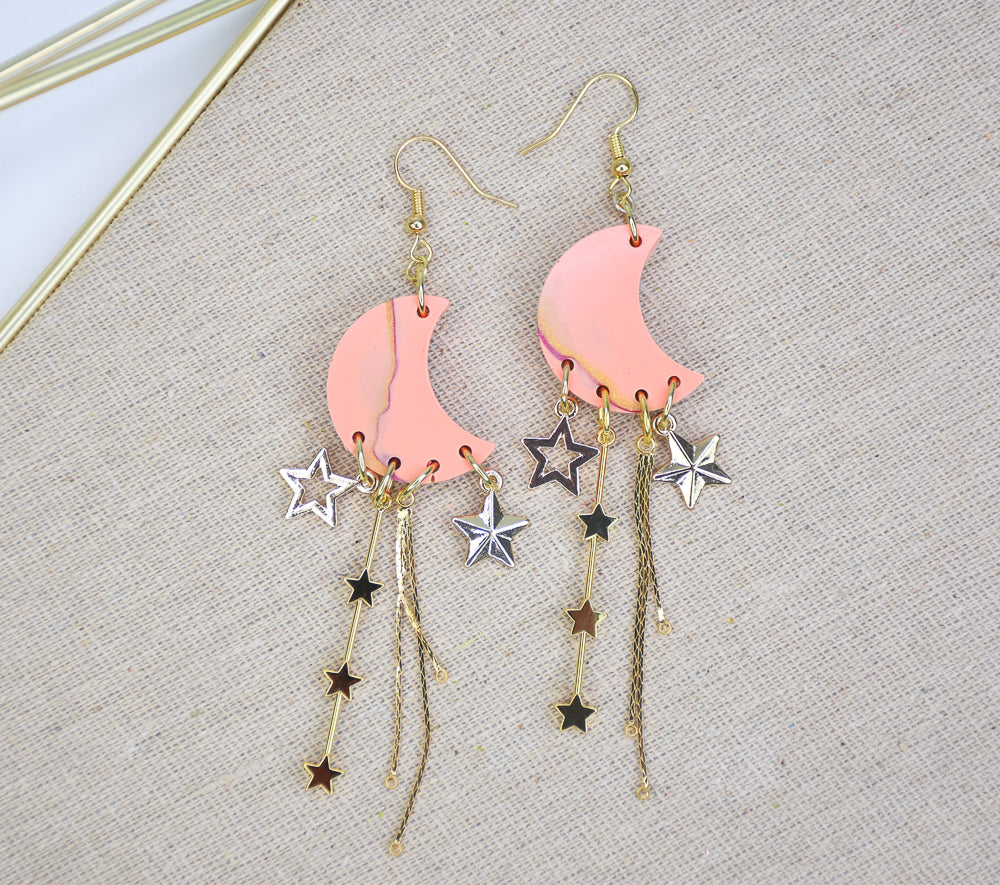
Dynamic colors and celestial shapes combine in these clever earrings to create a one-of-a-kind look that you can create in an hour! TIME TO COMPLETE: 60 Minutes to make, bake, and assemble
Read Less
ADDITIONAL SUPPLIES
  • Paper towel
  • Small silicone baking liner for marbling liquids
  • Silicone moon shaped earring mold
  • Various star themed charms and dangles (8)
  • 6 mm Gold toned jump rings (10)
  • 4 mm Gold toned jump rings (2)
  • Gold tone ear wires (2)
  • Flat nose pliers
View full details
Project Instructions

Step 1

Getting Started with Liquid Sculpey®:

Please make sure your work area is covered and you are not working on an unprotected surface. We recommend working on the Sculpey® Oven Safe Work Mat, wax paper, metal baking sheet, or disposable foil. Uncured Liquid Polymer Clay may damage unprotected furniture or finished surfaces. Be sure to cover your crafting area appropriately.

- Stir Liquid Sculpey® completely. Thin with Sculpey® Liquid Clay Softener as needed

- Wash hands after use (we have found that baby wipes work best)

Baking:

-It is important to use oven
thermometer when you bake the liquids so that you can ensure your oven is at
the correct temperature.

-Do not microwave the liquids. They must be baked in a Preheated oven at 275 ºF (130 ºC) for liquid colors and 300ºF (149 ºC) for Clear – Do not exceed baking temperatures.

-If your piece is less than 1/4” bake for 15 minutes. For thicker pieces that are 1/4” or above bake for 30 minutes.

-If your liquid project has become yellowed or discolored in the oven, when you remake it, tent it by placing either – folding an index card in half and placing your project under it by
using aluminum foil over your project.

Here’s a tip for baking perfectly in silicone molds. Dampen a dish towel
with water and wring out as much of the water as you can. Fold the damp towel
so that the molds can sit level on top of it. The damp towel will slow down the
curing process so that the LS will cure evenly throughout and avoid warping.

Step 2

Add rows of Liquid Sculpey (LS) colors across the bottom of a silicone baking liner. When adding LS to the bottom of the liner, place like color on top of like color to create solid color bands. The liner in this photo is very small. The bottom of the cup is only about the same diameter as a coin quarter.

Step 3

Next, pinch a pour spout in the edge of the liner with your thumb and finger. Hover the pour spout over the mold. We want to dribble the LS slowly into the mold moving from one end of the moon shape to the other. This can be a little tricky as the design we see from the filling side is not the same as the front side. But every design will turn out cool.

Don’t worry about completely filling the moon shape yet. Our goal is just to get the bottom surface covered
so far.

If you run out of marbled colors in the liner, wipe it clean with paper towel, then repeat Step 2 again adding
enough LS to cover the second moon shape.

Step 4

Now that the face of the moons are covered, back fill the wells to level with more LS. At this point it doesn’t matter what color. Tap the mold on the work surface to release air bubbles.

Step 5

Bake the mold following the baking instructions for Liquid Sculpey. You can also bake the silicone liner to peel out the residual LS. Allow the mold to cool completely before flexing it gently to release the pieces.

Step 6

Here’s a rough idea of how I want to lay out the designs.

Step 7

This is the layout including all the necessary jump rings and ear wires.

Step 8

The left one has been assembled using flat nose pliers to open and close jump rings.

Step 9

Here are the completed earrings!