

Sculpey Soufflé™ Ochre Color Block Earrings
Sculpey Soufflé™ Ochre Color Block Earrings
Designed by syndee holt
Read More
Geometric shapes, solid colors and the color combination of Ochre and Latte are all on trend for earrings right now. Adding a small texture to one of the colors adds a visual interest to the bold shapes.
TIME TO COMPLETION: 60 minutes
Read Less
ADDITIONAL SUPPLIES
- Small spray bottle of water
- Small smooth tile
- Craft knife (like Exacto)
- 8mm gold oval jumprings (6)
- Gold-toned ear wires (2)
- Jewelry pliers (2 pair)
- Craft 2 speed heat gun (optional)
- Needle tool for making holes – I like to use my Sculpey Etch n’ Pearls for this!
- Small piece of graphing paper
Project Instructions
- Getting Started:
Start with clean hands, unwrap and knead clay until soft and smooth, or condition by running clay though a Pasta Machine. We recommend using a designated machine for clay purposes only. When working with multiple colors, clean hands with soap and water or baby wipes (we have found that baby wipes work best) before switching colors. Shape clay, pressing pieces firmly together. Wash hands after use.
- Baking:
Roll out about 1/3 to 1/2 of the conditioned Souffle Ochre clay to desired thickness for your earrings – mine are a little over 1/8 inch thick. Place on the smooth tile. Lightly spray the selected texture – I’ve used the Petal texture. Place the texture sheet on the clay and use the acrylic roller to press and roll the texture into the clay sheet.
(NOTE: I like to cut my textures apart so I can repeat the pattern, if necessary)

Remove the center of the largest teardrop from the stencil set on the edge of the pattern and position it on one edge of the pattern. Use the craft knife to slide around the inside of the pattern. Hold the knife loosely and let the pattern drive the blade, not your hand!
Cut two of the teardrops. Slide your clay blade under the entire sheet to lift it from the tile and remove your two teardrops and set aside.
Cut two of the teardrops. Slide your clay blade under the entire sheet to lift it from the tile and remove your two teardrops and set aside.

Cut out two of the medium circles from the set. Set aside.

Roll out a small amount of the conditioned Latte to the same thickness, press lightly to the tile and use the large half circle pattern to cut out two half circles.

Here is a look at my pieces that I have cut out and what I’m planning for design. There are so many design versions you can create from these shapes!

Okay, here is my trick for getting all the holes in the right position so that everything will hang straight! I use a small piece of graphing paper! I line the first piece up and place my holes top and bottom and then I add the second piece just below it, center it and create my holes. I can place all my pieces this way if I wish!
NOTE: I’ve clipped the very tips (about 1/4 inch) from my Etch n’ Pearls so that they fit my travel tool kit. I found that the clipped end makes very nice clean holes on BOTH sides of the clay!
Bake all the pieces according to the directions in Step 1 above.
NOTE: I’ve clipped the very tips (about 1/4 inch) from my Etch n’ Pearls so that they fit my travel tool kit. I found that the clipped end makes very nice clean holes on BOTH sides of the clay!
Bake all the pieces according to the directions in Step 1 above.

My pieces have baked and cooled and you can see I’ve laid out the pieces with the jump rings. That top jump ring is naturally perpendicular to the clay piece, but it also means that the loop in the ear wire is now facing the wrong way for the earrings.
So, I fire up my heat gun and let it preheat a moment, then I gather my jump rings and TWO pairs of pliers. One pair is used to hold the jump ring as shown (stabilizes the actual part that goes into the ear). Then I heat the bottom portion of the ear wire for just a couple of seconds with the heat gun. I immediately use the second pair of pliers to turn that bottom loop 90 degrees. Set the wire down, repeat and allow the wires to cool completely before mounting them to the earrings. Problem SOLVED, as you can see in the ear wire photo, the wire on the right has the loop turned to accept the jump ring correctly.
So, I fire up my heat gun and let it preheat a moment, then I gather my jump rings and TWO pairs of pliers. One pair is used to hold the jump ring as shown (stabilizes the actual part that goes into the ear). Then I heat the bottom portion of the ear wire for just a couple of seconds with the heat gun. I immediately use the second pair of pliers to turn that bottom loop 90 degrees. Set the wire down, repeat and allow the wires to cool completely before mounting them to the earrings. Problem SOLVED, as you can see in the ear wire photo, the wire on the right has the loop turned to accept the jump ring correctly.


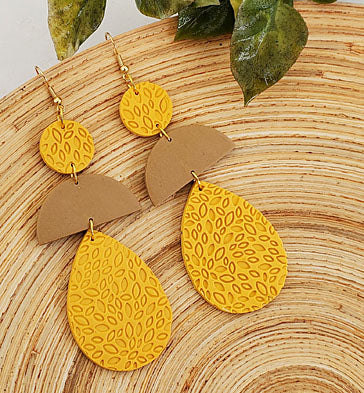
Here is a final look at my finished earrings! See how nicely the ear wire is integrated into design to best show off those amazing colors and designs?

- Choosing a selection results in a full page refresh.
- Opens in a new window.