

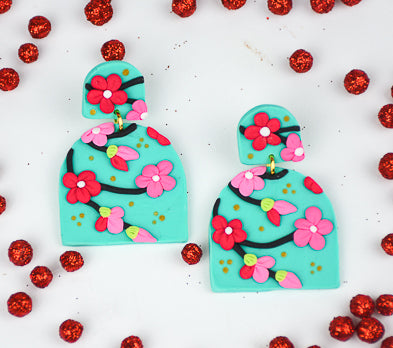
Sculpey Soufflé™ Fiji Floral Slab Earrings
Sculpey Soufflé™ Fiji Floral Slab Earrings
Designed by Phoebe Doehring
Read More
Create some Asian inspired tree blossom earrings that will become a staple in your wardrobes for Spring and Summer in just about an hour.TIME TO COMPLETION: 30 minutes to make 30 minutes to bake.
Read Less
ADDITIONAL SUPPLIES
- Gold Acrylic paint
- Paintbrush or stipple tool
- Gold-toned jump rings (2)
- Gold-toned earring posts (2)
- Jewelry pliers
- Instant glue
Project Instructions
- Getting Started:
Start with clean hands, unwrap and knead clay until soft and smooth, or condition by running clay though a Pasta Machine. We recommend using a designated machine for clay purposes only. When working with multiple colors, clean hands with soap and water or baby wipes (we have found that baby wipes work best) before switching colors. Shape clay, pressing pieces firmly together. Wash hands after use.
- Baking:
Combine a small amount of Igloo Souffle clay with a dime sized amount of Raspberry clay and blend together to make a medium Raspberry shade.
Combine equal dime sized amounts of Igloo and Raspberry to make a Pink shade.
Roll a nickel sized ball of Raspberry clay and set this aside with the other two shades.
Condition a 1/2 block of Fiji clay and run it through your clay machine on the #2 setting. Set this sheet on your work surface so that you can begin to make your floral slab design.
Roll some very thin snakes of Poppy Seed clay.

Create some cherry blossom inspired branches on your sheet of Fiji clay. Create two identical branching stems side by side.

Next roll many tiny balls from each of your 3 Raspberry Pink shades. You will be using these to make little 5 petaled flowers, 3 petaled flowers, and some buds on your branches.

To make the little flowers pinch each ball at one end and flatten a bit. Press 5 little petals together to make a flower. Press flowers along the branches in the different shades of Raspberry Pink. Make some single buds at the ends of a few branches and maybe a few 3 petaled flowers as well.
Roll some tiny balls of Pistachio clay. Pinch one end and press on to the base of each bud and each of the three petaled flowers.
Roll some tiny balls of Pistachio clay. Pinch one end and press on to the base of each bud and each of the three petaled flowers.

Use your 5 in 1 tool and make vertical lines down the center of each flower petal. Make 3 little vertical lines in each Pistachio piece as well.
Roll teeny tiny balls of Igloo clay and press one in the center of each of your 5 petaled flowers.
Roll teeny tiny balls of Igloo clay and press one in the center of each of your 5 petaled flowers.

Your design is complete so now it is time to cut out your earring shapes.
Place your desired stencil shape (1 1/4” dome and 1/2” dome used here) over an area of your floral slab design that looks visually interesting to you. Cut out the shape using your clay knife and cutting along the edge of the stencil. Cut out another of the same shape in the same spot from your matching section on your slab.
Use the matching smaller stencil in the same shape (1/2” dome) and cut out two small shapes from your slab for the top portion of your earrings.
Smooth the edges of your four earring pieces with your fingertip. Use your 5 in 1 tool to make holes at the bottom of each small top portion of the earring and at the top of each lower, bottom portion of the earring. Make sure the holes are large enough to accommodate your Gold jump rings.
Bake earrings according to directions. Allow to cool completely.

Use some Gold acrylic paint and paint some little Gold dots in random areas in the Fiji color portion of the earrings to add an Asian flare. Allow the paint to dry.

Use your jewelry pliers to open the Gold jump rings. Insert the jump ring into the holes to attach the top and bottom pieces together. Close the jump ring with your pliers. Repeat for the other earring.
Turn the earrings over. Put a drop of Super Glue on the back top portion of each earring and glue the Gold earring posts onto the back. Allow to dry.
Turn the earrings over. Put a drop of Super Glue on the back top portion of each earring and glue the Gold earring posts onto the back. Allow to dry.

- Choosing a selection results in a full page refresh.
- Opens in a new window.