

Sculpey Soufflé™ Big Bead Garland
Sculpey Soufflé™ Big Bead Garland
Designed by syndee holt
Read More
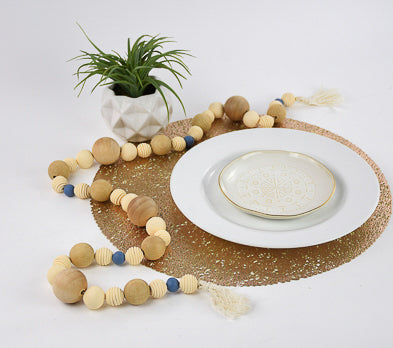
Customize your wooden bead décor by adding your own colors and textures created with Soufflé clay. The Soufflé Ivory is a perfect color to blend with the natural wooden beads that are readily available. The bonus is Soufflé is a lighter clay so you won’t be adding a lot more weight to the final piece.
TIME TO COMPLETION: 90 minutes
Read Less
ADDITIONAL SUPPLIES
Customize your wooden bead décor by adding your own colors and textures created with Soufflé clay. The Soufflé Ivory is a perfect color to blend with the natural wooden beads that are readily available. The bonus is Soufflé is a lighter clay so you won’t be adding a lot more weight to the final piece.
TIME TO COMPLETION: 90 minutes
Project Instructions
- Getting Started:
Start with clean hands, unwrap and knead clay until soft and smooth, or condition by running clay though a Pasta Machine. We recommend using a designated machine for clay purposes only. When working with multiple colors, clean hands with soap and water or baby wipes (we have found that baby wipes work best) before switching colors. Shape clay, pressing pieces firmly together. Wash hands after use.
- Baking:
I like to use the circle cutters to help me measure the correct amount of clay for each bead. Here is my chart for bead size, using the largest circle cutter (2-inch) and conditioned clay sheeted out on the wide setting on the Clay Conditioning Machine.
NOTE: I decided NOT to make the larger size and created my balls with the 1/2 circle of clay (14-16), 1 full circle for the medium balls (8) and 2 circles for the larger balls (4-5). I also used the 1/2 circle of clay to create the simple Bluestone beads and I made 8 of those beads.
Push the measured number of circles into a rough round shape and then roll gently in your CUPPED hands to smooth out and keep round.

To create the coiled beads, I used the smallest (1/2 circle of clay) balls. I created a rope of clay that filled the extruder barrel and used the shape dye that looks like a flower with the multiple circles in it.
Extrude the barrel of clay. Start a coil by curling an end of the coil tightly and add about 3 more wraps before positioning the coil on the bead.
Extrude the barrel of clay. Start a coil by curling an end of the coil tightly and add about 3 more wraps before positioning the coil on the bead.

Place the coil you started on the bead and wrap the rest of the extruded length around the bead to the other end and trim the end to just tuck into the coil. I found this to be quite addicting to make these beads! This will give you a really nice texture to mix into the smoother surface beads in your strand! I made 14-16 of these beads. Set aside for now.


Create your smooth surface beads as directed in Step 2 above. Use the pointed end of the bamboo skewer to gently twist through each bead. I like to keep my finger on the opposite side of the bead so that I can feel the point of the skewer getting close to the opposite side. Then I stop, remove the skewer. There will be a little bump on the opposite side to show you where to insert the skewer and gently twist back through the bead. This will help keep the round shape of the bead for you as well as create smooth holes for stringing.
Make the holes in the coiled beads as well using the start of the coil to be your guide.
I threaded the beads back onto the skewers and used both the metal frame from the bead baking rack and the circle cutters to prop the skewers up off my baking rack. Bake according to the directions in Step 1. NOTE: I baked my beads for an hour. I covered them loosely with aluminum foil to prevent any accidental browning during the long baking time. Allow the beads to cool to warm and then twist them off the skewer.

While the beads were baking, I made my tassels. I use my wire jig to set two pins about 4 inches apart and wrap the thread around the pins several times before wrapping the lead part of the cord around the loops at one end and securing with a knot (a drop of clear instant glue will help secure the knot). Then I cut the loops at the opposite end and make the second tassel. Once both are complete, I can trim the ends to the desired length and use one of the bead needles from the bead baking rack to help “shred” the twisted twine. Set aside.

Apply the instant glue to the end of the twine for the bead strand for about 1/2 inch length at the end of the twine. Once this is dry, this will function as our “needle” to thread the beads onto the twine. Thread your wood and clay beads onto the twine using a pattern or just in a random pattern. Thread the end of the twine through the loops of the tassel and secure with a knot and a drop of glue. Repeat on the other side of the strand.
