

Sculpey Premo™ & Sculpey Souffle™ Stacking Rings
Sculpey Premo™ & Sculpey Souffle™ Stacking Rings
Designed by Amy Koranek
Read More
Spend a delightful hour or so creating these fun (and addictive!) polymer clay rings. Make one to match your favorite outfits and don’t forget to make one for your BFF as well!
COMPLETION TIME:
90 Minutes to make and bake
NOTE: This project uses the following clay colors from the Sculpey Premo™ & Soufflé™ Multi-Pack:
Read Less
- Sculpey Premo™ 1 oz. Galaxy Glitter - 1 bar
- Sculpey Premo™ 1 oz. 18K Gold - 1 bar
- Sculpey Souffle™ .85 oz. Sea Glass - 1 bar
- Sculpey Souffle™ .85 oz. Igloo - 1 bar
ADDITIONAL SUPPLIES
- Heavy weight card stock (like Manila folder) and transparent tape -or-
- A dowel rod in the dimension of your finger -or-
- Small circle cutters in a dimension that best fits your finger
- Measuring tape
- Ruler
- Scissors
- Pencil
Project Instructions
- Getting Started:
Start with clean hands, unwrap and knead clay until soft and smooth, or condition by running clay though a Pasta Machine. We recommend using a designated machine for clay purposes only. When working with multiple colors, clean hands with soap and water or baby wipes (we have found that baby wipes work best) before switching colors. Shape clay, pressing pieces firmly together. Wash hands after use.
- Baking:
Let’s start with a tip about ring forms if you don’t have any metal circle cutters that fit your finger well. You can make a ring form from household items like a dowel rod, or even heavy card stock like a Manila folder. If you are using a dowel rod, it would be best to cover it with a thin layer of transparent tape. The clay will more easily release from the tape than it will the wood. To make a card stock ring form, cut a strip from an old folder about 2” wide. Curl the stock by sliding it between your fingers to help it not be so stiff.
Measure your finger using a measuring tape. Then trim the card stock to this measurement + 1/2”. Mark the 1/2” line on the card stock with pencil.
Then bend the card stock until it meets the 1/2” line and tape it to secure it. Cover the entire card stock form with a thin layer of tape so that the clay will release easily from it.
When you apply a clay ring to the card stock form, start by cutting an angled cut in the clay. Then wrap the clay around and trim with an angled cut again.

Finger buff the angled seam in the ring.
Once the ring form is filled with clay rings, bake them on the form so they will hold their shape. Then carefully remove them when the form and the clay is completely cool.
The remainder of my photos show baking on a circle cutter.
Once the ring form is filled with clay rings, bake them on the form so they will hold their shape. Then carefully remove them when the form and the clay is completely cool.
The remainder of my photos show baking on a circle cutter.

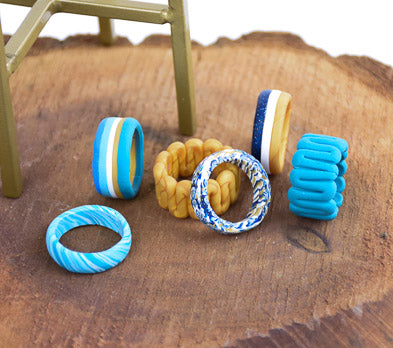
Squiggle Ring:
For the Squiggle Ring, roll 1/4 bar of 18K Gold into a long thin rope about 1/8” thick. Gently twist the rope as you roll it and the mica in the clay will create mica twists.
For the Squiggle Ring, roll 1/4 bar of 18K Gold into a long thin rope about 1/8” thick. Gently twist the rope as you roll it and the mica in the clay will create mica twists.

Bend the rope in half making sure the sides touch each other right at the fold point.

Carefully squiggle the clay back and forth making a series of arches. Make sure each arch is well connected to the one before.

Keep making arches. Make the arch design at least as long as the measurement that you took of your finger in Step 2. Trim the ends so that when you wrap the clay around, it will make a continuous squiggle where it was trimmed. We can make sure it works out by gently compressing or stretching the clay around the form.

Carefully wrap the clay around your ring form. If there is not enough clay, carefully stretch it to meet. If there is too much, carefully compress the clay back all around the ring. Smooth the seam where the two ends meet with your finger.

Apply enough pressure to the clay that there are no gaps between the clay and the form.
In the final photo you can see also a Squiggle Ring that I made using Sea Glass Souffle.
In the final photo you can see also a Squiggle Ring that I made using Sea Glass Souffle.

Striped Ring:
For the Striped Ring, start with 1/8 bar each of Galaxy Glitter, 18K Gold, and Igloo. Roll these colors into very thin ropes - less than 1/8” thick.
For the Striped Ring, start with 1/8 bar each of Galaxy Glitter, 18K Gold, and Igloo. Roll these colors into very thin ropes - less than 1/8” thick.

Push the ropes together sides touching.

Gently pick up the rope from each end and carefully stretch it. You might need to go back and pinch pressure all along the rope to make sure it is well attached and that the bands are thin enough. You can make the stripes thinner by stretching again. You can also make sure the stripes are attaching to each other by applying some flattening pressure with your fingertips.

Cut an angled trim in the clay. Bend it around the ring form. Trim the other end where the clay will meet with an angled cut.

Smooth the seam with your fingertips. In the photo of the finished rings, there is an example of the Striped Ring with five bands using Sea Glass, Igloo, 18K Gold, and a blend of Sea Glass/Igloo.

Mirror Image Ring:
Use scraps from the Striped Ring and ball them up.
Use scraps from the Striped Ring and ball them up.

Roll the ball into a log and twist it to make stripes.

Fold the twisted rope in half and in half again.

Roll and twist the rope to create more stripes.

Flatten the rope with your fingertips. You want to keep the rope not more than 1/4” wide.

Cut the rope in half with the Clay Blade.

Open the rope up along the cut line and you will see the mirror image on each side of the clay. Push the clay sides together lining up the mirror image.

If the ring is wider than you would like, you can trim away the clay from the outside edges with the Clay Blade.

Cut an angled trim in the clay. Bend it around the ring form. Trim the other end where the clay will meet with an angled cut.

Smooth the seam with your fingertips.

Bake the rings on the ring forms following the baking instructions in Step 1 above. Allow the forms and the clay to cool completely before removing them.

- Choosing a selection results in a full page refresh.
- Opens in a new window.