

Sculpey Soufflé™ Tripod-Style Crystal Holder
Sculpey Soufflé™ Tripod-Style Crystal Holder
Designed by syndee holt
Read More
Read Less
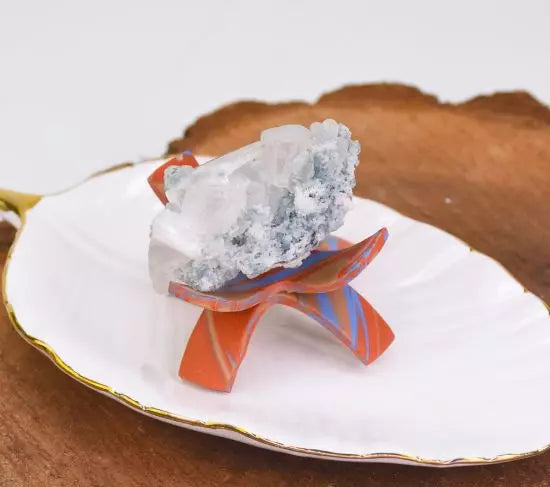
This great little crystal holder was a LOT easier to make than I thought it would be. Cutters and a couple of small bowls did all the work for me! AND a couple of drops of Sculpey Oven Bake Adhesive to do the impossible for me! Of course, I had to feature my beloved Soufflé Cinnamon with bold dashes of Latte and Bluestone. TIME TO CREATE: 30 minutes (with about an 45 minute wait time before baking)
TIME TO BAKE: 30 minutes
TIME TO BAKE: 30 minutes
ADDITIONAL SUPPLIES
- 2-1/4 inch round cutter (or a jar lid you can cut around will work as well!)
- 2-1/4 inch “bath bomb” metal bowl (2)
- 3/4 inch round cutter (size can be adjusted for how deep/long you want your prongs to be)
- Small sheet of plain paper to work on
Project Instructions
Step 1
- Getting Started:
Start with clean hands, unwrap and knead clay until soft and smooth, or condition by running clay though a Pasta Machine. We recommend using a designated machine for clay purposes only. When working with multiple colors, clean hands with soap and water or baby wipes (we have found that baby wipes work best) before switching colors. Shape clay, pressing pieces firmly together. Wash hands after use.
- Baking/Curing:
Step 2
Condition and roll out a log of Cinnamon that is about 5 inches long and 1/2 inch wide.Condition and roll out logs of the Bluestone and Latte the same length but about half as thick.
NOTE: By altering the amounts of each color, I am controlling which color will be dominant in the marbling.

Step 3
Twist the colors together and roll on work surface a little to secure them to each other.
Step 4
Fold the clay in half as shown.Twist the clay again.

Step 5
Once you have twisted the clay again, use your thumb to flatten the twisted clay. Use the acrylic roller to GENTLY roll with the stripes to flatten a little more.
Step 6
Position the clay in the Clay Conditioning Machine (pasta machine) with the stripes running vertically and roll through on the widest setting.I have just enough for my 2 circles to be cut out. If you do not, just repeat the steps 1-6 for the second circle.

Step 7
Cut out two circles with the 2.25-inch circle cutter.Place one of the circles on a smaller sheet of paper on your worksurface.

Step 8
Center the smaller circle cutter on the clay (but do NOT press down!) and use the CORNER of the square cutter to cut out a triangle of clay.Repeat this on the opposite side of the circle, taking care to line up with the previous cut (spin the small paper).

Step 9
Spin the paper again and cut the two remaining pieces as shown. Set aside.Repeat these steps 7-9 for the second circle as well.

Step 10
Put one of the pieces face down on a small bowl as shown. (Mine are #2 bath bomb bowls).Repeat on the second bowl with the second piece.

Step 11
Put a couple of small drops of Sculpey Oven Bake Adhesive (SBA) on one of the circle centers.
Step 12
Move the first bowl out of the way of your immediate working area and position the second bowl on top, take care to line up the “clay prongs” on both bowls. Gently press the top bowl in the bottom bowl GENTLY!Now let the build sit for about 30 minutes (or longer) for the SBA adhesive to sink into both clays and make a more stable bond.
Bake as directed in Step 1 above.

Step 13
Once the clay has baked and cooled, gently pry/pull each prong loose from its metal bowl surface.How cute is this?

Step 14
Here’s the big reveal! I’ve even put some of my larger crystals in this and it has fully support them.