

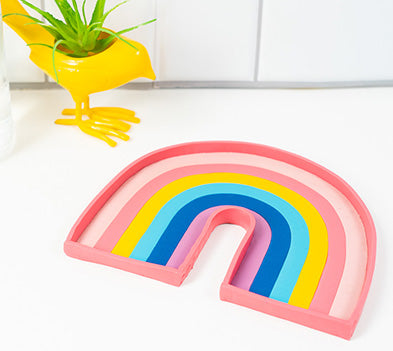
Sculpey Rainbow Trinket Tray
Sculpey Rainbow Trinket Tray
Designed by Vanessa Brady
Read More
I love all things rainbow, so it’s no surprise that I made this Sculpey Rainbow Trinket Tray to be the perfect catchall. Using the right tools for this project makes the most significant difference in the overall look of this tray. The wide range of Sculpey colors means you’ll be able to customize it to match any room!
Read Less
ADDITIONAL SUPPLIES
- Clay extruder with strip disc
- Circular cutter
Project Instructions
- Getting Started:
Start with clean hands, unwrap and knead clay until soft and smooth, or condition by running clay though a Pasta Machine. We recommend using a designated machine for clay purposes only. When working with multiple colors, clean hands with soap and water or baby wipes (we have found that baby wipes work best) before switching colors. Shape clay, pressing pieces firmly together. Wash hands after use.
- Baking:
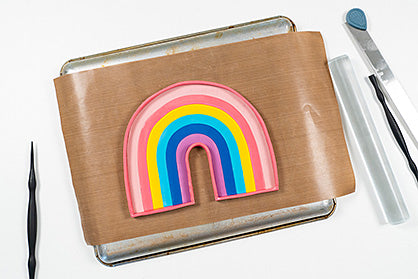
Use a clay extruder to create 18” flattened strips from all the desired colors. You can adjust the size of the strips if you want to make a larger or smaller trinket tray.

Place a 1” circular cutter (or any other circular object) in the center of the work-safe mat. Carefully bend the purple strip around the circle, allowing the ends to hang down straight.

Continue adding the differently colored strips until you have created a rainbow. Use the clay blade to remove the excess clay from the bottom. Press layers together with a few passes of the acrylic clay roller.

Use a clay extruder to create a 24” strip of Blush Premo Clay. Use a needle end pointer to rough up the edges of both the rainbow and Blush strip. Press rough Blush edge onto the roughed outer edges of the rainbow, creating the sides of the trinket tray. Use blunt point tool to press them together gently.

Bake the clay according to the directions in Step 1 above.
Once the Rainbow Trinket Tray is finished baking, remove and enjoy your cute and functional creation!

- Choosing a selection results in a full page refresh.
- Opens in a new window.