

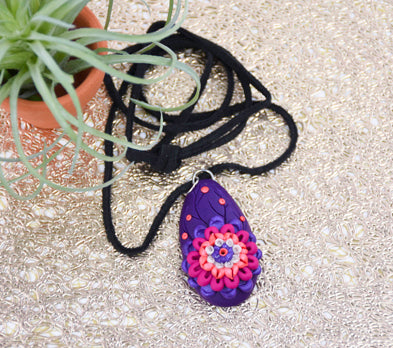
Sculpey Premo™ Floral Pendant
Sculpey Premo™ Floral Pendant
Designed by Amy Koranek
Read More
Create this striking pendant with a combination of a few simple tools and some dramatic colors.COMPLETION TIME:
60 Minutes to make and bake
Read Less
ADDITIONAL SUPPLIES
- Large paper clip
Project Instructions
- Getting Started:
Start with clean hands, unwrap and knead clay until soft and smooth, or condition by running clay though a Pasta Machine. We recommend using a designated machine for clay purposes only. When working with multiple colors, clean hands with soap and water or baby wipes (we have found that baby wipes work best) before switching colors. Shape clay, pressing pieces firmly together. Wash hands after use.
- Baking:
These instructions are based on 1 ounce bars of Sculpey Premo™. For the background of the pendant we will need 1/4 bar (1/4 ounce) of Purple. Divide the 1/4 piece into two pieces - one twice as large as the other. Make a basic shape for the backing with the smaller piece of Purple. You can make a lump by hand or you can select one of the shapes from the Jewelry Templates. The lump should be large enough to hide the large paper clip inside of it which will act as the connector to turn the finished piece into a pendant.
Position the paper clip on top so that one end of the clip sticks out of the top of the clay.
Position the paper clip on top so that one end of the clip sticks out of the top of the clay.

From the larger portion of Purple that we divided out from the 1/4 ounce, make a top piece. Again, you can hand shape it or use a larger version of the shape that you want from the Jewelry Templates. Sandwich the paper clip between the two pieces. Smooth the sides of the clay with your fingertips so that it is domed.

Mix 1/4 bar (1/4 ounce) of Purple with 1/8 bar of Pearl to make Purple Pearl. Roll the Purple Pearl into a thin rope. Slice off twelve equal size pieces with the Clay Blade.

Roll each little piece into a teardrop shape for petals. Position four of the petals onto the background.

Add the remaining petals to make a circle.

Press down each petal with the flat end of the Knife Tool to flatten it and to help it stick to the background. When the petals are in position, the sides should just touch each other.

Roll a rope from 1/16 bar of Fuchsia. Make twelve more teardrop shaped petals. Position these over the Purple Pearl petals. Use the Blunt Point end to push them into place and to give them texture.

Make very small balls from Sunset Pearl. Position these on top of the Fuchsia petals. Score them with the Needle Tool.

Fill the area in the center with Pearl. Stipple the Pearl center with the Blunt Point tool.

Place a button of Purple Pearl in the center of the Pearl. Set it into place by pressing down on it with the flat end of the Needle Tool.
Score vine designs in the area above the flower with the Needle Tool.
Score vine designs in the area above the flower with the Needle Tool.

Add tiny dots of Sunset Pearl to the vine. Poke the center of each one with the Needle Tool.
Add a ring of Pearl dots around the outside of the Purple center. Poke a hole in each one with the Blunt Point tool.
Score lines in the Purple dot. Add a Sunset Pearl dot to the middle and poke a hole with the Blunt Point tool.
Bake following the baking instructions for Sculpey Premo™. Allow to cool completely before handling.

- Choosing a selection results in a full page refresh.
- Opens in a new window.