

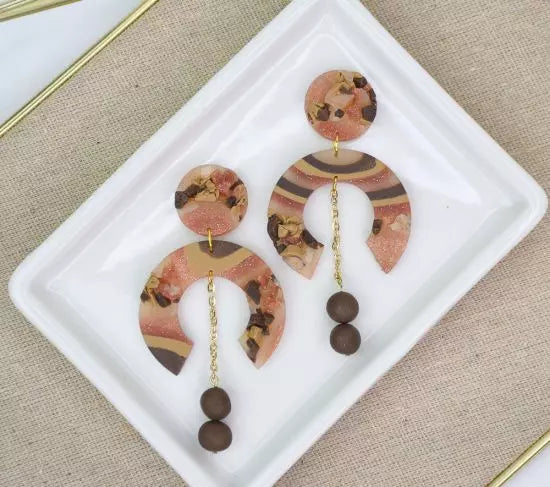
Sculpey Premo™ Faux Agate Druzy Stone Earrings
Sculpey Premo™ Faux Agate Druzy Stone Earrings
Designed by Mrs Victoria
Read More
Read Less
This unique faux Druzy pendant will be sure to garner compliments! You can wear it to the office or team it with your favorite jeans.TIME TO COMPLETION: 30 minutes to make, 30 minutes to bake
ADDITIONAL SUPPLIES
- Exacto knife and/or tissue blade
- 18 inch gold chain
- 4 large Gold jump rings
- 2 small gold jump rings
- 2 Gold earring posts
- 2 gold flat bottom eye pins
- 1- 1 ½ in triangle cutter
- Sand paper
- Dremel/hand drill
- Jewelry/Wire pliers
- Super glue
Project Instructions
Step 1
- Getting Started:
Start with clean hands, unwrap and knead clay until soft and smooth, or condition by running clay though a Pasta Machine. We recommend using a designated machine for clay purposes only. When working with multiple colors, clean hands with soap and water or baby wipes (we have found that baby wipes work best) before switching colors. Shape clay, pressing pieces firmly together. Wash hands after use.
- Baking (also called Curing):
Step 2
Cut 1/4 off each block of clay. Condition all your clay by rolling it through a pasta roller 15-20 times until the edges no longer crack when you roll them through. Set aside about a 1-inch ball of each color.Roll the Premo rose gold glitter and Souffle latte into 1-mm slabs.
Roll the Premo™ Mocha Pearl and Translucent into 1-mm slabs.

Step 3
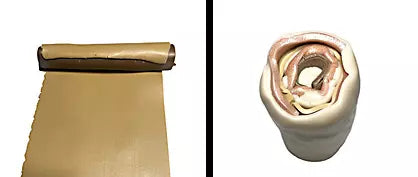
Make a 7-1/2 mm long 8-mm thick coil with the Premo Translucent clay.Start wrapping each slab layer around the Translucent coil. You can layer them in whatever order you would like.
Step 4
After you have layered them all you should have a log that you can now roll into a coil. Roll until your coil is about 5-6 mm thick.Make a 1-mm thick slab of Translucent about 5 inches square.
Cut your log into slices and add them to your slab. Leave gaps in between slices so you can later add the druzy effect.
After you lay your slices down on the translucent slab set it to the side

Step 5
Make your druzy effect by taking your 1-inch balls you set aside earlier and chopping them into very small pieces with your tissue blade.Toss all the chopped up colored pieces together lightly. You do not want them to smoosh together.
Add Transparent Liquid Sculpey to all the gaps you left in between your slices then all add your chopped up colored pieces in the spots. This does not need to be perfect and can be a bit less precise.

Step 6
Once you have all your gaps filled take your 1.5-inch circle cutter and begin cutting out two circles. Use your 3/4-inch cutter to cut a small circle out of the center of the 1.5-inch circles you just cut. This will make a hoop shape.Then cut two more separate circles for the stud part of the earrings with your 3/4-inch circle cutter (you can also just use the circles that are inside of the larger circles you just cut instead of cutting the two just mentioned).
Remove excess clay from around the shapes you cut. Lift up shapes with your tissue blade and separate the two circles from each other.
You will now have a hoop/donut shape. Use your triangle cutter to take a wedge out of the large hoop/donut shape.

Step 7
To make the beads you will take four small of the same amounts of clay of the Premo Mocha Pearl clay. Roll in the palm of your hands and then carefully insert in the pins in the middle.Bake all the clay pieces according to the directions in Step 1 above and allow the clay to cool.
Sand the edges of your shaped and remove the pins from the beads.
Line your pieces up and mark where you want your holes where you want the earring to attach together as shown in the picture. Use your hand drill or Dremel to create holes. Set these shapes aside.

Step 8
Take your eye pin and poke it through two of the beads. With your wire pliers create a loop at the top and cut off any excess. Cut your chain to the desired length to hang from the middle of your hoop/donut.
Step 9
Attach your 3/4-inch circle shape and 1.5- inch shape together with the large jump ring and close the ring.Add the other large jump ring in the center of your hoop/donut and close the ring.
Add the small jump rings to each end of the chain and add one end to the large closed jump ring in the hoop/donut.
Add the other end to the beaded eye pin where you added the loop.
Add the post to the back of the small circle at top using your favorite technique for this.
