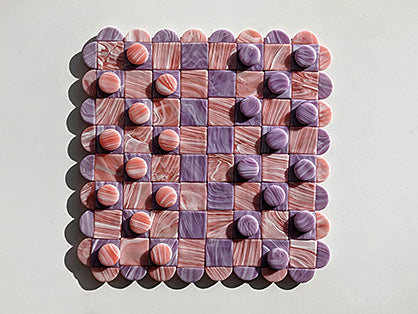
Sculpey Marbled Checkers Board Game
Sculpey Marbled Checkers Board Game
Designed by Nancy Nguyen
Read More
I love the handbags and home decor from the brand Edie Parker. I also love board games and saw that this brand makes upscaled versions of classic games such as connect four and checkers. So I decided for this challenge I wanted to create my version of a marbled upscale checkers board game inspired by the Edie Parker brand!
TIME TO COMPLETION: About 2 hours including baking
Read Less
ADDITIONAL SUPPLIES
- Cardboard
- Pasta Machine or Acrylic Roller
- Clay Cutters or Ruler
- Super Glue or Hot Glue Gun
- Sanding Drill or X-acto Knife

Project Instructions
- Getting Started:
Start with clean hands, unwrap and knead clay until soft and smooth, or condition by running clay though a Pasta Machine. We recommend using a designated machine for clay purposes only. When working with multiple colors, clean hands with soap and water or baby wipes (we have found that baby wipes work best) before switching colors. Shape clay, pressing pieces firmly together. Wash hands after use.
- Baking:
To Create Marble Slabs for Pieces:
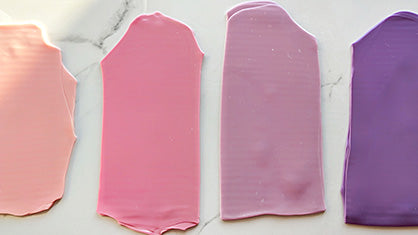
Determine your two main colors of your checkerboard and pieces. For mine I used pink and purple.
Roll out translucent clay and slit into 4 sections. You want a light and dark shade for each of your chosen colors. Then add a little bit of those colors to the translucent clay.
Determine your two main colors of your checkerboard and pieces. For mine I used pink and purple.
Roll out translucent clay and slit into 4 sections. You want a light and dark shade for each of your chosen colors. Then add a little bit of those colors to the translucent clay.

Mix well by kneading together/rolling with your acrylic roller or run the clay through a pasta machine until fully mixed. Feel free to mix a few different shades together until you get the color you’re looking for!

Create the marbled effect and start by focusing on one of the 2 main colors at a time.
For instance, I started with my purples so I rolled up into snakes the light purple and dark purple.
For instance, I started with my purples so I rolled up into snakes the light purple and dark purple.

I twisted them together and rolled with my hands, continuing to fold the snaked clay in half and twist again.
After doing this a few times I then incorporated a thin snake of white and a snake of pearl clay to add some veins to the final marbled slabs.
I did the twisting steps with these new colors added. You want all four colors (light purple, dark purple, white, pearl) intertwined but not fully blended - you still want to be able to see the different shades!
Repeat these steps above for the second set of colors for your pieces.

Once the clay is twisted together you can now roll it all out (by hand or with your pasta machine) into a slab. When rolling it should now reveal a nice marbled look with all your colors.
A classic checkers board has 64 squares (32 for each color). You now want to cut out those squares from your marbled slabs. I used 1”x1” clay cutters, but if you don’t have this then you can also carefully measure with a ruler and make little dents in the clay to mark where to cut and then use your tissue blade.
A classic checkers board has 64 squares (32 for each color). You now want to cut out those squares from your marbled slabs. I used 1”x1” clay cutters, but if you don’t have this then you can also carefully measure with a ruler and make little dents in the clay to mark where to cut and then use your tissue blade.

Make Playing Pieces
I wanted my actual playing pieces thicker than the square so that they were easier to pick up as you played the game. I layered the extra marbled clay over top of a rolled out piece of white clay. I then used a circle clay cutter that was approximately 0.75” to cut out my pieces (12 pieces for each color, so a total of 24). If you don’t have circle clay cutters you can try to find circle lids from around the house that are the size you want.
I wanted my actual playing pieces thicker than the square so that they were easier to pick up as you played the game. I layered the extra marbled clay over top of a rolled out piece of white clay. I then used a circle clay cutter that was approximately 0.75” to cut out my pieces (12 pieces for each color, so a total of 24). If you don’t have circle clay cutters you can try to find circle lids from around the house that are the size you want.

Cut Out Decorative Edge
You can always leave your checker board game with straight edges, but I wanted to add a bit of fun to mine so decided on adding a scalloped edge in the same marbled clay.
I used a circle clay cutter the same size as the squares I made, so 1”. I cut out 8 full circles for each color, and then with my x-acto knife I sliced each of those in half. So in total I now had 16 pink and 16 purple semi circles.
Bake all your finished pieces according to the directions in Step 1 above.

You may notice that the edges of your baked pieces may be a little rough. To smooth this out I used my handheld sanding drill with a buffing piece. If you don’t have this, you can also use an x-acto knife to cut off any hanging clay off the edges.

Assemble Everything Together
You want to attach all your squares and (optional) decorate edges to a single surface. I decided to use cardboard to recycle some I already had and felt it’s sturdy enough to use for a board game.
Measure your cardboard to ensure you have a solid flat piece of it to fit your entire board. For me, I needed 9”x9”. I used my x-acto knife to cut out this size.

When attaching my decorative edge, I realized if I just glued it directly on the straight edges of the cardboard that I would still see a bit of the cardboard peek through, so cut triangles in the spaces between each semi-circle before gluing.

With super glue or a hot glue gun, now all you need to do is glue on your square pieces in alternating colors. Remember, it should be 8 pieces per row for 8 rows. <

All Done!
With your checkers board and pieces complete you now have a fun and pretty checkers game ready to go! I love that this can be matched to whatever your color scheme and style is in your own home and acts as a nice little conversation starter piece.
With your checkers board and pieces complete you now have a fun and pretty checkers game ready to go! I love that this can be matched to whatever your color scheme and style is in your own home and acts as a nice little conversation starter piece.


