

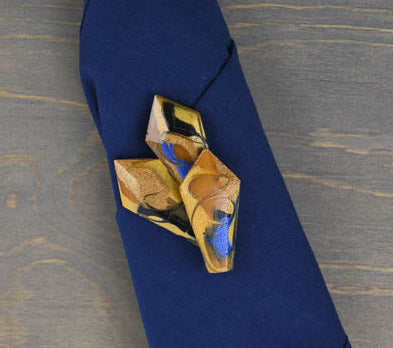
Liquid Sculpey® Faceted Crystal Brooch
Liquid Sculpey® Faceted Crystal Brooch
Designed by Amy Koranek
Read More
This stunning statement piece brooch is actually quick and easy to make using Liquid Sculpey colors and the Sculpey Geometric Jewelry mold.
TIME TO COMPLETE:
2 Hours & 15 Minutes to make, bake, and assemble
Read Less
ADDITIONAL SUPPLIES
- Paper towel
- Pin bar
- Silicone glue or instant drying glue
Project Instructions
- Getting Started with Liquid Sculpey®:
- Getting Started with Liquid Sculpey®:
- Baking:
- It is important to use oven thermometer when you bake the liquids so that you can ensure your oven is at the correct temperature.
- Do not microwave the liquids. They must be baked in a Preheated oven at 275 ºF (130 ºC) for liquid colors and 300 ºF (149 ºC) for Clear – Do not exceed baking temperatures.
- If your piece is less than 1/4” bake for 15 minutes. For thicker pieces that are 1/4” or above bake for 30 minutes.
- If your liquid project has become yellowed or discolored in the oven, when you remake it, tent it by placing either – folding an index card in half and placing your project under it or by using aluminum foil over your project.
To make the faceted pieces that we need for the three-piece brooch, we will fill the Faceted Crystal shape with small amounts of several of the colors. Here I’ve dripped a thick line of both Bronze and Gold Liquid Sculpey® (LS) and then a thin line of Black and a couple dots of Navy Metallic. I’m using sparing amounts of the dark colors because I want them to be a highlight not the main color.

I added Amber Translucent next in the blank spaces but not filling the mold cavity yet. We still need to see where the various colors lay in the next step.

Insert the tip of the Blunt Point Tool into the Black LS area and make sure the tip of the tool goes all the way to the surface of the mold. It’s important to drag the tip of the tool through all the colors always making sure the tip is touching the mold. If the tip doesn’t touch the mold, the cool swirling effect will be lost inside the baked shape instead of appearing on the surface.
Drag the tip of the tool through all the colors creating a cool swirl pattern and when you are happy with the design, carefully remove the tool from the LS. Tools can be wiped clean with paper towel.
Drag the tip of the tool through all the colors creating a cool swirl pattern and when you are happy with the design, carefully remove the tool from the LS. Tools can be wiped clean with paper towel.

Back fill the rest of the mold to level with Bronze LS. Tap the mold vigorously on the work surface to release air bubbles.

Bake the mold following the baking instructions for Liquid Sculpey®.
Designer’s Tip: Here’s a tip for baking perfectly in silicone molds. Dampen a dish towel with water. Then, wring out as much of the water as you can. Fold the damp towel and place it on a baking tray so that the mold(s) can sit level on top of it. Then bake according to the instructions for Liquid Sculpey® but add 10 minutes to the baking time. The damp towel will slow down the curing process so that the LS will cure evenly throughout and avoid warping both the mold and the cured piece. This tip works especially well for flat molds with large openings.
Allow the mold to cool completely before removing the piece by gently flexing the mold.
Repeat Steps 2-6 to create two more Faceted Crystal pieces. Alter the position of the colors in the mold before swirling them so that each piece looks unique.

Roll Black Premo™ to a very thin sheet, about 1/16” thick with the Acrylic Clay Roller. Position two of the crystal pieces on the Black clay as shown.

Cut out around both of the crystals with the Clay Blade making them into one connected piece.
Mount the third crystal shape to the Black clay sheet as well and cut it out singly with the Clay Blade.

Position the third crystal overlapping the other two.
Bake one more time following the baking instructions for Sculpey Premo™. The Premo™ on the back of the top crystal will connect it securely to the bottom crystals.
Bake one more time following the baking instructions for Sculpey Premo™. The Premo™ on the back of the top crystal will connect it securely to the bottom crystals.

Glue a pin bar to the back and allow to dry completely before handling.

- Choosing a selection results in a full page refresh.
- Opens in a new window.