

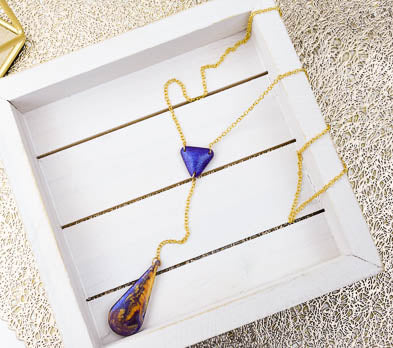
Liquid Sculpey® Color Shifting Teardrop Necklace
Liquid Sculpey® Color Shifting Teardrop Necklace
Designed by Amy Koranek
Read More
The technique shown here is a version of a dirty pour used often in acrylic painting. The partial pre-mixing of the colors in the same cup gives a very fluid and organic result. Depending on the volume of each color used, and the repetition of the layers, you can get a totally different outcome every time.
TIME TO COMPLETE:
1 Hour to make, bake, and assemble
Read Less
ADDITIONAL SUPPLIES
- Paper towel
- 1 Ounce silicone baking cup for layering colors
- Dremel drill, or pin drill, or spring drill
- 20” Gold tone fine chain with clasp
- 6mm Gold tone jump rings (3)
- 8mm Gold tone jump ring
- Wire cutters
- Flat nose jewelry pliers
Project Instructions
- Getting Started with Liquid Sculpey®:
- Baking:
- It is important to use oven thermometer when you bake the liquids so that you can ensure your oven is at the correct temperature.
- Do not microwave the liquids. They must be baked in a Preheated oven at 275 ºF (130 ºC) for liquid colors and 300 ºF (149 ºC) for Clear – Do not exceed baking temperatures.
- If your piece is less than 1/4” bake for 15 minutes. For thicker pieces that are 1/4” or above bake for 30 minutes.
- If your liquid project has become yellowed or discolored in the oven, when you remake it, tent it by placing either – folding an index card in half and placing your project under it or by using aluminum foil over your project.
Place Color-Shifting Purple Liquid Sculpey® (LS) in the bottom of a 1-ounce mixing cup and Gold LS in the bottom of the cup side by side.

Layer Gold LS over the Purple, and Purple over the Gold.

Turn the cup halfway around. Layer Gold LS over the Purple, and Purple over the Gold one more time.

Pinch a spout in the wall of the cup.

Carefully and slowly pour the layered LS into the Elongated Teardrop shape beginning at the tip and moving straight down to the rounded end. When you get to the rounded end, allow the layered colors to drip into the same area until the mold is filled to level. Staying in the same position will create the little pool of swirls at the bottom. When the cavity is full, carefully lift the cup away.
Tap the mold vigorously on the work surface to release air bubbles.
Fill the small triangle in the Cabochon mold with Color-Shifting Purple LS. Tap the mold vigorously on the work surface to release air bubbles.
Bake the molds following the baking instructions for Liquid Sculpey®. Here’s a tip for baking perfectly in silicone molds. Dampen a dish towel with water and wring out as much of the water as you can. Fold the damp towel so that the molds can sit level on top of it. The damp towel will slow down the curing process so that the LS will cure evenly throughout and avoid warping.

When the mold is completely cool, carefully release the baked piece by flexing the mold gently. I made more than one of these shapes and so I have more than one to choose from. Also, this technique yields a different look on the front and on the back, so you’ll want to choose which side you like the best for the design. The piece which I chose for the finished look is actually the face downside that was molded in these photos.

Drill a hole through the top of the teardrop shape from side to side. Drill a hole in each of the points of the triangle shaped cabochon.

Layout the design for assembly.

Use flat nose pliers to connect the pieces together with jump rings. Cut 1.5” of the center of the necklace chain (opposite the clasp) out with wire cutters. This piece will connect the dangling teardrop to the triangle connector. Connect the ends of the cut chain to the remaining two holes in the triangle connector.

- Choosing a selection results in a full page refresh.
- Opens in a new window.