

Sculpey Soufflé™ Fall Colors Slab Earrings
Sculpey Soufflé™ Fall Colors Slab Earrings
Designed by syndee holt
Read More
These earrings are sure to be your “go to” jewelry this Fall..and beyond!
TIME TO COMPLETION: 70 minutes including baking
Designer Tip: I like to use a small piece of graphing paper to help me line up my earring elements to position the holes accurately!
Read Less
Designer Tip: I like to use a small piece of graphing paper to help me line up my earring elements to position the holes accurately!
ADDITIONAL SUPPLIES
- Toothpicks
- Cotton Swabs
- Gold-toned jump rings (2)
- Posts (2)
- Instant Glue
- OPTIONAL: Small sharp pair of scissors (used for embroidery)

Project Instructions
- Getting Started:
Start with clean hands, unwrap and knead clay until soft and smooth, or condition by running clay though a Pasta Machine. We recommend using a designated machine for clay purposes only. When working with multiple colors, clean hands with soap and water or baby wipes (we have found that baby wipes work best) before switching colors. Shape clay, pressing pieces firmly together. Wash hands after use.
- Baking:
Condition the Ivory clay by kneading until it is soft and elastic. NOTE: I always wash my hands before conditioning/using light colored clay! If you are using an acrylic roller, roll the clay out to a thickness you would like for your earrings. If you are using a pasta machine, a medium thickness is what I use.
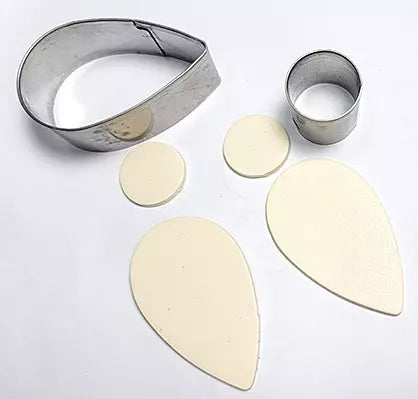
Cut out two of the largest teardrop shapes and 2 of the smallest circle shapes. Set aside.
Cut out two of the largest teardrop shapes and 2 of the smallest circle shapes. Set aside.
Roll a small ball of the Turnip clay and press into the flower mold. If the clay is sticking to the mold, a light spray of water or a quick wipe with a wet towel will help act as a mold release.
Make two of these flowers.
Make two of these flowers.

Position the flowers on your earring bases, making sure that you mirror the images.
Use the pointed tool in the Clay Tool Starter set to add texture to the flower petals.
Use the pointed tool in the Clay Tool Starter set to add texture to the flower petals.

Add a small ball of the Cinnamon Souffle clay to the center of each flower and use the pointed end of the tool to press it into place and texture it.

Use small bits of the Ochre Souffle to create several of the smaller flat petals and set aside.
Mix a bit of the Cinnamon into the Jade clay to create a slightly warmer green to create an elongated leaf from the mold.
Mix a bit of the Cinnamon into the Jade clay to create a slightly warmer green to create an elongated leaf from the mold.

Add the leaf next to the flower and use two of the Ochre petals to create a flower.
Add a small, elongated ball of the Sea Glass for the center of the flower. Use the pointed end of the tool and the knife to add texture to this element.
NOTE: At this point, I am not worried about my elements exceeding the size of the oval circle. I like to decide at the end whether to trim them to the oval shape or leave them for extra interest!

Roll several small balls of the Cinnamon clay and add to both the flowers. Use the pointed tool to texture them so that they look like small seed pods. Repeat for the other earring.

Mix a tiny bit of the Turnip into a small pea-size portion of the ochre and roll out into a thin coil. Cut 3 pieces for each of the earrings.
Anchor the new “petals” with more of the Cinnamon seed pods. I like to use the needle tool to add more texture to these petals. Repeat for the other earring.
Anchor the new “petals” with more of the Cinnamon seed pods. I like to use the needle tool to add more texture to these petals. Repeat for the other earring.

Mix a pea size portion of Ochre with about 1/2 pea size of Jade to create a warm, bright green. Roll a small ball of this mix, gently point one end and then flatten on your work surface to create a new, small leaf. Position the leaf by the flower we just added and use the needle tool to texture the veins in. Repeat for the other earring.

Roll a small snake of the Turnip and cut off small pieces of equal size to roll into balls to create a small flower near the top of the teardrop with a Sea Glass center. This will help balance the colors for us and add more interest and texture towards the top of the earrings! Repeat for the other earring.

Use the needle tool to poke the holes for assembling the earrings. At this point, I haven’t decided to cut off the clay bits that are over the edge of the oval, but I know that since this is Soufflé clay, I can easily trim those elements after baking if I want a cleaner oval look.
Bake the earrings as described in Step 1 above.
Bake the earrings as described in Step 1 above.

After the earring were baked and cooled, I DID decide to trim the design to the original oval with my small sharp embroidery scissors.
Add your jump rings to attach the elements together and glue the post to the backs of the top circles. Once the glue is dried completely, ENJOY YOUR NEW EARRINGS!
Add your jump rings to attach the elements together and glue the post to the backs of the top circles. Once the glue is dried completely, ENJOY YOUR NEW EARRINGS!

Here's a look at the finished earrings!

- Choosing a selection results in a full page refresh.
- Opens in a new window.