

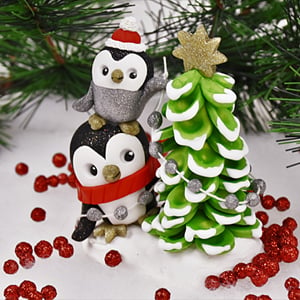
Sculpey Premo™ Penguin Topsy Turvey Tree
Sculpey Premo™ Penguin Topsy Turvey Tree
Designed by Swirly Designs
Read More
Read Less
This adorable little pair of penguins is sure to delight your family this holiday.
TIME TO COMPLETION: 90 minutes including baking
ADDITIONAL SUPPLIES
- Drill with drill bits
- Wooden dowels or bamboo skewers
- Mini wood disc approx. 1” wide
- Craft Glue
- Wire cutters
- Ceramic tile
- Wax twine or string
- Scissors
- 20 gauge wire
- X-acto knife
Project Instructions
- Getting Started:
Start with clean hands, unwrap and knead clay until soft and smooth, or condition by running clay though a Pasta Machine. We recommend using a designated machine for clay purposes only. When working with multiple colors, clean hands with soap and water or baby wipes (we have found that baby wipes work best) before switching colors. Shape clay, pressing pieces firmly together. Wash hands after use.
- Baking:
Use a mini wood disc and a drill and drill a hole in the middle of the wood disc to fit a 3” high bamboo skewer. Glue the skewer into the hole in the wood disc. Let dry. This will be the armature for the tree.

Condition the white clay and cover the wood disc to create a snow base. Approx. base size 2”wide x 3” long.

Use the 8mm metal ball end tool to smooth the clay and to create a snowy base. Cut a 1” piece of a skewer and insert it across from the large skewer into the clay. This will be where you will insert your big penguin on.
Place the base on top of two wooden skewers on a ceramic tile and bake in oven according to the information in Step 1 above. We feel baking them on the skewers prevents cracking, Let cool.
Place the base on top of two wooden skewers on a ceramic tile and bake in oven according to the information in Step 1 above. We feel baking them on the skewers prevents cracking, Let cool.

String of lights
Cut a 9” piece of wax twine or string. Then roll 13-15 mini balls of white gold glitter clay.
Cut a 9” piece of wax twine or string. Then roll 13-15 mini balls of white gold glitter clay.

Place the balls in a row with a ¼ space between each ball. Use Exacto knife and make a slice in each ball without cutting them in half. (You want the balls to look like it has a mouth.) Once you have all the balls cut open lay down the string in the slice and use your fingers to close and form a ball again for each one. Set aside

Large Penguin
Penguins body, wings and eye balls
Condition a piece of Twinkle Twinkle clay.
Form a 1 1/2” light bulb body shape with a flat bottom with your hands.
Then form two wing shapes ¾ in length. And roll out two mini balls for eyes.
Penguins white face and belly
Condition a piece of White clay.
Run a piece through the # 7 setting of conditioning machine.
Use your Exacto knife to free hand cut out a 1.25” heart shape.
Penguins beak and feet
Condition a piece of Yellow Gold Glitter clay.
Run a piece through the # 1 setting on conditioning machine.
Use a star cutter for the two feet. Use your Exacto knife to remove all but three points of the star. Use the extra clay and sculpt a cone shape beak.

Assembling the Penguin
Take the penguins body and press the white heart shape to the front.
Use the 7mm metal ball tool to make two eye sockets and add the small black eye balls.
Use a small piece of wire and insert it where the beak will be and apply some bake and bond and add the cone shape beak.
Attach feet and wings using the 7mm metal ball tool to burnish it to the body.

Red scarf
Condition a piece of Cadmium Red Hue clay.
Run a piece through the #3 setting of conditioning machine.
Use a super slicer blade to cut a 1/4 x 5” rectangle shape.
Use the clay knife to create stripes in on the scarf.
Wrap it around the penguin body.
Set aside
Condition a piece of Cadmium Red Hue clay.
Run a piece through the #3 setting of conditioning machine.
Use a super slicer blade to cut a 1/4 x 5” rectangle shape.
Use the clay knife to create stripes in on the scarf.
Wrap it around the penguin body.
Set aside

Making the little Penguins
Penguins body and eye balls
Condition a piece of Twinkle Twinkle clay.
Form a 1” light bulb body shape with a flat bottom with your hands.
Plus roll out two mini balls for eyes. Penguins white face
Condition a piece of White clay.
Run a piece through the # 7 setting of conditioning machine.
Use a heart shape cutter. Cut out a heart shape with your super slicer blade and cut the bottom of the heart.

Assembling the Little Penguin
Take the penguins body and attached the white heart shape to the front.
Use the 7mm metal ball tool to make two eye sockets and add the small black eye balls.
Use a small piece of wire and insert it where the beak will be and apply some bake and bond and then add the cone shape beak.
Take the penguins body and attached the white heart shape to the front.
Use the 7mm metal ball tool to make two eye sockets and add the small black eye balls.
Use a small piece of wire and insert it where the beak will be and apply some bake and bond and then add the cone shape beak.

Body, wings and feet
Condition a piece of White Gold Glitter clay.
Run a piece through the # 7 setting of conditioning machine.
With a super slicer blade cut out a rectangle shape to wrap around and cover the bottom half of the penguin. Sculpt out two wings and attach them along with the two feet.
Condition a piece of White Gold Glitter clay.
Run a piece through the # 7 setting of conditioning machine.
With a super slicer blade cut out a rectangle shape to wrap around and cover the bottom half of the penguin. Sculpt out two wings and attach them along with the two feet.

Hat
Condition a piece of White clay.
Roll out a small ball for the pompom and a small tube shape for the hats rim. Condition a piece of Cadmium Red Hue clay.
Roll out a ball and with your super slicer blade and cut ball in half.
Place the half ball on the head, wrap around the tube shape trim.
Insert a small wire in top and apply bake and bond and attach the pompom.
Use a needle end pointer to create texture on the trim and pompom.
Set aside

Making the tree
Condition a piece of Bright Green Pearl clay.
Run a piece through the # 1 setting of conditioning machine.
With a tear drop cutter cut out between 40-45 pieces.
Use an 8mm metal ball tool and press into each tear drop piece.
Condition a piece of Bright Green Pearl clay.
Run a piece through the # 1 setting of conditioning machine.
With a tear drop cutter cut out between 40-45 pieces.
Use an 8mm metal ball tool and press into each tear drop piece.

Keep placing layer after layer until you get to the top with less than 1/2 of the skewer showing.

Making the Star
Condition a piece of White Gold Glitter clay.
Run a piece through the # 2 setting of conditioning machine.
Use a star cutter to cut out two of the star shapes and press them together.
Use a needle tool to make a hole and apply some bake and bond on the skewer top and insert the star on top.
Condition a piece of White Gold Glitter clay.
Run a piece through the # 2 setting of conditioning machine.
Use a star cutter to cut out two of the star shapes and press them together.
Use a needle tool to make a hole and apply some bake and bond on the skewer top and insert the star on top.

Assembling it together
Apply some bake and bond to the small wood skewer and press the large penguin on it.
Add a small skewer with bake and bond through the top of the large penguin head and place the small penguin on top.
Apply some bake and bond to the small wood skewer and press the large penguin on it.
Add a small skewer with bake and bond through the top of the large penguin head and place the small penguin on top.

Use a needle tool to make a hole in one of the large penguins wing and another hole in the small penguin wing (this is so you can insert the string of lights through)

Apply some Liquid bakeable clay white on the edges of the tree branches to create snow effect.
Place the finished piece on a ceramic tile and bake it in the oven according to the directions in Step 1 above.
** We placed the string of lights in the last 5 minutes of baking because it such a small piece and you don’t want it to burn.
Once cooled feed the string through the penguins wings and tie a knot.
