

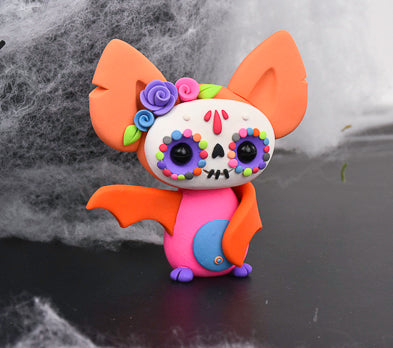
Sculpey III® Sugar Skull Bat
Sculpey III® Sugar Skull Bat
Designed by Little Lazies
Read More
Read Less
Create this creatively colorful little bat using classic sugarskull decoration techniques. This is sure to be a show-stopper in your household seasonal decorations!
TIME TO COMPLETION: 30 min - 1 hour with a bake time of 45 minutes.
ADDITIONAL SUPPLIES
- 5 mm Glass Bead x 2
- Toothpick or Wire
Project Instructions
- Getting Started:
Start with clean hands, unwrap and knead clay until soft and smooth, or condition by running clay though a Pasta Machine. We recommend using a designated machine for clay purposes only. When working with multiple colors, clean hands with soap and water or baby wipes (we have found that baby wipes work best) before switching colors. Shape clay, pressing pieces firmly together. Wash hands after use.
- Baking:
Prepare/Mix Your Clays:
Prepare your clay by mixing/conditioning all of the clay colors you wish to use. I prefer to use bright colors, like Hot Pink or Just Orange Sculpey III, but I like to mix in some White Sculpey III to lighten the colors up a bit. Do this by kneading both clays together until the clay is mixed well, soft and pliable – if it is too soft, let the clay rest for 10-20 minutes before you start sculpting. You can create so many different colors by mixing - have fun and experiment!
Prepare your clay by mixing/conditioning all of the clay colors you wish to use. I prefer to use bright colors, like Hot Pink or Just Orange Sculpey III, but I like to mix in some White Sculpey III to lighten the colors up a bit. Do this by kneading both clays together until the clay is mixed well, soft and pliable – if it is too soft, let the clay rest for 10-20 minutes before you start sculpting. You can create so many different colors by mixing - have fun and experiment!

Sculpting the Sugar Skull Bat
Now it’s time to make all the Body Parts of your Bat. First the head! Take a chunk of your prepared clay to make the Bat’s head, I used the prepared clay from Step 2, Just Orange + White Sculpey III. Using your hands, form a thick ball in your palms and then widen it to an oval shape. Next, to make the skull, take some White Sculpey III and form a thin oval shape to place on top of the bigger/thicker oval. Set aside.
Now it’s time to make all the Body Parts of your Bat. First the head! Take a chunk of your prepared clay to make the Bat’s head, I used the prepared clay from Step 2, Just Orange + White Sculpey III. Using your hands, form a thick ball in your palms and then widen it to an oval shape. Next, to make the skull, take some White Sculpey III and form a thin oval shape to place on top of the bigger/thicker oval. Set aside.

To make the wings! Take some clay, I used Just Orange, and form an oblong shape - Using your Sculpey Acrylic Roller, flatten the oblong shape to about ⅛ of an inch. With an oval cutter, press out half circles into the flattened shape to create the curves of the wings. Do this twice, one smaller and one larger. Set aside. Take your smaller Bat wing and add a wire or toothpick to the end to make the piece easier to attach later and to give it strength.

Grab some of your prepared clay, I used Hot Pink Sculpey III, to create the body - take a ball in your hands and with your palms create a teardrop shape. To make the belly, take more of your prepared clay, I used the Turquoise and White Sculpey III mix, and create a small ball using your palms, then flatten it out with your palm or finger. Add this on top of the teardrop shape / body. Set aside.

To make the ears, take another small chunk of the Just Orange + White Sculpey III mix that you used for the head and make a teardrop shape, flatten with your palm or fingers. Do this twice! Next grab a modeling tool or any tool/item around the house that has a rounded triangular shape (even your pinky finger would work for this!). Press this into each ear shaped piece to make an indentation. Grab an oval cutter and cut along each ear shape at a diagonal. Then to add detail, cut a small triangle or slit out of the side of each ear. Set aside.

To make the feet, take your prepared Purple Sculpey III Polymer Clay and create two small balls of your prepared clay and form small triangular shapes - flatten them out with your finger. Set aside all your body parts for now.

Now it’s time to make the flowers/roses with leaves! You can use any color Sculpey III Clay you wish, but I chose Purple, Turquoise, and Hot Pink for the roses and Granny Smith for the leaves.
To make the 2 smaller roses, pinch a bit of clay and form into an oblong shape. Roll it flat then with your fingers curl it up onto itself to form a spiral. Do this twice, with whatever color clay you would like. To make the bigger rose, do the same step to form a small rose/spiral, then take clay and make small balls (about 3-4 of them) and flatten them with your finger. These are the petals!
To make the 2 smaller roses, pinch a bit of clay and form into an oblong shape. Roll it flat then with your fingers curl it up onto itself to form a spiral. Do this twice, with whatever color clay you would like. To make the bigger rose, do the same step to form a small rose/spiral, then take clay and make small balls (about 3-4 of them) and flatten them with your finger. These are the petals!

Use some of your Granny Smith colored clay and form two triangular or teardrop shapes - flatten them just a bit, then using a blade, cut a small line down the center to form the vein of the leaf. Do this twice! Set aside your roses and leaves.

Creating the Bat’s Face
Grab your head shape from Step 3 and start by pressing two indentations into the clay using your biggest Sculpey Ball Tool.
Grab your head shape from Step 3 and start by pressing two indentations into the clay using your biggest Sculpey Ball Tool.

Grab another color clay, make two balls and press each into the indentations you just made - then using the same Sculpey Ball Tool, press into these balls to spread the color into the indentions you just made.
Using two 5 mm sized glass black beads, press them firmly into the sockets. (Instead of Beads, you could also use clay for this step by forming two small balls in the Black Sculpey III™).
Next you need a blade, take it and cut a small semi-circle onto the face where you would like the Bat’s smile to be. Using Black clay make 3 very small balls and roll them into small tube shapes. Press them gently onto the slit of the smile to form stitch-like details.
Using the same Black clay, make a tiny heart shape and flip it upside down! Press this firmly into the face of the Bat - this is the nose.
Finally on the face you can add the rest of the details- using a lot of different colors that you prepared in Step 2, form tiny balls and flatten each one around the indentations of the eyes. You can also add some clay details to the top-center of the head as decoration by making small tear drop shapes in any clay color you choose. Then add tiny white dots of clay for eyebrows. Set aside the head.

Now it is time to start assembling the Sugar Skull Bat! First take some wire or toothpicks and attach to the base of each of the ears and top of the body; this makes the pieces stronger and less likely to break.
Take the body and apply some Sculpey Oven Bake Clay Adhesive (formerly Bake n’ Bond) to the base of the toothpick or wire. With the Bat head in your hand, press it firmly onto the body, making sure the wire or toothpick goes into the head so it attaches to the body.
Then attach the ears, wings, feet, roses and leaves - apply Sculpey Oven Bake Clay Adhesive to each one right before you press into place!
Next, using a blade, cut into the feet to make toes.
Lastly, to make a belly button for the Bat, make a very small circle out of clay, press this circle onto the lower center of the belly. Using a very small Sculpey Ball Tool, press into that circle to create the Belly Button. Add a small ball of Sculpey III Polymer Clay into the indentation by pressing gently with your finger.
Once you are done sculpting and happy with your unbaked Sugar Skull Bat, bake it according to the instructions in Step 1. Remove from the oven and let cool completely. Your Sugar Skull Bat is complete!

- Choosing a selection results in a full page refresh.
- Opens in a new window.